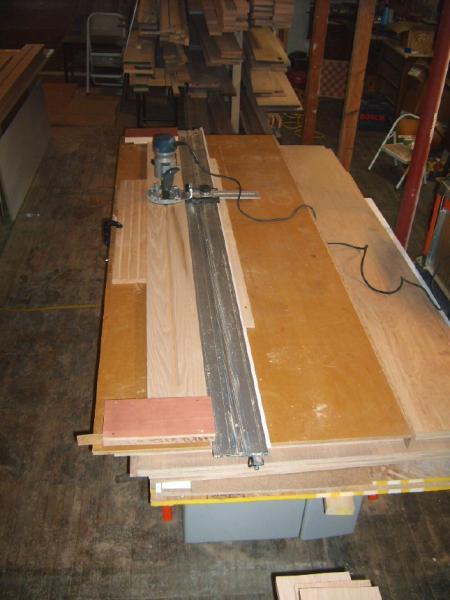
I am milling 20 7″ fluted columns using a modified EZ guide & plunge router.
Here are a few pics of the setup:


I am milling 20 7″ fluted columns using a modified EZ guide & plunge router.
Here are a few pics of the setup:

Smart construction decisions and material choices can significantly improve occupant safety and survival in the event of a fire in the home.


"I have learned so much thanks to the searchable articles on the FHB website. I can confidently say that I expect to be a life-long subscriber." - M.K.
Dig into cutting-edge approaches and decades of proven solutions with total access to our experts and tradespeople.
Start Free Trial NowGet instant access to the latest developments in green building, research, and reports from the field.
Start Free Trial Now


Replies
Brian
Doesnt look like your getting any burnout in the beginings/ends, they look good, what are they for?
Doug
They are for both columns and casings in a Greek Revival sytle commercial building in Winona. All the outside corners in the building are made to look like 8x8 columns and doorways are cased to match.I do try to avoid burn marks by making three passes and the last pass is fast at the ends--no stop and burn. The EZ guide has a tiny bit of play allowing the final pass to shave an extra thousandth off each side of the flute by pulling the router slightly to one side of the guide and pushing to the other side.I do a 2/3s hog out pass, a deep pass, and a final clean up.
Doug,The shop is starting to look like a shop. I filled the 1-1/2 yard dumpster a few times and burned a bunch of useless scrap lumber in the wood stove, even hung some cabinets and such.Brian
View Image
Is that the same place!
Nice when you can have a little extra room to move around in.
Since we moved to the new place I'm doing a lot of thinking about all the stuff I've been saving over the years! You have any need for some curved casing? Got about 75 radiused corners that I cant seam to throw in the burn barrel!
I don't want to start to look like rez and Junkhound!
Doug
Uuh...yup. Same place. Got rid of about 1/3 of the junk, used another 1/3 on projects around here and organized about half of the remainder...still have a bunch of wierd stuff to sort out.I mentioned this in another thread, but there is still a piano out there. Not a good sign if you can't find the piano.I have some old arch-topped windows, 100 year-old stair rail parts, etc.Most of my work in Jan and Feb. in shop-based. The other reason I've been getting time in the shop is that all of the little women here are having a PMS fest...I'm just hiding out there 'til things blow over.I'm gonna go build a medicine cabinet now.Cheers,Brian
I mentioned this in another thread, but there is still a piano out there.
If your not planing on using it and its old strip the ebony and ivory keys off of it and throw the rest of it on the burn pile!
I did that with one that was left in a house that I bought, the neighbors all thought I was crazy, I didnt see any of them taking it when offered though!
Doug
I still have the harp and soundboard out of one that I junked the carcass from years ago. Kids though it looked neat so it is still here. they refuse to let me part with it. My neighbors also think I am crazy!
They can't get your Goat if you don't tell them where it is hidden.
HEY! I heard that!
be hurts to know the truthPeace out.
:) no offence of course!
he doesn't keep fences in his sheds too?
They can't get your Goat if you don't tell them where it is hidden.
I don't buy tools at pawnshops.
Peace out.
Edited 1/6/2008 4:25 pm ET by rez
Had me going "HUH?" for a moment . LOL
They can't get your Goat if you don't tell them where it is hidden.
Nicely done.
Questions:
What size bit?
How did you decide on spacing?
I also admire how you shimmed the work area to just the right height ( ez flutin. jpg).
OldGuy,Thanks3/4 diameter bit with a 3/4 space between the flutes. The spacing and bit size were chosen to match previous work at the Riverfront building.On 7" columns I would have chosen a 1" diameter bit and a tighter spacing 3/8" between flutes and added another flute or two.The work table on blocks gave me both a nice working height and made clamping things down easier.B
Heyyyyyyyy...that looks familiar!! Cool huh? wait'll you do it with Azek.
How'd you attch the router? I tried doublestick tape but didnt trust it...so I used the base screw method.
Spheramid Enterprises Architectural Woodworks
"Success is not spontaneous combustion, you have to set yourself on Fire"
Looks good.
How many passes did you do?
Chuck Slive, work, build, ...better with wood
Chuck,Thanks,i did a 2/3's hog out pass, a deep pass and a final cleanup.B
I used screws for attaching the base. It is a good way to do business.With so much loud routing to do, I got me some noise cancelling headphones and put the iPod in a zip lock freezer bag for dust potection.Jammin' with A.C. Reed, Albert Collins, and Koko Taylor.You still finding white dust in various places?
Not so bad cuz I did the flute routing outside, but when I blew out the router ( which normally lives in a table) the dust reminded me of that day.
I was suprised that with Azek, one pass was all it took.
That EZ sure does make it a sweet job ,huh?
Did you have to jack up the outside of the router base to keep it from being Tippy? I recall needing a 1/2" spacer I think. Spheramid Enterprises Architectural Woodworks
"Success is not spontaneous combustion, you have to set yourself on Fire"
No tipping issues, at least with the wide stock. I'll keep that in mind.I do like the system. I mark each flute setting on the EZ router base with a sharpie marker so if I need to repeat any milling steps, I save on set up time. I sprayed the guide rail with Teflon Dry Lube...smooth running!Azek has some nice features.Later,Bass
Looks great!
But -
I've never liked routed grooves at the ends. I think that semi-circle is too unlike the long grooves.
I always use a molding-head cutter in the TS, to get a more elliptical entry and exit to the groove. Here's a project in my typical, overdone fashion. Kind of a lot going on for the house they front! I think they're cypress.
View Image
Just my opinion, FWIW - not to complain!
Forrest
Edited 1/6/2008 8:12 pm by McDesign
That could be accomplished with a router too..one justs needs to shim up the guide to raise the bit out of the plough nearing the ends.
Sphere-just wanted to use the word plough in sentence.Spheramid Enterprises Architectural Woodworks
"Success is not spontaneous combustion, you have to set yourself on Fire"
<one justs needs to shim up the guide to raise the bit out of the plough nearing the ends>
I've heard that - never tried it
Forrest
See p. 98-99 in issue #173 / Sept 2005Jim Chestnut has an explanation of what I think you are looking for - gradually tapering the flute ends.
'Man who say it cannot be done should not interrupt man doing it' ~ Chinese proverb
I would like to try that sometime...in this case, I am matching the existing molding as close as possible. The work I am doing is in a newly remodeled wing of a building and they want it to look like it really belongs with the rest.Are your column corners mitered or lap-jointed?
Actually, they're just square-cut ((2) 5/4 X 9", and (2) 5/4 X 7"), and screwed with piffin screws! I was afraid miters would open up. I assembled the first three sides of all six in the shop, then slid them around the structural 4x4s, and slipped in the last face and screwed it in, and just filled the holes.
Those piffin screws ROCK!
Forrest - knew better
<edit> Okay, DW just told me I was a jerk for whining about your groove-ends!
Forrest - chastened
Edited 1/6/2008 8:48 pm by McDesign
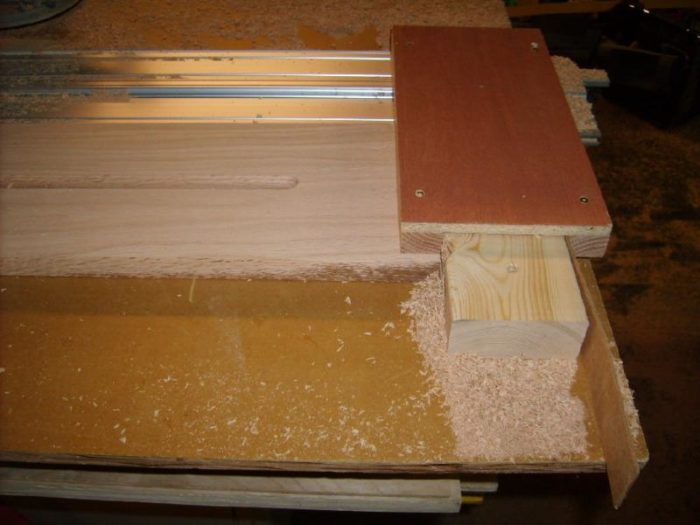
No worries McJerkman. ;o) I do that kinda thing too...comes naturally for me.It is good to keep the tapered flute end option in mind for the future.I stacked up the outside corner faux column stock in the shop. My stuff is lap-jointed too (even though it is indoors--matching the other stuff). I used fillers to allow me to keep the router guide settings the same (the flutes are off center on the smaller piece--so they look the same with the lap added).The smaller stock was put in the jig with the filler on one side, one outside flute routed, the flipped end for end and the filler put on the other side. This allowed the router guide to just have two settings for the whole project.
Stained the oak millwork today (finally got a good stain match):P.S. Glad you're back.
Thanks - nice work and work space - wish I had as much and so dramatic a room!
Forrest
Thanks Forrest.It is nice having a big room. I get some strange habits though...I can turn rather long stock over, end for end, without hitting the ceiling. That move doesn't work so well at most job sites.Still have so much work to do fixing up the ballroom--little by little.Cheers,Brian
<I can turn rather long stock over, end for end>
Hah! I've perfected the "propeller spin & duck" under my 8' ceiling
Forrest
Hah! I've perfected the "propeller spin & duck" under my 8' ceiling
In my current project it's tilt, duck and spin under sloped ceiling!
Thanks for posting this thread. It has given me some ideas on how to do this.
I have to make 3 cherry fluted boards next week. i don't have router base like yours though.
I was thinking about setting it up like yours stops and all. Then add spacers for each flute for the router to slide down. Woods favorite carpenter
Matt,Your plan should work fine. Nice to know you picked up some ideas.The EurekaZone router base set up is a good deal, pick one up sometime.I would flute cherry in several light passes to avoid burn marks. Expect to mess some up (have some extra cherry on hand). If the flutes are shallow enough, and both sides of the stock look good, you can turn a messed up board over and try again on the backside.I goofed up six times making 60 flutes.All the best,Brian
Thats what I figured, I could flip the boards over if need be.
Cherry burns very easy, so I thought about 3 passes with a 3/8's core box bit.
That small of a flute to match up with some other premade clumns the HO bought. Woods favorite carpenter
What thread did you post pictures of crown on a vaulted ceiling?
I wanted to show one of my special olympian coworkers what I have been trying to tell him.
Woods favorite carpenter
The thread was called "Cutting Crown Molding" IIRC...now buried back about 150 threads.Did you want the pic looking straight up or the close up of the transition?
I was looking for the transition.
Where the pitched side of the roof meets the eave side.
I found it Basswood. It wasn't as buried as I thought it would be.
Woods favorite carpenter
Edited 1/11/2008 7:06 am ET by MattSwanger
Started installing the columns today.
Very nice.
Woods favorite carpenter
Oh yeah!I hope you will be posting more pics of the process.
I will take more pics this week showing the process and finished product with crown, etc.The building is an old IH tractor factory...I'll start another thread about that too.
--The building is an old IH tractor factory--I like when old buildings are recycled. Too much is torn down and hauled to landfill in the name of progress.
Here are a few more pics. Each column has 20 visible pieces and 8 backing pieces. This job has 13 columns (9 are outside corners and 4 are doorways). Spent all week installing columns, base and crown in that building. Think it will take 2 or 3 more days.
How bout showing the detail of the base at the mtl door frame.
thanks.A Great Place for Information, Comraderie, and a Sucker Punch.
Remodeling Contractor just outside the Glass City.
http://www.quittintime.com/
I can get a pic of the base to metal frame next time I get the camera out. I just did a simle bevel cut chamfer...no nice little returns to hide end grain or anything.
ThanksA Great Place for Information, Comraderie, and a Sucker Punch.
Remodeling Contractor just outside the Glass City.
http://www.quittintime.com/
Here are a couple of pics showing the transition to the metal door jamb/frame/casing. Not ideal but whatcha gonna do?
Sanded smooth and varnished up it'll look just fine.
The reason I asked, I think it was you that ended your crown (on a cab maybe) at a 45 return (2-22.5's) to the wall. Thought maybe you had tried that, keeping the finished face running around and to the shallow jamb. I probably would clip the very end edge like you did at the jamb.
___/A Great Place for Information, Comraderie, and a Sucker Punch.
Remodeling Contractor just outside the Glass City.
http://www.quittintime.com/
Calvin,I have done the returns you describe with crown and even on base, but in this case...I decided to keep it simple.Thanks for asking,Bass
I'm going to start fluting my columns this week.
I had a system in my mind with spacer shims and a straight edge.
Dino gave me free shipping so I bought an EZ router base.
Any advice you can give would be cool.
Do you clamp the EZ rail to a sheet of plywood? Then clamp your stock down next to it? I seen your photos where you had screwed stops on the end of each board.
It's cherry stock so I need to do at least two to three passes for each flute. Woods favorite carpenter
Hey Matt,
One thing I made that assists the EZ set up is a different version of the smart table, I just screwed together a 2x2 "ladder" that folds shut . 2x2 rails and rungs with just one screw at each end.
Elevate the ez guide up on a thickness the same as your stock on the ladder and like you imagined, clamp it all together. I used pins to attach the ply to the ladder.
Set the router base so that you can rout two flutes at one setting by flipping the stock end for end, and then use spacers for the remaining flutes..pretty simple actually.
I also had just squared a pencil line for start and stop, but the azek was a two pass deal only..(per flute) and it was fairly easy to be starting and stopping atthe same divot each time, and my finished work is 20' up in the air (G)
Sharp bit for that cherry, and light, fast passes to avoid the burn.Spheramid Enterprises Architectural Woodworks
"Success is not spontaneous combustion, you have to set yourself on Fire"
Doesn't the thickness of the EZ rail almost equal 3/4"? That would put them both at almost the exact height if I clamped it directly to a table.
What was your thread called? I remember some pictures, I'd like to research this as much as possible, these are going into a kitchen where they will be seen at eye level. Woods favorite carpenter
You still need to jack up the guide cuz of the router base being higher.
Here ya go.
http://forums.taunton.com/tp-breaktime/messages?msg=94838.1Spheramid Enterprises Architectural Woodworks
"Success is not spontaneous combustion, you have to set yourself on Fire"
THanks for the link I see what you mean by 2x2 ladder now.
I have smaller flutes to route, 3/8" core box bit, but 6 flutes per board.
I like the idea of mounting the base directly to the router, much safer as you said.
You mounted the EZ directly to your table, right? THen the stock gets jacked up to meet the router base? Woods favorite carpenter
No, the guide rail is screwed to a hunk of 3/4 ply..that makes it and the stock on the same plane. The router attachment slider adds another 3/8th's I think, so I added a "skate" on the actual round part that I bolted to the router, to help keep it from tipping.
You just have to have all bits and pcs. in front of you and it becomes clear about what ya have to do to make it work.
I didn't getthe router screws perfectly flush, due to tools I had on site, (and the ez base is pretty thin) and I didn't want to scratch up the azek..so the "skate" was a good Idea to help with that aspect.
LUBE the guide rail and base, witha good dry lube..I used Mica dust, but teflon spray would probably work well. You don't want any hangups with that cherry, it will burn ina heartbeat.Spheramid Enterprises Architectural Woodworks
"Success is not spontaneous combustion, you have to set yourself on Fire"
Thats what I figured, when I get on site I can see what modifications I need to do to make the system work.
Had to be cherry for the first real attempt at this, at least each board has two faces. I'll be practicing on some scrap before I get into the real deal. Woods favorite carpenter
Yeah, yer a smart cookie, it kinda just falls into place once ya see what has to happen and where.Spheramid Enterprises Architectural Woodworks
"Success is not spontaneous combustion, you have to set yourself on Fire"
Is your skate much like the EZ sub base? Doing it over would you roll your own, or use Dino's version?And, while I've got a pretty good idea of your ladder top table, wondered if you had a pic. Do the extensions all rotate to within the dimensions of the plywood they're screwed to?'Man who say it cannot be done should not interrupt man doing it' ~ Chinese proverb
No the skate was just a 3/8ths rip double stick taped to the ez router base..like an outrigger on a boat. Just added some stability without the ez plate actually riding on the azek.
As for the ladder, the plywood is NOT attached it just lays on top of the cross pcs. The cross pcs just swivel on the screw that attaches them to the rails ( picture an upside down rail road track, with one spike on each tie end) If you push one rail and pull the other it folds up and the rails meet when it is closed.
Its outside somewhere, I might be able to get a pic, but it is so simple, you should be able to cipher it out (G)Spheramid Enterprises Architectural Woodworks
"Success is not spontaneous combustion, you have to set yourself on Fire"
Got it on the skate now, thanks.And, while I can't believe you wouldn't run outside in this weather and snap a pic <G>, your description gives me a different idea to try out. If it works I'll share; if not, well, let's just forget that I mentioned it. LOL'Man who say it cannot be done should not interrupt man doing it' ~ Chinese proverb
Glad ya got an idea.
I have the Smart table parts, the sliders and stuff. I found that I can get a folding plastic table at Costco for 40 bucks and they are a nice flat , lightweight substitute for typ. saw horses.
To make the EZ stuff eZier, I just plop this ladder on the table OR horses. I had made the first EZ table top outta 3'x6' 3/4" ply and it was warped and heavy from being out in the weather..so this operation suits me better. Fits in the van nicely and becuse of that, I am more likely to actually PUT it in the van.Spheramid Enterprises Architectural Woodworks
"Success is not spontaneous combustion, you have to set yourself on Fire"
Matt,
The SRK base is adustable +- 1' 1/4" Up or down.
You have 2 sets of holes on the base and 2 slots on the sliding arm.
Good luck.
david.
I clamped the ends of the rail to the ply and screwed a rip of 1/4" birch 5 ply over the rail "grip edge" on the side opposite the work piece.My work pieces where not clamped down, just bounded tightly on all sides (by the guide rail, end blocks and another board clamped to the table on the near side of the work.I did not have to put anything under the guide rail, not sure why Sphere did. Maybe my router guide has a slightly different design?
Thanks BW for the pics and the lessons.
If it doesn't turn out to be a train wreck I'll post some pictures in the Kitchen with a Cathedral Thread.
What was the 1/4" plywood for? Woods favorite carpenter
The 1/4" ply lapped over the rubber/plastic EZ-guide edge gripper thingy and was screwed down to the work table to secure the side of the guide away from the work piece shown on the right side of the guide in that last pic.All the best,Bass
Is the second groove in from the left on the corner column shorter than the rest or is that an optical illusion?
They can't get your Goat if you don't tell them where it is hidden.
No! It's short! I KNEW someone would see that! - thought it would be Sphere! I noticed that nice jig made all the ends line up perfectly.
I think I had rigged up some kinda' half-azzed end stop on a table beyond my TS. Starting (the top) was the hard part. Had to drop it down on the spinning blade, dropping down UNDER a stop above and beyond the blade.
Forrest - feet of clay. Well, mostly all clay
Edited 1/6/2008 8:58 pm by McDesign
I saw it right away,,I was being nice and quiet.Spheramid Enterprises Architectural Woodworks
"Success is not spontaneous combustion, you have to set yourself on Fire"
Well, quiet, anyway.
Forrest
Tough crowd.
Actually Sphere emailed me about it. ;-)
They can't get your Goat if you don't tell them where it is hidden.
Oh, yer asking for it now...LOL
Rabble -rouser you.Spheramid Enterprises Architectural Woodworks
"Success is not spontaneous combustion, you have to set yourself on Fire"
I did my EZ flutes today.
Turned out very sweet. 100% better than the ones the kitchen shop sent us. Theirs had burn marks, chatter marks. Mine had neither.
Thanks for the photos they helped.
Woods favorite carpenter
Matt,
Glad to hear all went well. I enjoy working with cherry (get to use it for an entertainment center next week).
Have a good weekend.
Brian
Cherry works very well, I like the smell of it as well when you are working with it.
Just have to take your time or it burns, tears out, splinters. You know that.
THanks for selling me on another tool that I am very happy with. Collins Clamps, EZ router base, and tree spikes (which are alot of fun by the way). Woods favorite carpenter