FHB Logo Facebook LinkedIn Email Pinterest Twitter X Instagram Tiktok YouTube Plus Icon Close Icon Navigation Search Icon Navigation Search Icon Arrow Down Icon Video Guide Icon Article Guide Icon Modal Close Icon Guide Search Icon Skip to content
Subscribe
Log In
  • How-To
  • Design
  • Tools & Materials
  • Restoration
  • Videos
  • Blogs
  • Forum
  • Magazine
  • Members
  • FHB House
  • Podcast
Log In

Discussion Forum

Discussion Forum

Framing on a slab with RFH

Paularado | Posted in Construction Techniques on May 1, 2002 06:19am

Okay, chastise me if you must. I can take it. But, we carefully laid out the tubes in our basement to accommodate for future walls before we poured the slab. I took pictures and documented where the walls should go. However, just two short weeks later, I realize I want more walls! The problem is that we can’t just go nailing frame walls to the floor. Is there a method for attaching the frame to the floor without nailing through? These are non-load bearing walls. Has anyone done this before? Surely I’m not the first woman to change her mind! ha ha ha

Thanks! Paula (PDF on the old board)
Reply
  • X
  • facebook
  • linkedin
  • pinterest
  • email
  • add to favorites Log in or Sign up to save your favorite articles

Replies

  1. NormKerr | May 01, 2002 07:13pm | #1

    If you have pictures, can you locate the tubes to within a half a foot? The tubes are often routed 12 or 16" apart so you if you can get enough accuracy to power nail in a target that size you'll be ok.

    Another idea, since your slab ought to be 4" thick, there should be almost 3" of concrete above your tube. Size your nails so that only about 1 1/2 " penetrates.

    Use construction adhesive to assist and just enough nails to make the wall bottom so you won't kick it out by accident.

    How's this sound to the rest of you out there?

    1. spinnm | May 01, 2002 07:29pm | #2

      ummmm....careful Norm.

      Paula, unless you were present at the pour and watched like  hawk and are absolutely, positively sure that none of the tubing floated......

      I've got a hotter spot in my kitchen.  Know that the tubing must be closer to the surface.....but sure didn't see it during the pour.

      Shelley

      1. NormKerr | May 01, 2002 08:02pm | #3

        good point, SBPERKI,

        When pouring a slab over radiant PEX tubing I like to put the 6x6" wire mesh over my tubing (staple the tubing to the XPS foam sheets, lay they mesh on that and then place the cement).

        It keeps the tubing on the bottom and keeps the mesh at least 1" above the bottom. Best for both, I think.

        1. spinnm | May 01, 2002 08:28pm | #4

          Yeah, that's the way we do it here too.  But I've got this 3'x6' section in my kitchen that must have floated up some way.  Only part of the whole house that actually feels warm to the feet when the zone is on.  go figure.

          1. NormKerr | May 01, 2002 08:37pm | #5

            it could be that the tubing is down where it belongs, but that the spacing between them is closer than in other places, or that it is nearer the beginning of a loop than other places (the closer to the boiler the hotter the water), or that the heat loss of the room is less in that area than in others (furniture, windows, etc.), but I'm just guessing.

            How about this: size the nails for only about 1/2 " penetration (just BARELY enough to prevent movement if someone hits the wall) and use adhesive for backup?

  2. Piccioni | May 01, 2002 08:42pm | #6

    Paula

    I have/had the self same problem, and managed to 'find' a pipe as a result of what I assume to be movement during the pour. C'est la guerre.

    Fortunately, a hole in a pipe is a fixable problem if you know about it. I happened to use Tapcon screws (because I have no luck with concrete nails) and you know right away when you drill a hole into a pipe under pressure. I suspect nails are a more iffy proposition and likely to result in a slow leak, at least until the nail corrodes away, by which time the water damage would be considerable.

    As things went along, I would use high end construction adhesive and forgot most of the screws. I made most of my walls from steel studs and experimentally glued a short piece of stud to the floor in a closet. I suspect I will have to chisel it off. Wood seems to be easier to remove, but pretty well stuck down.

    If you think about it, the walls are unlikely to fly into space if they aren't nailed down. Most are probably anchored to a wall at both ends anyway. The worst case would be around a door, which could wiggle loose with time. I just 'pinned' the studs down on either side of the doorway. The good news is that you only need to drill an inch or so for tapcons to hold real good, and they don't have to hold well to serve as pins.

    I suspect it is overkill on my part. Nothing has moved yet.

    Brian

    1. spinnm | May 01, 2002 09:24pm | #7

      I actually would have no concerns about adhesive on the bottom of a non load bearing wall....if the inspector buys off on it.  Some of the new stuff is pretty amazing.

      As far as what happened to my own installation....pretty much sure that it's a surface thing, rather than the others.

      Don't know what it's like other places, but around here a large pour is pretty much apparent chaos.  Lots of guys, lots of concrete, lots of noise, lots of yelling, trucks coming and going, English not in use.  For all I know someone said, "I just kicked something loose"  and someone else replied "don't worry about it, they'll never know" :o)

      Shelley

    2. DavidThomas | May 01, 2002 10:48pm | #8

      To follow up on Piccioni's thought that walls typically connect to other walls: you could cut out plywood "T"-shaped gussets to secure the bottom plates of the newly-specified walls to the previously sited ones.  Go to town with some 2" screws and cut the studs in that area 3/4" shorter.

      And how about two-part epoxy?  Sure, construction adhesives have gotten better, but when I've tested an epoxy joints to failure, the unepoxyed wood breaks before the joint does.

      David Thomas   Overlooking Cook Inlet in Kenai, Alaska

      1. AlanSenoj | May 02, 2002 02:02am | #9

        I'd go (have gone) with subfloor adhesive. The better ones, esp. those with urethane are almost like welding. I did a test once when I was worried about some sleepers I was putting down. Took a 1X2 scrap and stuck it to the concrete floor of my shop with a dab of PL400. I forgot about it until I tripped over it the next day. Banged it off with my framing hammer and it took some concrete with it. I didn't clamp or weight it, just pressed it into the gob of glue.  The urethanes expand as they cure so a little bracing side to side on the floor plate should do it. Push down with a wedged 2X4 if you think it needs it.

        By the way, David Thomas has suggested the absolutely best way, but its messy. You must mix two parts together, as well as a filler.

        Best of luck...........

        Ahem!..I meant Paula. Newf, you should be in here: Hey, hey Paula (song from my youth)

        Alan Jones

        Edited 5/1/2002 7:12:45 PM ET by ALANSENOJ

  3. Catskinner | May 02, 2002 07:13am | #10

    Paula,

    If you use a good quality construction adhesive on the bottom plate I don't see any reason for concern. Needing more walls and not knowing where the tubing is happens to everyone if they build on slabs long enough.

    What I do is once the wall is in position then every few feet I drive a short case-hardened nail (actually an 8d sinker will work if the concrete is green) just far enough to nick the concrete. In other words, as soon as you feel concrete instead of wood, one more firm tap and stop. We're not even talking about 1/8 inch of penetration into the concrete, just a nick.

    This will be enough to keep the wall from sliding around while the glue sets up, but not enough to puncture a tube.

    Some of the newer adhesives are amazing. More than enough to hold interior walls in place.

    Dave

    1. Piffin | May 02, 2002 07:44am | #11

      PL Premium is a urethene adhesive that will weld your bottom plate down. Wedge or weight it in place overnite. Then built the walls next day.Excellence is its own reward!

      1. Paularado | May 02, 2002 06:07pm | #12

        Thank you so much everyone! I really appreciate your responses.

        Paula

Log in or create an account to post a comment.

Sign up Log in

Become a member and get full access to FineHomebuilding.com

Video Shorts

Categories

  • Business
  • Code Questions
  • Construction Techniques
  • Energy, Heating & Insulation
  • General Discussion
  • Help/Work Wanted
  • Photo Gallery
  • Reader Classified
  • Tools for Home Building

Discussion Forum

Recent Posts and Replies

  • |
  • |
  • |
  • |
  • |
  • |
View More Create Post

Up Next

Video Shorts

Featured Story

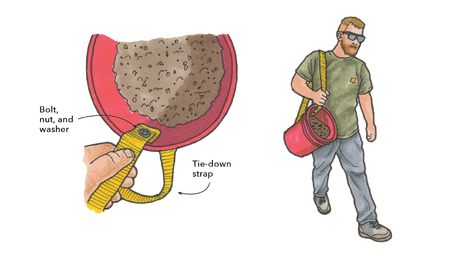
Shoulder Your Buckets

Add a strap for easy carrying and pouring when working with 5-gal. buckets.

Featured Video

How to Install Cable Rail Around Wood-Post Corners

Use these tips to keep cables tight and straight for a professional-looking deck-railing job.

Related Stories

  • Fight House Fires Through Design
  • Making the Move to Multifamily
  • Custom Built-ins With Job-Site Tools
  • An Easier Method for Mitered Head Casings

Highlights

Fine Homebuilding All Access
Fine Homebuilding Podcast
Tool Tech
Plus, get an extra 20% off with code GIFT20

"I have learned so much thanks to the searchable articles on the FHB website. I can confidently say that I expect to be a life-long subscriber." - M.K.

Get home building tips, offers, and expert advice in your inbox

Signing you up...

This site is protected by reCAPTCHA and the Google Privacy Policy and Terms of Service apply.
See all newsletters
See all newsletters

Fine Homebuilding Magazine

  • Issue 332 - July 2025
    • Custom Built-ins With Job-Site Tools
    • Fight House Fires Through Design
    • Making the Move to Multifamily
  • Issue 331 - June 2025
    • A More Resilient Roof
    • Tool Test: You Need a Drywall Sander
    • Ducted vs. Ductless Heat Pumps
  • Issue 330 - April/May 2025
    • Deck Details for Durability
    • FAQs on HPWHs
    • 10 Tips for a Long-Lasting Paint Job
  • Issue 329 - Feb/Mar 2025
    • Smart Foundation for a Small Addition
    • A Kominka Comes West
    • Making Small Kitchens Work
  • Issue 328 - Dec/Jan 2024
    • How a Pro Replaces Columns
    • Passive House 3.0
    • Tool Test: Compact Line Lasers

Fine Home Building

Newsletter Sign-up

  • Fine Homebuilding

    Home building tips, offers, and expert advice in your inbox.

  • Green Building Advisor

    Building science and energy efficiency advice, plus special offers, in your inbox.

  • Old House Journal

    Repair, renovation, and restoration tips, plus special offers, in your inbox.

Signing you up...

This site is protected by reCAPTCHA and the Google Privacy Policy and Terms of Service apply.
See all newsletters

Follow

  • Fine Homebuilding

    Dig into cutting-edge approaches and decades of proven solutions with total access to our experts and tradespeople.

    Start Free Trial Now
    • Facebook
    • Instagram
    • X
    • LinkedIn
  • GBA Prime

    Get instant access to the latest developments in green building, research, and reports from the field.

    Start Free Trial Now
    • Facebook
    • YouTube
  • Old House Journal

    Learn how to restore, repair, update, and decorate your home.

    Subscribe Now
    • Facebook
    • Instagram
    • X

Membership & Magazine

  • Online Archive
  • Start Free Trial
  • Magazine Subscription
  • Magazine Renewal
  • Gift a Subscription
  • Customer Support
  • Privacy Preferences
  • About
  • Contact
  • Advertise
  • Careers
  • Terms of Use
  • Site Map
  • Do not sell or share my information
  • Privacy Policy
  • Accessibility
  • California Privacy Rights

© 2025 Active Interest Media. All rights reserved.

Fine Homebuilding receives a commission for items purchased through links on this site, including Amazon Associates and other affiliate advertising programs.

  • Home Group
  • Antique Trader
  • Arts & Crafts Homes
  • Bank Note Reporter
  • Cabin Life
  • Cuisine at Home
  • Fine Gardening
  • Fine Woodworking
  • Green Building Advisor
  • Garden Gate
  • Horticulture
  • Keep Craft Alive
  • Log Home Living
  • Military Trader/Vehicles
  • Numismatic News
  • Numismaster
  • Old Cars Weekly
  • Old House Journal
  • Period Homes
  • Popular Woodworking
  • Script
  • ShopNotes
  • Sports Collectors Digest
  • Threads
  • Timber Home Living
  • Traditional Building
  • Woodsmith
  • World Coin News
  • Writer's Digest
Active Interest Media logo
X
X
This is a dialog window which overlays the main content of the page. The modal window is a 'site map' of the most critical areas of the site. Pressing the Escape (ESC) button will close the modal and bring you back to where you were on the page.

Main Menu

  • How-To
  • Design
  • Tools & Materials
  • Video
  • Blogs
  • Forum
  • Project Guides
  • Reader Projects
  • Magazine
  • Members
  • FHB House

Podcasts

  • FHB Podcast
  • ProTalk

Webinars

  • Upcoming and On-Demand

Podcasts

  • FHB Podcast
  • ProTalk

Webinars

  • Upcoming and On-Demand

Popular Topics

  • Kitchens
  • Business
  • Bedrooms
  • Roofs
  • Architecture and Design
  • Green Building
  • Decks
  • Framing
  • Safety
  • Remodeling
  • Bathrooms
  • Windows
  • Tilework
  • Ceilings
  • HVAC

Magazine

  • Current Issue
  • Past Issues
  • Magazine Index
  • Subscribe
  • Online Archive
  • Author Guidelines

All Access

  • Member Home
  • Start Free Trial
  • Gift Membership

Online Learning

  • Courses
  • Project Guides
  • Reader Projects
  • Podcast

More

  • FHB Ambassadors
  • FHB House
  • Customer Support

Account

  • Log In
  • Join

Newsletter

Get home building tips, offers, and expert advice in your inbox

Signing you up...

This site is protected by reCAPTCHA and the Google Privacy Policy and Terms of Service apply.
See all newsletters
See all newsletters

Follow

  • X
  • YouTube
  • instagram
  • facebook
  • pinterest
  • Tiktok

Join All Access

Become a member and get instant access to thousands of videos, how-tos, tool reviews, and design features.

Start Your Free Trial

Subscribe

FHB Magazine

Start your subscription today and save up to 70%

Subscribe

Enjoy unlimited access to Fine Homebuilding. Join Now

Already a member? Log in

We hope you’ve enjoyed your free articles. To keep reading, become a member today.

Get complete site access to expert advice, how-to videos, Code Check, and more, plus the print magazine.

Start your FREE trial

Already a member? Log in

Privacy Policy Update

We use cookies, pixels, script and other tracking technologies to analyze and improve our service, to improve and personalize content, and for advertising to you. We also share information about your use of our site with third-party social media, advertising and analytics partners. You can view our Privacy Policy here and our Terms of Use here.

Cookies

Analytics

These cookies help us track site metrics to improve our sites and provide a better user experience.

Advertising/Social Media

These cookies are used to serve advertisements aligned with your interests.

Essential

These cookies are required to provide basic functions like page navigation and access to secure areas of the website.

Delete My Data

Delete all cookies and associated data