Free forming a Spiral Handrail
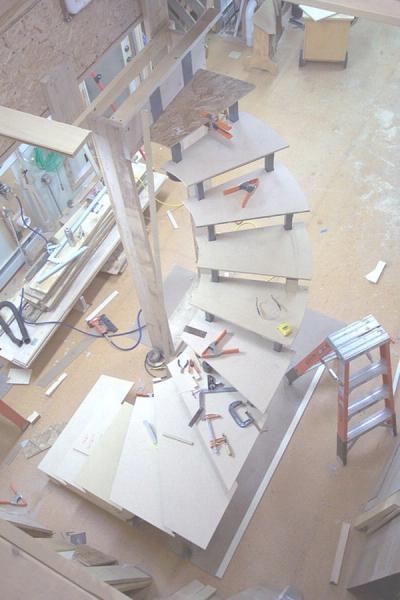
<!—-> <!—-><!—-><!—-><!—-><!—-><!—-><!—->Photo shows basic stairs, treads set and ready for handrail. View Image
Edited 3/11/2006 10:43 pm ET by riverman
Free forming a Spiral Handrail
<!—-> <!—-><!—-><!—-><!—-><!—-><!—-><!—->Photo shows basic stairs, treads set and ready for handrail. View Image

Fine Homebuilding is excited to be the official media partner of the 2024 Building Science Symposium series! This event offers builders, tradesmen, architects, designers and suppliers to discuss topics ranging…


"I have learned so much thanks to the searchable articles on the FHB website. I can confidently say that I expect to be a life-long subscriber." - M.K.


Replies
Early on I used the more common wood/plywood fixture for my rail laminating work however I found that laminating tight spirals exerted so much pressure against the wood fixture they would either deflect or snap off. After much experimenting I settled upon the design in the photo. The vertical tube is tall enough to cover the steep ascending rails as well as short enough as not to be in the way for the more common rise tread ratios. The wood blocks screwed to the sides allow me to fasten cauls, backup blocks and pegs to assist in lining up the laminates. The LRB’s are fastened to the tread by way of two C-clamps. Or in this case, since the center of the tread is carpeted, one clamp and two screws. The location of the LRB’s is critical, as they will determine the centerline of the rail as well as the final radius. In the case of a spiral I locate the centerline of the Rb to conform to the face of the imaginary riser setting it back from the baluster centerline half the thickness of the rail plus the thickness of the caul.
Edited 3/11/2006 10:45 pm ET by riverman
Red brackets are bending fixtures welded up from 1-1/2 x 1 steel tube ¼ plate & 1/8 gusset. (See detail next photo) We call them LRB’s (little red brackets) for short.
<!----><!----><!---->
Photo A2
Edited 3/11/2006 10:45 pm ET by riverman
photo A4
<!----><!----><!---->
<!----><!----><!----><!----><!----><!----><!----><!----><!----><!----><!----><!----><!----><!----><!----><!----><!----><!----><!----><!----><!----><!----><!----><!----><!----><!----><!----><!----><!----><!----><!----><!----><!----><!----><!----><!----><!----><!----><!----><!----><!----><!---->Notice location of C-clamps, vertical wood strips and locator blocks (small bar clamps) The underside of the LRB’s are covered with a thick peel & stick paper to help cushion the steel base against marring the wood tread. For inside bends the LRB’s telescope past the tread, hence the high visibility, anti head whacking red paint job.
<!----><!---->
Edited 3/11/2006 10:46 pm ET by riverman
<!----><!----><!----><!----><!----><!----><!----><!----><!----><!----><!----><!----><!----><!----><!----><!----><!----><!----><!----><!----><!----><!----><!----><!----><!----><!----><!----><!----><!----><!----><!----><!----><!----><!----><!----><!---->
<!----><!----><!----><!----><!----><!----><!---->Once the brackets have been set I measure the length of the required laminates and run the stock through the resaw. Whenever possible I try to cut all the laminates from one 12/4 board insuring I get a nice grain & color match. However with some species it’s difficult to find material thick enough so I resort to using one wide 4/4 board and attempt to bookmatch as many sections as possible. After resawing I run the strips through the wide belt sander to clean up any saw marks and take the laminates down to the finish thickness. The thickness of the laminate is determined by the radius, the species of wood and to a small degree by the steepness of the climb. The harder the wood and the tighter radius, the thinner the strips need to be. This rail is hard maple, 14-inch radius, about as bad as it gets. I settled on 18 plys @ .145 thick. The big plus of thinner laminates is as the number of laminates increases the amount of spring back decreases. It seems to level off at about 7 plies and anything past 11 the spring back is pretty <!----><!----><!----><!----><!----><!----> much zero.
View Image
Edited 3/11/2006 10:46 pm ET by riverman
<!----><!----><!----><!----><!----><!----><!----><!----><!----><!----><!----><!----><!----><!----><!----><!----><!----><!----><!----><!----><!----><!----><!----><!----><!----><!----><!----><!----><!----><!----><!----><!----><!----><!----><!----><!---->View ImageA15a
<!----><!---->
For making laminates and veneers this sander really shines as its one of the few small wide belts that comes with a helical steel contact roller. Unlike a rubber coated roller it will produce crisp square edges as opposed to a slightly rounded over edge. My first sander had a rubber roller and because of the slight round over would not produce a tight invisible glue line as the center was always a few thousands thicker than the edges. It will also constantly peel off as little as .001 of an inch if necessary.
<!----><!---->
Edited 3/11/2006 10:47 pm ET by riverman
Sorry about the out of order post, this should have been #7. Couldn't figure out to change a photo after the initial post was made.
<!----><!----><!----><!----><!----><!----><!----><!----><!----><!----><!----><!----><!----><!----><!----><!----><!----><!----><!----><!----><!----><!----><!----><!----><!----><!----><!----><!----><!----><!----><!----><!----><!----><!----><!----><!---->
<!----><!----><!----><!----><!----><!----><!---->The laminates are numbered as to best grain match, the edges defuzzed and prepped for the glue. We use Unibond 800, a resin/ powered catalyst glue that produces a rigid glue line eliminating the common cold creep and telltale joint shift caused by yellow glue under high stress conditions. The maximum open time is about 45 minutes at 70 degrees. Spreading the glue and installing the clamps is a two person job with no time to spare. Sometimes I’ll cool the shop down or if that’s not possible I’ll back off on the catalyst a tad to gain a few minutes. The glue is roller applied to all surfaces, reassembled into a tight stack. After everything is lined up we stretch wrap the entire bundle from end to end. This helps keep the laminates from drifting out of line while bending around the LRB’s and prevents the glue squeeze out from trashing the clamp threads. (note the laminates in the photo are not the ones used in this project)
Edited 3/11/2006 10:49 pm ET by riverman
In the majority of curved stair work the builders will opt to use round top balusters to speed up the final installation as drilling a round hole is far quicker than mortising a rectangular one. This particular staircase was in the same room as the previously built main stairs which utilized my “Diamond Balusters”. The client liked these for their simple clean line custom appeal and asked I incorporate them in the spiral unit as well.
View Image
View Image
In situations like this I choose to laminate the railing in two halves, allowing me to rout the mortise into the side of the first glued up half then covering up the mortise opening with the remaining laminates. This has several advantages first and foremost the time spent on mortising is a small fraction of what it would be if it were done it after the fact. Second, it allows me to index the rail into the original position once the LRB’s have been removed. This is critical since the profiling of the rail depends on getting it back to where it belongs plus or minus nothing. Ok it’s not micro atomic precision but if you are off an 1/8 you may not have sufficient thickness, in some parts of the rail, to complete the profile. Last but not least, if you did everything right, during the final installation the balusters pop into the mortise and self align the railing with the treads predrilled baluster screw holes.
Edited 3/12/2006 8:47 am ET by riverman
Edited 3/12/2006 8:48 am ET by riverman
<!----><!----><!----><!----><!----><!----><!----><!----><!----><!----><!----><!----><!----><!----><!----><!----><!----><!----><!----><!----><!----><!----><!----><!----><!----><!----><!----><!----><!----><!----><!----><!----><!----><!----><!----><!---->
<!----><!----><!----><!----><!----><!----><!---->It is important the fixture face be perpendicular to the axis of the spiral otherwise the balusters will sit askew in the handrail and since they are not round you will not have the luxury of rotating them into position. The centerline of the fixture must be plumb otherwise once the rail is extended to it’s final height you will be off far enough to spring the baluster and force the rail out of line. A slight error can be corrected by modifying the tip of the baluster a bit, allowing it to float slightly in the mortise. However unless you are into buying putty by the case it’s better to make an effort to get it right the first time.
View Image
Edited 3/12/2006 9:13 am ET by riverman
In the case of bending an inner rail the LRB’s have to be removed to route the mortises. I remove them one at a time and replace them as I go.
<!----><!----><!----><!----><!----><!----><!----><!----><!----><!----><!----><!----><!----><!----><!----><!----><!----><!----><!----><!----><!----><!----><!----><!----><!----><!----><!----><!----><!----><!----><!----><!----><!----><!----><!----><!----><!----><!---->
<!----><!----><!----><!----><!----><!----><!---->Once all the baluster notches have been completed it’s a matter of adding the remaining laminates to the stack. This is a bit of a trick since there is no way to stretch wrap the pack and keep everything in line. If we have enough stock length we stretch wrap the ends letting the center float. Again we start from the bottom, securing the end in place just enough so it doesn’t pose a threat to life and limb. As I work my way upward I bend the stacked laminates around the rail while my wife drops a plywood U-block over the rail at every third LRB. Sorry no working photo available, see sample photo for general concept. The U-block is slightly larger than the total railing cross section. Its purpose is to hold the laminates in place without restricting movement between the plies as it stretches around the bend. Once all the U-blocks are in place I start from the center and work both ways installing sandwich blocks to the top and bottom of the rail pulling them together with pony clamps. This pulls the laminates in line with the existing glued up blank. Byy now more than half the open time has been used up and we quickly fill in the remaining clamps and tighten everything down.
View Image
View Image
ok.. i get it ... the next layers of laminate hides the pockets you routed in the previous posts / picsMike Smith Rhode Island : Design / Build / Repair / Restore
Photo below shows the completed inner rail blank as well as the first half of the outer rail blank fully clamped. Notice all but three of the LRB’s supporting the inner rail have been removed.
View Image
<!----><!----><!----><!----><!----><!----><!----><!----><!----><!----><!----><!----><!----><!----><!----><!----><!----><!----><!----><!----><!----><!----><!----><!----><!----><!----><!----><!----><!----><!----><!----><!----><!----><!----><!----><!---->
<!----><!----><!----><!----><!----><!----><!---->At four points along the rail I insert wood supports into the mortised baluster holes. The supports are hot melt glued to the rail and clamped to the tread as shown. This allows me to secure the rail blank in it’s original position while I remove the rest of the LRB’s and profile the top of the railing.
View Image
Edited 3/12/2006 7:04 pm ET by riverman
<!----><!----><!----><!----><!----><!----><!----><!----><!----><!----><!----><!----><!----><!----><!----><!----><!----><!----><!----><!----><!----><!----><!----><!----><!----><!----><!----><!----><!----><!----><!----><!----><!----><!----><!----><!----><!----><!----><!----><!----><!----><!----><!---->The top of the rail is float sanded with an angle grinder to clean off any glue bumps that may get in the way of the layout lines. The success of profiling depends on how accurate the layout lines are. All the side lines must follow the rake of the rail, and the inside and outside lines must be perpendicular to the axis of the stairs. In other words the sides must be plumb and the top and bottom level with the tread at the riser line. If not the rail will look tilted or whop sided.
<!----><!---->
To scribe the lines on the rail I construct a fixture resembling a railroaders semaphore (winged signal apparatus). Using the master template on the shop floor I install a vertical section of 1-1/2 conduit at the vertex of the riser lines also called the center of the circle. The pole becomes the axis of the stairs to which the scribe head is attached.
Photo of scribe arm attached to conduit. The guide tab allows the scribe arm to follow the slope of the railing as it swivels around the axis of the stairs. A pencil tracks in a dado milled into the backside of the scribe arm. This enables me to scribe lines both on the inside and outside of the rail perpendicular with the axis of the stairs. This produces parallel lines outlining the thickness of the finished railing. The final profile is a simple oval so I scribe as many lines as necessary along the top and sides of the rail to insure I have a visual concept of how much wood to remove.
View Image
View Image
With one hand I swivel the fixture around the pole as gravity slides it downward while gently pushing on the pencil creating the parallel lines in the photo. The far side of the rail is done in the same manner. When it’s all said and done I have matching sets of lines on both sides of the rail. Using the same concept I scribe lines on the top surface as well.
View Image
<!----><!----><!----><!----><!----><!----><!----><!----><!----><!----><!----><!----><!----><!----><!----><!----><!----><!----><!----><!----><!----><!----><!----><!----><!----><!----><!----><!----><!----><!----><!----><!----><!----><!----><!----><!---->
<!----><!----><!----><!----><!----><!----><!---->I begin by grinding the top of the rail flush with the uppermost layout lines. This generates a lot of dust hence the collection cone attached to the flex hose. A good eye and sense of feel is important as one can flash past the point of no return in a matter of seconds. You can hog off a lot of material using a 36 grit disk. From time to time I check my progress with the scribe arm to insure I maintain a level profile. Once I have the top surface where I want it to be I scribe a series of parallel lines on the top face. With the same 36 grit disk I’ll grind away the edges one line at a time checking the depth of cut with a plastic template conforming to the shape of the finished oval profile.
View Image
<!----><!---->
<!----><!----><!----><!----><!----><!----><!----><!----><!----><!----><!----><!----><!----><!----><!----><!----><!----><!----><!----><!----><!----><!----><!----><!----><!----><!----><!----><!----><!----><!----><!----><!----><!----><!----><!----><!---->
<!----><!----><!----><!----><!----><!----><!---->Once the top of the profile is roughed in I remove the rail from the staircase and set it on adjustable horses and grind the bottom in the same manner. All the remaining profile lines are now indexed off the face of the rail. At this point I switch to a 120 grit disk taking light cuts and long strokes to minimize the risk of over cutting.
The final sanding operation generates far more dust than the coarse disks. Weather permitting I do the final sanding outdoors however January in Upper Michigan pretty much rules out that option. A makeshift visqueen box and two dust collector outlets pretty much takes care of the problem.
View Image
Grinding and sand tools used.
4 1/2 inch angle grinder, sanding disks, fine & coarse carbide disks. The disk on the lower right was custom made to grind concave profiles into the sides of railings.
Inflatable drum / right angle drill motor & 6 inch random orbit sander take care of the finishing.
In real time, not counting the layout time, it takes about a hour a lineal foot to grind and finish sand an oval profile on a curved railing.
View Image
View Image
Riverman, awesome!
blue
Thanks Blue & oldfred
Yes I have some other stuff I'll be getting to soon. Have a retro stair in a 70's tri-level that will be quite the remodel. At best should be some usefull stuff to pass on, at worst some info as to what not to do.
Edited 3/14/2006 10:56 pm ET by riverman
Great post riverman. I would be hard pressed to find a better book on the subject....that's not a mistake, it's rustic
Riverman, if i ever graduate completely out of framing, I might ask you to be your apprentice for my next life.
blue
Simply amazing.
Thanks, I'm hoping to find some time to continue the thread with a few photos on joining a straight rail to a curved section.
70866.77 in reply to 70866.76
Thanks, I'm hoping to find some time to continue the thread with a few photos on joining a straight rail to a curved section.I ran across your post in the archives- great post. If you've taken any pics I'd love to see them & read your comments.
Thanks for your interest. I'm currently working on the most challenging staircase of my 41 year career, unfortunately I'm way behind schedule and do not have the time to post real time progress photos. Will do so later this summer and hopefully be able to answer your questions at that time.
Having seen pics of your work I'm really curious to see pics of this staircase when you have time to post.Thanks,
Keith
How did your staircase go? haven't seen any postings from you in awhile, hope you were able to take some pics.
Still not finished. The last of the nasty stuff should be installed tomorrow then it's on to the mop up, punch list, and gee I wish I hadn't left this for last stuff. By the time it's completed I will have spent almost a year on one stair project. Ok I did inherit some non stair millwork in the home however the stairs are by far the lions share of the project. To sum it up, I must have been nuts to do this.Thanks for the interest, I'll post Photos at some point in time.
Riverman,
As everyone has rightly said, your stair work is beautiful. But your ingenious jigs are equally impressive. How about some more pics of your jigs and and your shop?
Thanks for these threads! Hope you put them into a book someday!
oldfred
I'm interested to know- is grinding and sanding the only way you form those profiles? I was expecting you to put some sort of jig on the EMT you had set up to align a router to make the profile.
Your method reminds me again what valuable tools our sense are- It looks like a skill that would take years and years to build.
inspiring work,
zak
I'm interested to know- is grinding and sanding the only way you form those profiles? I was expecting you to put some sort of jig on the EMT you had set up to align a router to make the profile.
ZaK, I do have different jigs (see photos) that I use with the router. However spirals climb and twist at such a rapid rate that it's difficult or near impossible to control the router, jig or no jig. In the first photo I used a 12 in PVC pipe as the bending form for a freestanding wood stringer and hand rail. Even with this setup I still had to free hand shape the back side. The other two photos show a two guide rail system used with a router and float jig. This works very well on circular stairs however it takes a lot of time to set up the rails and is a very complicated procedure. Everything has to be right on or the rail will have thick and thin spots along it's length. The other big negative is handrail cutters are huge, stick out of the router like a prop and take a lot of skill to control. The wood is stressed from the bending and should you snag a piece of wild grain the tear out can be enormous. Finally you still have to shape the underside by hand. Once I developed the skills required to handle the grinder I pretty much abandoned the router method. For me the time savings was substantial since I can grind a rail in about the same amount of time it takes me to set the router rails. As to fastening a router to the conduit forget it. It would take a lot of steel to stabilize any kind of routing operation strung that far out.
View Image
View Image
View Image
Edited 3/13/2006 6:45 pm ET by riverman
Riverman, absolutely great series. I love reading this stuff. While FHB is a gret rag I think your presentation here is bigger and better than anything would ever get in print.
We pretty much shape our railings the same way you do, with the same exact routers set up in almost the exact same kinds of jigs in too. But when fabricating with laminations we flatten the tops of the railing blanks and then surface the top with another 3/8" or even 1/2" lamination laid flat so that the we don't get any glue lines showing. Ever do that? I think it makes the railing look more like it was fabricated from solid wood.
But what I really wanted to ask you was have you ever considered setting yourself up with a Scheer Handrail Router for shaping rails?
View Image
We've toyed with the idea of getting one for a few years now but just have never seemed to get around to it.
View Image
Jerrald,
Thanks for the compliments.
I have only seen the Scheer rail router in a brochure. It looks like one really cool tool and I seriously considered getting one. However I recall it came with a pretty impressive price tag and that being said I would want to see one in action before I forked out the money. My plans are to attend the IWF show in Atlanta this summer and maybe get to fondle one of these babies and see what they can do.
surface the top with another 3/8" or even 1/2" lamination laid flat so that the we don't get any glue lines showing.
That is something I have not done on curved rail, I know others have pulled it off with great sucess and I'll concur it would look better than the glue lines no matter how well they are matched. How do you get the top of the rail flat enough to get a good fit with the top laminate?
I may be taking a trip up to ERSysTech in a month or two so I'll try and remember to let you know what I find out while I'm there plus they will be at New England Industrial Woodworking Expo in April too which is only an hour away from me.
"That is something I have not done on curved rail, I know others have pulled it off with great sucess and I'll concur it would look better than the glue lines no matter how well they are matched. How do you get the top of the rail flat enough to get a good fit with the top laminate? " We hit the rough blank first with the grinder then follow with a cylinder sander like you have only ours is pneumatic and then we scrap it but to tell you the truth I personally once did a decent job out in the field with just the grinder and a random orbit sander. It took a bit of clamping the cap piece on and then checking the fit and then pulling it off to sand it down some more but it did work out. One of my guys after getting the blank close puts on some heavy gloves and then just palms a surform blade up and down the blank to level it before he scrapes.
View Image
then we scrap it but to tell you the truth I personally once did a decent job out in the field with just the grinder and a random orbit sander.
I'll be dipped, Thats what I thought all along but was afraid to ask. As to getting a good fit, I have not tried it in the application you describe. But along those lines when I need a near perfect fit I stick a strip of carbon paper, to a piece of clear packing tape. Put the carbon paper face down between the two pieces of wood and gently rub the joint together. The carbon paper will leave a blue mark on all the high spots showing where to scrape or sand. My dad was a tool maker and this is what he did to fit cast iron dies except he used a blue dye paste instead of carbon paper.
Carbon paper. Yeah that is a real great idea. I'll have to put that one in the brain somewhere for future reference.
View Image
Hi Jerrald
I think someone should pass the word to the manufacturer of that tool about River man wanting to get his hands on that tool.Maybe he could do a review .If it is the real deal .He would probably know.
Rick Sheehan
Well ya know reading through the posts here it does appear we already do have a BreakTimer that uses the Scheer Handrail Router. Bear mentioned using it in his msg#70866.39.
View Image
Sorry Professor
I will be quiet now and go sit in the back of the classroom:)
Naaaa., don't shut up. Talk is good. I just thought maybe you missed Bear's post, We just need to get him to talk some more about it now.
View Image
Great work and a great post. Very ingenious with some of your methods.
Very impressive. I tend to be a little more traditional with my stairs and rails and lack some of your creative methods.Two points; 1) We use vacuum bags for all of our stringers and curved rails. It saves a lot of time with clamps.
2) we use the Sheer handrail router to profile our curved sections. It is not cheap and it does not produce miracles, but it is the only option to the smaller shop to do this kind of work.Bear
We use vacuum bags as well however we have had very poor results on the tighter radius rails. The rail section in the photo shows an extream example of what occurs when a stack of laminates is bent around a 9 inch radius. To an extent this happens on all spiral bends however in the case of larger radius it does not seem to be as much of an issue. The laminates have to bend in the long plane as well as roll across the grain. The ones we tried using the vacuum bag were tight in the center but had good sized gaps along the outer edges. In our second attempt we used clamps spaced every foot or so in conjunction with the bags. The clamps helped but still left a lot of gaps. We now limit the vacuum bags to the larger radius stringers and use the clamps for the rails.
View Image
Armin: You are simply in a class all by yourself. I will find it embarrasing almost to post what little I do.
You are simply one of a kind. Keep it up.....
Stan
Ha! Stan you are too modest.
You two guys are truly craftsmen and my respect goes out to you.Jake Gulick
[email protected]
CarriageHouse Design
Black Rock, CT
Ha! Stan you are too modest.
Yes he is and thats what makes him a great person as well as a great craftsman.
Ya just know, that if in another life, he was a bug, he would have been a humblebee.
Edited 3/14/2006 8:38 pm ET by riverman
Armin: I may be modest....but brutally honest as well. I have a lot of catching up to do. Forgive me for being so mesmerized by what you have presented here.
I went to work on a curved stairway today and I just didnt have the fire in my belly. I need some new challenges to get me attempting some of the stuff you are doing.
I have always thrived on challenges.....I love building curved stairways ......I just am desiring even more challenges though.
This will be my last slap on your back Armin on this project...as I know you are modest as well. But you show signs of pure patience with God knows what IQ behind those skilled hands of yours.
Stan
If you get the chance and have the time could you post a few pic's showing the scheer router in action?
Armin:
As everyone else has said, awesome work, and thank you so much for taking the time to share the construction details with us.
Having done some curved bent lamination before, I'm curious as to how you keep all of the lamination strips aligned with each other. I've never done a spiral (straight curve only), but even then I get some "creep" between the laminations where they slide up and down slightly with respect to each other. Usually I just make the blank plenty oversize and cut down to the finish size, so the slight variation isn't a huge issue.
I'd have thought this problem would be more severe with a spiral on top of the curve. Yours, though, seem to be pretty much dead flat across the whole bundle. Any trade secrets? --Ken
I'd have thought this problem would be more severe with a spiral on top of the curve. Yours, though, seem to be pretty much dead flat across the whole bundle. Any trade secrets? --Ken
See post #12
You are right the spiral will drift more than a flat curve. However, unless you are out of line when you bend the rail around the brackets or force it in the wrong direction the stretch wrap holds it together very nicely. I use the 5 inch wide roll, one pass with a 1 inch overlap.
Let me see if I can get a few picture to load.Bear
A few words about the Sheer Handrail router. I had been looking at it for a long time. When I needed it, ER did not have it in stock, and when I didn't need it I didn't want to spend the $3,000 dollars for it.
I finally had a real need and time to wait, so I purchased it in Sept. You can expect atleast 3 weeks for delivery. ER will only sell it to you with a profile cutter at additional cost, about $600.
The insturctions leave something to be desired, so if you have never seen one in operation, you may have a difficult time. I live on Long Island, NY, so if anyone would like to visit, I am avaible.
Using it; your blank most be is reasonable good shape, the router will only profile what you give it, crap in, crap out, like they say. Its big advanatges are; you can resaw your slices as thin as you need, so bending tighter radii is possible. It also works very well with rails that change pitch or direction.
It is a good solution for smaller stair shops doing curved work.
I hope this helps.Bear
Bear Thanks for the info & pics , I might just look you up the next time I go out east.
"I live on Long Island, NY"
Sounds like you need to lug that bad boy over to TipiFest and do a demo!
Not to get too far out in the weeds here but any impressions of using rail that comes already resawn?
I need to replace a small section (about 3') of curved rail that was ripped out many moons ago and replaced with a straight section when the place I am working on was converted from a house to apartments (hard to describe but they widened the hallway by straightening a graceful curve in the floor and rail above -- presently looks like something out of a Hitchcock movie).
Now it's converted back to a house and I need to replace that small section of rail. I already have a suitable oak blank and have the timberwolf on my little 12' bandsaw ready for action, but the learning curve looks pretty steep (heh, heh) and I'm not sure if it's worth learning for 3' of rail.
But before I get too crazy with it, would it pay to just get 3' or 4' of matching rail already resawn (looks like a pretty common rail style) and just glue that up? Other ideas? Favorite suppliers for that sort of thing?
Thanks in advance.
"A job well done is its own reward. Now would you prefer to make the final payment by cash, check or Master Card?"
Here's a picture so you can see what I mean. You can see where the floor used to curve beneath the rail. It's a small section but I think it will make a huge difference in appearance.
And yes, that focackta subfloor will be replaced before laying hardwood over it -- it was carpeted (yetch!).
View Image
"A job well done is its own reward. Now would you prefer to make the final payment by cash, check or Master Card?"
That radius is way to tight to use bending rail on. You must either resaw your own very thin slices or build it up from solid woods and cut to shape and profile.
Not to be offensive, but it looks like the whole rail system could use an overhaul.Bear
Bear: thanks for the advice. Time to give it a try. There's always got to be a first time and maybe a short section is just the ticket. At least when it still gets screwed up on the third try, I won't have as much in materials into it. ;-)
No offense taken about the rest of the rail. I tend to agree but it's not in the budget plus the rail dates back near 200 yrs. and I'm under the impression they intend to keep it even if budget allows at a later time. Most people like old world details but not the imperfection that comes along with actual age, but this house is a little different.
I'll probably need to beat up the new section a bit so it doesn't stick out like a sore thumb. The square balusters shown in the pic are not original and are also to be replaced. An upper section of the staircase is intact original, so I have a reference for new balusters. The originals are actually sort of delicate looking and, in this particular house, much prettier than the plain square ones.
Anyway, thanks again.
"A job well done is its own reward. Now would you prefer to make the final payment by cash, check or Master Card?"
Bear is right that rail is way to tight to bend with off the shelf bending rail. As to matching up a 200 year old rail it's going to look like a patch job no matter what. The bending is the easy part getting it to look like it belongs is going to take some doing..
Hey Riverman, thanks for the reply. By the way, very impressive work (beyond exceptional, really) and I can't tell you how appreciated it is that you are sharing so much about how you do it.
Believe it or not, for me the bending will be the hard part. Never done it before but it's a small section and I'm willing to take my lumps learning how to get it right. Hopefully by curved blank #7 I'll have something that fits. ;-)
I have more time in matching finishes and "distress" so I think I can get it pretty close.
A question for you in terms of replacing it -- three story staircase. I know it would be impossible to give any kind of price, but in terms of discussing a new rail, I'd like to be able to have a "in play, maybe" versus "out of the question" number I can use for discussion if possible.
Like "if you don't have at least $x in the budget, don't even think about a new rail, and it could run twenty times that, etc." Are we talking $1k, $5k, $10k, $20k, etc.? If there's a positive response, I could then take it further. If it's sticker shock, then I don't have to waste anyone's time (mine included ;-) to get a quote put together that'll just be flat out rejected.
I don't think a replacement is in the cards, but that's the impression I get. Purpose of some of what I'm doing there is to put it back "the way it was" within reason (& budget available). The staircase in this place is (like most houses) a huge focal point (its called an "independence hall" style staircase with rooms off each side of it at different levels and an open area running down the center) -- so who knows, it is such a focal point, maybe getting a real stair guy in is something they'd want.
Thanks again.
"A job well done is its own reward. Now would you prefer to make the final payment by cash, check or Master Card?"
Edited 3/19/2006 10:28 am ET by philarenewal
Cost depends on lots of factors and covers a huge range of possibilities. Custom straight rail 30 to $50 lin. ft. Custom curved rail for a staircase built in the shop $100 to $150 lin. ft. Custom curved rail site built, as in a replacement, can cost twice that much. One guy can build a really quality job for $1000 the next guy bangs something together for the same money and calls it done. What will the customer be happy with. I build everything one way and avoid the customers who don't know the difference. I spend more time finish sanding than most spend building the entire rail, the finish quality sets me apart from the others and it's my edge, gets me the jobs I really want to do.
It's funny 'cause the number I had in my head, for no educated reason, was about $10k.
At around $200 to $300/ft. for site built curved replacement would work out to almost that much (total running length of existing rail is 31' give or take). Add in balusters and $10k makes a nice round "baseline" number. So my take away is: ballpark of $6k to $10k range to even start thinking about this sort of thing in a "typical" 3 story house (which is very helpful to know), but as with anything else, sky's the limit depending on many factors.
Don't think that'll fly on this job for a couple of reasons, but maybe down the road somewhere. You travel? ;-)
I'm also very fussy with sanding anything that will get touched or where imperfections tend to stand out (flat surfaces) or stuff close to eye level, but I have to admit to giving base and crown a "lick and a promise," sand out any mill marks and a quick pass overall (there's just so damn much of it, even in smaller rooms).
Anyway, thanks again.
"A job well done is its own reward. Now would you prefer to make the final payment by cash, check or Master Card?"
You travel? ;-)Yes I'm like horse sh#t, just about everywhere.
I just read through this thread looking for deck railing ideas and found it by search.
YOU DA MAN!
Thanks Clay, how did you find the thread I thought it was moved into the twilight zone of breaktime.
I put in looking for decks railings and steps in the advanced search.
I had followed lots of deck threads and was just looking for more goodies.
Your layout tell so much, I don't even expect to rise to ?????? but in viewing your processes it helps me, and humbles me.
Thanks Much.
I found it because people keep posting anew, in this case 11 new of 71, so it's always right there in the navigation column. I'm also subscribed to this thread because I'm a soon to be installer of high-end shop-built staircases. I just landed the job today and I'm bragging about it every chance I get. Will start training in about 4 weeks, right after I finish the kitchen I'm remodeling. They gave me a tour of the shop, which has 3 20+ foot tall adjustable curved frames and 2 CRC cutters. It's a full time gig with full benefits, just what I needed. They'll also provide all the power tools, blades, etc. I need, although I already have most. After training (6 to 10 weeks) I'll be working solo.
What I'll be doing doesn't compare to what your sharing with us here (thanks, by the way), as all that is done in the shop. I'll just be installing the precious cargo (yikes!)when it's delivered to the jobsite. Watching this thread makes me realize just how much trust they're puting into my hands.
There's also the possibility I may do some shop work to get a better feel for what goes into this works of art. Man, that would be awesome, even though I'm more inclined to work in the field. But a couple of months in the shop... I'm rambling. Fantastic and inspiring workmanship you're doing, thanks for sharing it. You definately should write a book.
--------------------------------------------------------
For a good time, visit http://www.MyToolbox.netIf at first you don't succeed, you're about average.When in doubt, ponder."And I'm buil-il-ding a stai-air way to heaven..."
Edited 4/7/2006 1:33 am by Ted W.
Edited 4/7/2006 3:32 am by Ted W.
Congradulations on your new job, you will have to keep us posted as to how it goes. Just for the record if I was offered such a position I would take it in a heartbeat. I'm happy for anyone who can make a living doing what they enjoy.
Thanks Riverman, wasn't being rude by not responding, don't know how but somehow missed your congrats post. But yes, when you love your job you never have to work for a living. Well, almost never. ;-)--------------------------------------------------------
For a good time, visit MyToolbox.net See some of my work at TedsCarpentry.com
Phil,
StairPak in Pine Grove PA will make that for you and it won't cost a zillion dollars. Rich Senior at Stairpak can make anything. 800-845-5100.
Stairworks in Perkaise might be able to as well. If they do, it will be worth a trip to go see their shop. They have a pretty slick business going and the owner we met, Steve, was one of the nicest guys I've met in the business in some time.
Either will be cheaper than doing it yourself.
Robert. Thanks for the info!
I'm working on a rehab now (just waiting on the permits, tick, tick, tick) that's really tiny and needs some extra "jazz." A cool staircase may be just the ticket.
I'll give Rich and Steve a call.
Thanks again.
"Let's get crack-a-lackin" --- Adam Carolla
Phila , How about giving Riverman a shot at this stair job . You can see he does good work . And I can almost bet that his bid will be very competative. But the workmanship will be above and beyond anything that a stair mill pumps out.
Ooh yeah! I've already confirmed that he travels. ;-)
"Let's get crack-a-lackin" --- Adam Carolla
Photos A8,A9,A10 show the bundle of laminates bent around the brackets and clamped. Note the stretch wrap.
The sequence of operation is as follows.
I walk the top edge of the rail blank up the stairs (the rail is not bent at this time) while my wife maneuvers the bottom into position setting it on the lower locator block and installing a pony clamp (orange bar clamp) on the first LRB. She also ties the lower connection off with a nylon safety strap. The strap is a must have, if the first clamp were to let loose before the second clamp was in place it would launch anything in it’s path clear across the room. A stack of spring loaded laminates could land one in the ER pretty quick. Once I’m satisfied the rail is where I want it to be I slowly bend the glued up blank around the brackets setting the bottom edge on top of the locater blocks while my wife installs a clamp on every steel post. The pony clamps are not fully tightened at this time allowing the laminates to shift into position slightly if necessary. Once all the pony clamps are in place the spaces between the clamps are filled in with as many wood screw clamps as will fit.
View Image
View Image
View Image
Edited 3/11/2006 10:48 pm ET by riverman
Close up of the wood clamps used. These are inexpensive homemade clamps that exert enormous pressure evenly across the full width of the glue blank. Unlike bar clamps or C-clamps these will pull both edges tight eliminating any chance of a gap forming at the edges due to uneven pressure. . Care must be used to tighten both bolts evenly otherwise it could cause the laminate to drift or form a void. Clamp body is any hardwood although I prefer maple or beech. Full threaded 5/16 x 6 in. bolts, washers and Tee nuts make up the working parts. Threads are wax coated to prevent binding under pressure, Bolts are tightened with a nut driver, drill motor and finished up with a few turns of socket wrench.
<!----><!----><!---->
<!----><!---->
Edited 3/11/2006 10:48 pm ET by riverman
Riverman:
Great work and very interesting, but I can barley read the small print. Can you repost?
Don't know what the deal is as on Internet Explorer it showed up a different size than on Mozella.
Riverman....
....wow!
this post is like answering "why is the sky blue" question my kids ask me. I've always wondered how this type of thing goes together...and now I know.
Thanks a million and keep them coming!
knowledge without experience is just information.... Mark Twain
http://www.cobrajem.com
Excelent tutorial riverman. Having always used factory made bending rail, glued up and clamped up in a similar fashion, I'm waiting for istallment #2, on the machining of your glue-up to your profile. Good work.
Roger
Thank you for taking the time and putting in the effort to produce this thread. When I see workmanship like this, I wonder how I can call myself a carpenter. Very informative--Thanks again.
Greg in overcast connecticut
I don't know if you saw the "This Old House" program with their rehab of a burned-out Washington, DC rowhouse. In the final (or next to final) episode they made a curved handrail which caught my eye for two reasons.
First, they used alignment jigs very much like yours. Second, the blanks they were using to form up the curve had a bead and cove milled in adjacent strips so they interlocked, and in essence made the strips self-aligning.
Their project wasn't a spiral, of course, but it was curve that looked like it went around about 180 degrees.
The strips for the hand rail looked like something the contractor had purchased and not milled up himself, but they didn't explain to that level of detail.
I thought you might find the bead and cove alignment interesting.....
--Ken
The strips for the hand rail looked like something the contractor had purchased and not milled up himself, but they didn't explain to that level of detail. It's called bending rail and I use it on occasion. However it is available in only a few species of wood and is pretty limited as to how tight it can be bent. On a tight spiral such as the one in this thread commercially available bending rail would not work since the laminates need to be very thin. Also the rate of climb is so great the bead would most likely pop out of the groove at some point and pretty much scrap the rail. Over the years I have tried everything I can think of and this still works the best for me.