Gaps in long miters on exterior work
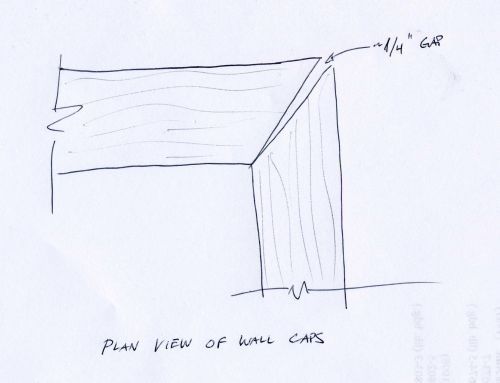
I’m replacing an exterior 1×8 wall cap that is in poor condition. The 1×8 is laid like a “plate”, with the 7-1/4″ face in the horizontal plane (see sketch below). At a 90-degree bend, a long miter is used on the wall cap to execute the change in direction.
The existing cap shows a large gap (about 1/4″) at the “outside” corner of the miter, whereas the “inside” corner is still tightly in contact. I know this has something to do with the differential shrinkage of wood across the grain as opposed to along the grain, but I don’t know exactly how to apply that knowledge and address the problem.
I want to do whatever is required to make this joint last a long time. I plan to upgrade the existing cap to 2×8 cedar with a slight peak machined into it in order to shed water. But what can I do to prevent a gap from occuring at the outside corner? Would gluing a spline into the miter help?
Thanks in advance for any tips.


Replies
Miters outside in most climates are going to be problematic and should be avoided when-ever possible.
When you say wall cap, what type of wall is it capping?
You're on the right approach switching from 1x to 2x IMO and a way to shed water is important.
I'd first suggest not mitering the corners together and come up with a way to shed water and butt them together.
Does it have to be Cedar? If not I would look at woods that are going to be more stable, Depending on what you can get locally I would look to use Cypress or Ipe.
If you have to miter the corners for some reason I'd pocket screw it from below and glue the corner with gorilla or similar glue.
When you say wall cap, what type of wall is it capping?
It's a low wall (i.e. parapet wall) near a porch.
I'm with you on avoiding miters where possible. I'd probably butt the joint, but since the profile will be peaked, a butt joint would be pretty difficult there.
Thanks for the other suggestions; luckily, I have some time to design this project, and I'll be able to think everything over carefully before actually doing the work.
For an interior application I would suggest using kiln-dried stock that has acclimated to the conditions in which it will live before cutting it. However for exterior, that miter will almost certainly open up due to cross-grain expansion and contraction. What about making a square corner block with a pyramid-beveled top? You could mill it out of thicker stock - laminated scraps actually - making it just a bit wider than the overall width of the cap. Match the side reveals on the topside with a slight reveal from the top peak of the cap's bevel to the bottom edge of the corner block's bevel. Follow me? Connections could be made with a good exterior glue - Titebond 3 - and stainless steel pocket screws. That would actually probably look quite nice given the application - just my opinion though.If you have to miter it, try to find the tightest-grained stock that you can find, let it dry, mill it, dry it some more, and seal the heck out of it - including the miters - before you install it. Glue it with epoxy or TB3 and run some long screws through the miter with plugs. That might hold up but it's a gamble.Hope that helps a bit,Nick
I'd use Azek, and glue the mitered corner.
I've had good (but limited) experiences with Azek. I capped the step walls in the photo below with 3/4" sheet Azek (the caps are about 21" wide). So far, they've performed great.
The walls on which I'll be working next are a bit different (they're nearly identical to the parapet walls around the covered porch in the picture). Maybe I could figure out a way to use Azek there, too.
Do you happen to know off the top of your head whether Azek is stocked in a 2x8 section?
View Image
As far as I know, Azek's not available in 1-1/2" thickness. But you might be able to use 2 layers of 3/4" Azek, and lap them in the corners, eliminating the miters.
What you've drawn is a joint that has swelled. those joints were probably tight when they were put up but it has swelled. If there is a dry season where you are you'll see that they will close back up. As the pieces swell and get wider the outside opens up. I had the opposite happen inside. The pieces dried and shrank so the inside of the joint opened up. The wood I used was vertical grain Doug fir.
If the wood is shrinking or swelling there is nothing you can do to stop this on a mitered joint. The forces involved will overwhelm any glue or spline you use.
I agree with Squash. Use the horizontal equivalent of plinth blocks. Old time trim carpenters used these to avoid miters.
View Image
Solar & Super-Insulated Healthy Homes
someone may have said this, but instead of perfect 45* miters, make them 46* or 47*. therefore there is a gap on the inside that no one sees. Then again I may be mis understanding the situation
hmmmm, your post perplexs me
I had to cap a similar wall condition on my home. I cut the miters so that they were a combination miter/scarf joint. Then glued, nailed, caulked. It's still nice and tight, but I was using 1 X 12 smartside trim, which I have found to be a very stable product.
DIA
Thanks to everyone for the ideas -- there are some good ones that I hadn't considered. Your input is greatly appreciated.
Squash: the transition block is a great idea and is up towards the top of the list in my mind right now!
complicate it---by using a shoulder miter
OR-a half lap miter
stephen