********************************************************************
The Posts below were copied from http://forums.taunton.com/tp-breaktime/messages?msg=69820.36 – I kinda felt like I had hijacked the thread so I moved it here:
********************************************************************
From: Jerry18 Apr-9 1:51 am
To: Dave45 (37 of 46)
69820.37 in reply to 69820.36
That is a beautiful top. I had thought about 3/4″ glass tops in my kitchen (sandblasted on the bottom) but worried about scratching. Glass does scratch very easily but as you said is suprisingly strong, even untempered.
I did make a fully cantilevered top for the 1/2 bath out of 3/4″ glass and although I never got a definitive answer, the general consensus of the experts was, it did not need to be tempered. So far, so good. Here’s a pic and ther’s more at: http://pg.photos.yahoo.com/ph/leccej/my_photos – in case anyone’s interested.
Jerry
Edited 4/9/2006 1:53 am ET by Jerry18
Edited 4/9/2006 1:54 am ET by Jerry18
– Attachments follow –
DCP_7165_xsx.JPG (ATTACHMENT BELOW)
45KB
#
From: wrudiger Apr-9 2:16 am
To: Dave45 (38 of 46)
69820.38 in reply to 69820.36
“Not tempered………(yeah, that surprised me too)”
One tap on the edge of a piece of tempered glass and it goes into hundreds of little pieces. The tempering (heat treating) causes the glass to go into a more crystaline pattern, which is stronger on the face (throw something at it and it’s likely to come back at ya) but more brittle on the edge because of the way the crystals align.
I probably totally botched the technical description, but I can vouch for the results!
#
From: Jerry18 Apr-9 2:33 am
To: wrudiger (39 of 46)
69820.39 in reply to 69820.38
Here’s what I found out about tempered glass (probobly not any more technically correct than your description).
The glass is heated and the the surface is cooled more quickly than the core putting the piece in perpetual compression, making it much stronger. They can vary the depth of the surface “skin” for different applications, but when the skin is compromised, by a deep scratch, by drilling, impact or chipping the edge, all that surface tension is immediately released and the piece sort of explodes. I guess it works on the same principle as pre-stressed or post-tensioned concrete.
Jerry
#
From: wrudiger Apr-9 2:51 am
To: Jerry18 (40 of 46)
69820.40 in reply to 69820.39
Good explanation – that makes sense. Thanks for the info!
#
From: Frankie Apr-9 10:20 am
To: Jerry18 (41 of 46)
69820.41 in reply to 69820.37
Great pics on your website Jerry. Very impressive.
You mentioned that you made the glass top for your 1/2 bath. Did you cut it to size and polish the edges yourself? I have never cut such a thick piece of glass. Same score and snap method?
How about the bowl used as the sink? Was it a bowl intended to be used as a sink with the proper detailed holeand indent for the drain basket? Or did you fabricate it out of a bowl you found?
I particularly like that you did your own stone fabrication. Which polisher and router do you have? I imagine you own as a stone router is not a typical rental item.
I do not mean to hijack this thread but it is rare for me to find someone who is doing this kind of fabrication without a big shop.
Frankie
There he goesï¿Â½one of God’s own prototypesï¿Â½a high powered mutant of some kind never even considered for mass production. Too weird to live and too rare to die.
ï¿Â½Hunter S. Thompson
from Fear And Loathing In Las Vegas
#
From: Jerry18 Apr-9 11:01 pm
To: Frankie (42 of 46)
69820.42 in reply to 69820.41
Dave,
I also hope I’m not hijacking your thread.
Frankie,
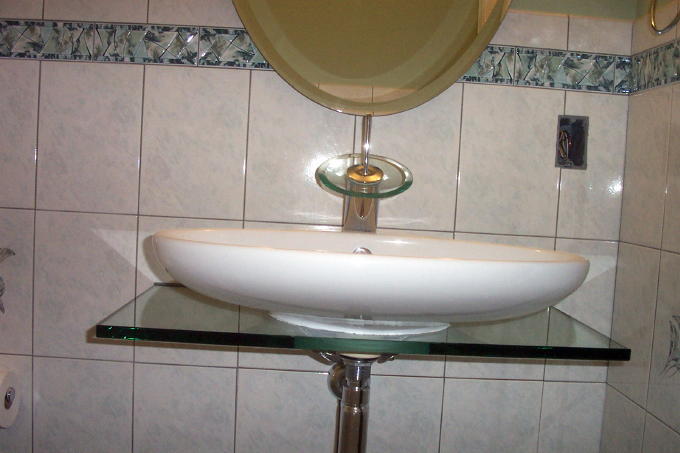
I believe the glass was 24″x30″x3/4″ and I bought it from a glass distributor for $55. It came cut to size with a 1/8″ bevel on all edges and polished. For another $450 (not a typo) they would have cut the 8″ diameter hole required for the sink, so that I did myself. I think you can see some of the pictures of me drilling the hole with an 8″ duct cap and some silicon carbide grit. The sink is made by Porcher (American Standard). The frame that supports the glass I welded up myself from some scrap.
That was my first atempt at granite and I really enjoyed it. The only power tool I bought specifically for the job was a Flex 1503 water fed polisher. I made the water attachment for the circular saw and built the work table/tranporter also from scrap. Of course I had to buy all the diamond blades, pads and wheels. For the 3/8″ roundover I used a diamond profile wheel made by Alpha that attaches to my polisher and most of the shaping was done with a 4-1/2″ grinder with a diamond blade.
If you have any questions, feel free to ask,
Jerry
#
From: Frankie Apr-10 12:30 pm
To: Jerry18 (43 of 46)
69820.43 in reply to 69820.42
I just went back and took a better look at your pics. I am even more impressed now – if that is even possible!
Your choice of toilets is great. I love the rear exhaust and having the toilet elevated off the floor. Was this for ease of mopping or is the bathroom in a basement/ on slab? I have gotten the in-wall tank design spec’d in the last 2 jobs I bid. Looks like it is becoming popular.
Getting back to the stone countertop fabfrication – I have a similar Flex unit. Mine is reddish rather than yellow and has a water feed. I was not aware a profiling bit could be used on this unit. Did you find it dificult to keep the bit parallel and square to the slab? Does it have a bearing component as a router bit may have so that it can “ride” a template?
The sink cutout must have been a challenge. Tell me how that went. I would think that any error in this area would be very apparent. How did you maintain a consistant profile?
BTW – nice design and fabrication on the transporter. Note to self: Learn to weld.
Thanks for the pics. I look forward to learning more.
Frankie
There he goesï¿Â½one of God’s own prototypesï¿Â½a high powered mutant of some kind never even considered for mass production. Too weird to live and too rare to die.
ï¿Â½Hunter S. Thompson
from Fear And Loathing In Las Vegas
#
From: Jerry18 7:29 am
To: Frankie (44 of 46)
69820.44 in reply to 69820.43
Sorry i didn’t get back to you sooner but I’ve been busy. I’ll post later today.
If noone object i may copy some of this to a new thread in “Constucuion Techniques”
Jerry
#
From: Frankie 8:31 am
To: Jerry18 (45 of 46)
69820.45 in reply to 69820.44
Cool.
No rush. Good things take time.
F
There he goesï¿Â½one of God’s own prototypesï¿Â½a high powered mutant of some kind never even considered for mass production. Too weird to live and too rare to die.
ï¿Â½Hunter S. Thompson
from Fear And Loathing In Las Vegas
#
From: draftingguy 12:15 pm
To: Jerry18 (46 of 46)
69820.46 in reply to 69820.37
The pictures in your album really illustrate the effort that went into that little half bath! Looks great…
Where did you get your lavatory? While I don’t think I have the time to go the glass countertop route, the sink would look good on the type of vanity I’m contemplating.
#


Replies
Thanks for the kind comments.
<<Your choice of toilets is great. I love the rear exhaust and having the toilet elevated off the floor. Was this for ease of mopping or is the bathroom in a basement/ on slab? I have gotten the in-wall tank design spec'd in the last 2 jobs I bid. Looks like it is becoming popular.>>
I was Skeptical at first but now I think it's the way to go - ease of cleaning is a big plus - much more sanitary, but it came to be because the wall it's hanging on had to move from it's planned location so that the drain ended up in the wall. It's on a slab with radiant floors, so moving the drain was not a pleasant solution. Installation was simple and the unit was suprisingly inexpensive.
Jerry
Should be addressed to: Frankie
<<Getting back to the stone countertop fabfrication - I have a similar Flex unit. Mine is reddish rather than yellow and has a water feed. I was not aware a profiling bit could be used on this unit. Did you find it dificult to keep the bit parallel and square to the slab? Does it have a bearing component as a router bit may have so that it can "ride" a template?>>
Mine is red and has a water feed too. To drill the glass top I used a cheap Harbor Frieght variable speed 8" sander/polisher because I could get the speed down real slow for the 8" dia. bit and I needed it to polish the paint on my son's 'vette anyway.
Here's a link to the Alpha bit I used (on the Flex). http://www.granitecitytool.com/showitem.cfm?itemnum=585.0&catnum=0 Very easy to use - almost foolproof.
<<The sink cutout must have been a challenge. Tell me how that went. I would think that any error in this area would be very apparent. How did you maintain a consistant profile?>>
That was a bit of a challenge. I was always working to a luan template so the profile wasn't a problem. I used a combination of all my tools here. I used the circ saw to rough it out, Then the 4-1/2" grinder with a 4" diamond blade to get closer, then a 2" zero clearance wheel to make it nice then polished with the 4" diamond pads on either a 3" backer or a 4" flex backer. If you look at the attached pictures you can see what happens when you not paying attention for a second. Both pics are the same area and it is very difficult to see the repair. I can tell you my heart sank when it happened; I thought for sure I'd be ordering another slab.
Jerry
Edited 4/11/2006 11:21 pm ET by Jerry18
Thanks again for the great replies. Lots of important info. Nice job repairing the edge. You are an artist.I checked out the profile bit you used. $168!!! WoW! I understand how the edge guide works, but tell me more about the depth guide. Is there only one depth and it is the flat portion of the bit which rides the top of the slab? The slab doesn't get scratched?BTW, what did you use to repair and fill the butt seams? I use material from Akemi. They have a epoxy based and polyester/ acrylic based fillers. Great stuff.Thanks again for sharing.FrankieThere he goes—one of God's own prototypes—a high powered mutant of some kind never even considered for mass production. Too weird to live and too rare to die.—Hunter S. Thompson
from Fear And Loathing In Las Vegas
Here's a link to an earlier post where I went into a little detail on the process; thought you might be interested. Really I'm just too lazy to type it again :-)http://forums.taunton.com/tp-breaktime/messages?msg=70782.29I bought mine about a year ago. I think I bought it from Granite City and paid about $120. Diamond tooling isn't cheap but that would be a pretty steep increase in a year, allthough; everything else has gone up this past year. It basically works like a bottom bearing router bit except that there is a top bearing too. The top plastic plate is attached with a bearing and rides on the face of the slab so it maintains the height. It doesn't spin (only the diamond covered part in the middle does) so the face doesn't get scratched. They make a few different profiles and now even have some that ride a template to make radiused corners.The seams were filled with knife grade Akemi epoxy that I mixed in a few batches with varying amounts of granite dust to color match the slab. Then I alternated from each batch along the seam so you wouldn't see a line of one color. I was happy that they came out better than most seams I've seen but I think they can be improved on. I want to try to top polish them but I have to buy more tooling -$$$$.Jerry
<<Where did you get your lavatory? While I don't think I have the time to go the glass countertop route, the sink would look good on the type of vanity I'm contemplating.>>
http://www.porcher-us.com/Default.asp
It's the sink shown on the home page (with their optional vanity). It's called the Kyomi. The glass top was actually very easy and took very little time. The metal frame in the wall that supports it was the harder part. (It seems like it's always the stuff you don't see that takes the most time!) So if you like the glass but didn't feel the need to cantilever it, you could support it in a number of different ways that would be simpler.
Jerry