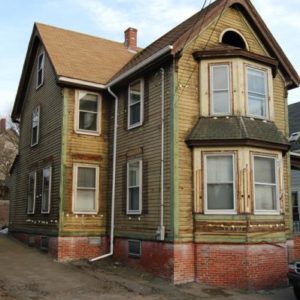
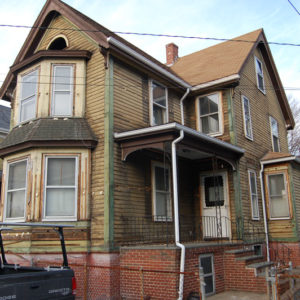
We recently had asbestos and aluminum siding removed from our 1880’s house in Salem, MA. During the process of installing the siding, insulation was blown in and historic details were removed. A lot of the damage is to the horns of the sills (especially around the bay windows) as well as all the 2-4″ holes that were hogged for the insulation.
So now I’m struggling with the repair or replace dilemma and when I add rot and nail holes/splits to the equation, I’m thinking replace in most cases.
Since the material is not standard dimensional lumber, how do go about replacing? I can easily create 1 3/4″ nosing for a single sill, but what can I do to replace pieces around the front 2 story bay windows? Where can I get 7/8″ material for the corner boards and 2″ material for the water table?
Do I need to look for salvage, or do I need to buy 5/4 or 8/4 and plane it down to the appropriate thickness in each case?
I’m not in a historic district, but I want to maintain the house’s historic character. I’m more of a woodworker than a carpenter and I’m certainly not a preservationist, but this is my first attempt at restoration and I don’t want to do it any disservice.
Thanks for reading; I’m looking forward to hearing from the pros…
Greg


Replies
Hey Greg....welcome to BT.
Ya know....someday, that aluminum and asbestos you tore off is gonna be considered "historic materials". ; )
In all seriousness though....gorgeous house!
Got any up close shots of the areas of concern?
Might help to make suggestions if we could see exactlty what we're trying to replicate.
J. D. Reynolds
Home Improvements
Pp, Qq
If you have a small mill shop in town, you might want to talk to them about milling replacement pieces. If you can, take some in to them and tell them how many feet you need.
Tom Silva once showed a method of replacing window sill sections for exactly this reason. Horns had been cut off for vinyl siding.
Anyway, he worked out a method using a router and jig to cut off a section of the sill, then put a replacement section in place that included the horns. I don't recall the specifics of how it was attached though. You might find it on the This Old House Web site.
Greg,
I applaud your interest in maintaining/restoring your home's original character.
In my own restorations, I have dealt with the "dimensional dilema" in several ways.
Salvaged materials are great, and are usually high-quality wood, but dealing with existing layers of paint and imbedded nails is time-consuming and problematic. So, I usually either saw/plane standard dimensional lumber to reduce the size, or glue-up standard lumber to increase the thickness.
A local sawmill could provide boards that you could mill or have milled to your required dimensions. That may well be the best approach, but I've had good results with my methods, using off-the-shelf material from the local big box stores and lumber yards.
For watertables, I screw-and-glue (PL Premium construction adhesive) stock to the backside of standard "2-by" lumber, then rip the appropriate profile. I've used the same technique for window sills. Sometimes it's only necessary to attach a couple of strips to the backside of standard lumber to bring the visible face of the trim out to the correct "thickness."
For decorative 3-inch-thick Italianate brackets, I have glued-up (West System epoxy) four layers of standard "1-by" (3/4-inch thick) stock.
For 1 1/4-inch-thick Greek Revival trim boards, I usually plane down "2-by" lumber. Whenever I'm at the big box stores, I look for close-grained, straight-grain boards and stockpile them for future use. But even for case-by-case use, it's usually possible to find some quality lumber if you dig through the stacks.
For 1-inch trim, you can use 5/4 boards, but try to stay away from flat-sawn pieces. Even when prime-painted on all sides, these tend to not be very stable (prone to cupping). Some lumber yards sell "rough sawn" 1 x 12s, which are planed only on one side, and actually measure about 7/8-inch thick. These tend to be quite "knotty," but a single board often includes some beautiful straight-grain along the edges, good for 4-inch boards. The 7/8-inch thickness also is handy for many restoration uses.
When I have to make secure attachements from the face of hefty trim boards, I countersink deck screws, and fill the holes with epoxy putty.
Allen
"Whenever I'm at the big box stores, I look for close-grained, straight-grain boards and stockpile them for future use."Was in HD the other day getting 2x material, and I found 4 absolutely clear tight grained df 2x4x8's. Straight as an arrow & absolutely beautiful...and it looked like heartwood from and old growth tree. You bet I scooped 'em up.There are days what ain't, but by God sometimes there are those days what is.
"... and it looked like heartwood from an old growth tree ..."
I had to re-create a number of window sash in my house. At HD I found some 2-by-4s that sound exactly like what you came across. Dense, straight-grain heartwood. Not truly old-growth, of course, but definitely "slow-growth," and old enough to have several inches of heartwood.
Now I can point to my 9-over-6 sash (with antique cylinder glass panes), and say, "They're made out of two-by-fours from Home Depot!"
The heartwood also has a very distinct and pleasant smell when it's sawn. Very different from the sapwood. To be honest, I don't know whether the wood is pine, spruce or hemlock, but the window sash are holding up beautifully.
The OP's house is really lovely. Lots of character and wonderful details. I hope he posts photos as the restoration progresses.
Allen
gee greg, that sure has good proportions and feel to it!
How 'bout some close ups of the areas of concern?
Welcome to the
Taunton University of Knowledge FHB Campus at Breaktime.
where ...
Excellence is its own reward!
Adkins -
Find a local mill shop that buys lumber in quantity - have them mill to size. A good shop can prime with alkyd primer too - even tint the primer. I highly recommend spanish cedar if you can afford it.
Jeff
Greg - welcome here. Lots of old house guys here. I'd say make the pieces yourself; no one else will make the piece you have imagined in your mind and described to them.
Also, adjust your woodworking accuracy mindset - 1/32" is NOT required on the outside of a house!
Forrest - old house guy
Greg,Yes, welcome. The more old-house guys the merrier. Like Forrest said, make your own parts. Find a supplier that sells 8/4 (1.75"). Sometimes you can still get 6/4 (1.25") too, but I've been unable to get that lately.If you have to, glue stuff up. A fein Multi-master is indispensable for chiseling the old stuff out to a recognizable shape in order to glue in your patches.It's not rocket science. Just good old fashioned whittlin' most of the time. Just like when we were kids.Steve
I will hit on a subject the others haven't mentioned.
Your insulation may be the old urea formaldehyde foam from what I see in the photos.
Might want to check to see how much it has shrunk if it is.
Maybe a thermal Scan of the house.
Hate to see you do a bunch of work only to have to open stuff up to get a good insulation job.
...and while you're at it, can you do anything about those cheesy looking wrought iron porch supports? That can't be historically correct.
CaliforniaRemodelingContractor.com
Wow, thanks for all the help, guys. I'm getting the idea about the lumber and the more work I do, the more I can see that working on an old place like this takes more ingenuity than carpentry in the classical sense.
As for the insulation, it is urea formaldehyde. What you're seeing is foam that I've used to plug the holes. After that, I covered them with tarpaper for until I get around to replacing the siding. The horsehair plaster is coming off on the inside and we're reinsulating and putting up blueboard and veneer plaster.
The wrought iron/brick/bluestone porch is of course not original and was added I believe around the time of the aluminum siding. The porch roof and flattened arches are original - the rest will be replaced with appropriate posts, railings, and decking.
Greg
Edited 3/18/2008 6:03 pm ET by adkins
Here are some problem area photos - corner boards, water table, bay window, and window hood shadow. As you can see, some of the better areas may as well be replaced due to the holes from the blown in insulation. Thus my original question as to how best to go about obtaining these materials...
How good a quality and expenses are you wanting to be involved with on the house?
Reason asked is there are a number of ways to tighten it up.
Peach full,easy feelin'.
"How good a quality and expenses are you wanting to be involved with on the house?"
Whatever it takes within reason...
But seriously, since I'll be doing the work myself, I'm willing to spend the time it takes to do it right. Unfortunately (or maybe fortunately), I have more money right now than time. What do you suggest, rez?
g
Depends on what you are wanting for the finished product. Many variables between the words getting by, ok, renovation and restoration.
The place is a diamond in the rough but I love the things even with the aluminum storms so that's besides the point.
Your post rings of attentiveness to detail and with your leaning toward historical character and being a woodworker it looks like you'll be happier the closer to accuracy you can get.
It'll be a labor of love and the finish product will show that.
My suggestions are limited as there are many more experienced on this board to better advise you than I.
But I will speak and say make salvage your friend and learn the power of epoxy if you haven't already.
If you can locate clapboards close enough to the originals then perhaps one wall can be replaced and those claps salvage for areas of need.
If you haven't seen madscientist's Victorian reno in Cal on here then it's a recommended read . 86536.1
And don't be afraid to hire some help so you'll not be getting swamped in tinytown details and emerge to daylight 5 years later. snorK*
Cheers
View Image
View Image
Peach full,easy feelin'.
Edited 3/19/2008 1:58 pm ET by rez
If I was him, I'd get the gutter changed out..that's a lot of upper roof dumping onto the porch roof, what with the porch only having one outlet there.
But then again, maybe not. Just looks funny to me.Spheramid Enterprises Architectural Woodworks
"Success is not spontaneous combustion, you have to set yourself on Fire"
Are you planning on stripping and painting the Clapboard? I bought a paint shaver for my house, board and batten, but it was really designed for clapboard. Go to http://www.oldhousejournal.com as a resource.
I'm thinking that the claps are just going to get replaced. There are a few good ones here and there, but even those are between boards with the holes hogged in for the insulation. I think my time would be better spent on the whole job done right.
That's a great tool, though my town is leery about anything other than hand scraping lead paint...
g
Much of what I see in your photos is old and tired, but definitely salvagable and doesn't necessarily need to be replaced. I'd recommend that you consider learning more about the various epoxy systems for wood restoration.
Hi RedfordHenry,
Can you elaborate based on my close ups? I'm familiar with West System for marine use, but (on the bays for example) the damaged sills seem to necessitate that I rebuild portions of the facade. Are you suggesting that I can make some of the said repairs in place?
I will definitely dig deeper here...
Thanks,Greg
Abatron epoxies.There are others, but you won't go wrong with this. They are designed to work outside, and accept the movement of wood.One hint. If you are building up with the putty, apply some consolidant first to the wood. The putty will bond better.http://www.abatron.com/home002.htm
Oh yeah, you'll have to replace some wood here and there. Hard to say without poking a chisel into it, but the sill horns and some of the ledges on the bay where large chunks of wood were hacked off are obvious candidates.
You don't necessarily need to excavate down to the sheathing, if the remaining wood isn't to punky, it can be "consolidated" with hardener, and then new wood added on to get back to the original profiles.
As you already know, it can be challenging to get existing wood chiseled back to smooth, planar surfaces for glue-up purposes, but you can come close enough for epoxy to be effective. Plus, epoxy repairs for simple checking and splitting, like on your corner boards, is a piece of cake. Once you get your surfaces repaired and primed, routine paint and occasional maintance should give many more good years of service.
There's no magic to finding the profiles that you need, just start with the best quality 6/4 or 8/4 pine (or cedar) stock that you can find. You can probably do most of the work with a table saw.
I find this sort of work is very time consuming, but highly satisfying.
I also see epoxy in your future.
I see there used to be shutters on your house. I reccomend you get some of this stuff:
http://abatron.com/cgi-bin/shop/index.cgi?cart_id=9195231.22308&pid=146
Will save you having to replace a lot of the wood.
The epoxies mentioned are good, and they certainly have their uses, but they don't come cheap. The time to use them is when something is more difficult to replace with fresh wood because of where it is, or the cost or difficulty in milling a replacement, or when you simply don't want to lose the original fabric, like timeworn mouldings that wouldn't look the same replaced wholesale with new stock. Rarely is epoxy cheaper when you have easy access to an easily removed, easily duplicated piece of non-unique wood. It's good for filling in missing chunks of intricate pieces: for instance if the elaborate window hoods were still there but damaged in parts, and repairing rotted sections of stuff that would be too difficult to just scarf in some fresh wood.What really helps is just to come to the mindset that you can whittle a piece for just about anything. Just need to get some wood, buy something thick enough, or glue it up to the thickness you need, and learn the basic carpentry techniques for cutting out the bad stuff and piecing in the new. You will need a fein multimaster to cut stuff out of those window sills and piece fresh stuff in. With it you can plunge right in like a vibrating chisel and cut stuff out cleanly and accurately.Also, just because something is worn and checked looking, doesn't mean it should be replaced. No wood you buy is going to be as durable as the 130-year-old wood that's there now. It was slower growth lumber with higher density. If it still sheds water properly, you would be better served to leave it there. Add a little epoxy to smooth things out if the weather-checking bothers you, but any wood you replace things with will be inferior to what's there.Mantra: Re-use, Repair, Restore,,,last worst option is to replace.Best of luck to you,Steve
Greg,
I have an 1890s house that we removed the aluminum siding on. You have to be creative sometimes in order to replace historic details using standard materials. The advice you are getting is good. I had a water table to replace that measured over 1.5" in on both sides. I ended cutting cedar 4x4s down on a table saw. Not easy but it worked alright.
Glad to see I'm not the only one with the old house disease.
Hi,
if you're in Somerville, you happen to be right down the street from Andersen McQuaid, which as I recall is one of the biggest moulding and trim places in the Boston area - really unusual stuff too. They would most likely have what you're looking for, dimensions and profiles.
I was only there once myself, but for what it's worth I'm 99% sure that was one of the Ask TOH stops in one of their shows involving trim.
They're off one of the side-streets near Alewife T Station. They have a web site: http://www.andersonmcquaid.com
-- I'd also hope that a furniture making guy would stay away from any wood from a big box store in favor of a local hardwoods supplier. There's just no compare. Let me know if you need a few names.