How to Attach Door to Rough Opening?
I am going to install this door into my garage this weekend, will size the rough opening properly, and attach a 1 x pressure treated to the bottom where it will sit on the concrete floor, but I’m curious if anybody has a good idea how to attach it to the rough opening?
My Plan:
Using 3″ stainless steel deck screws, drill and countersink holes in the jamb that will be on the exterior, shim, and screw into the rough opening. Then I will plug the holes with oak plugs. I will also do the door top jamb to stiffen it up, going to the top of the rough opening in the same way.
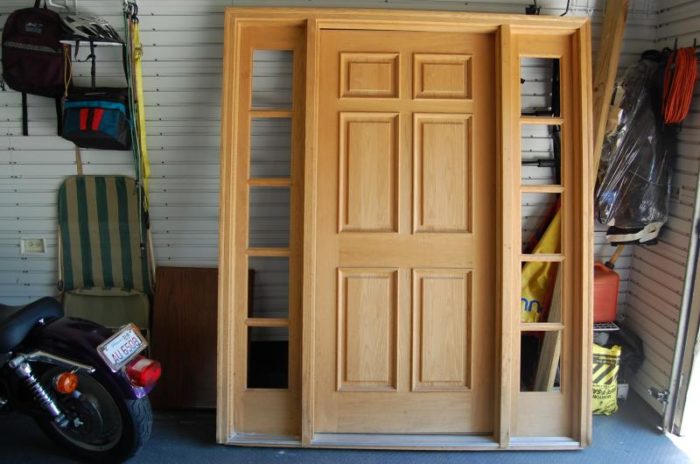
On the inside of the door (where the cherry wood is) there is no room to screw through the jamb.
Never installed a door with side lights, so figured I would ask.
You can see with the trim on the sidelights, really no room to put any fastners there….I could remove the trim (which doesn’t look easy without messing it up) and put a few screws there)….
The jam is cheery on the inside and oak on the outside….
Here is where I was going to drill and put screws in, on the exterior of the door on the vertical and top jambs.


Replies
I've only done one stain-finish door with lites. I used these instructions, but my jam was already made, so I removed the lites to match. I used ply spacers to come as close to the RO as I could before shimming, and used SS screws.
http://www.belentrydoors.com/installation.html#sidelite
Phill Giles
The Unionville Woodwright
Thanks, that confirms what I was going to do....I'll just put the screws in from the exterior part of the jam and cover them up with 1/2" oak plugs.
Be careful with the pressure treated 1X's on the bottom. You really shouldn't use it unless you need to raise the frame up off the floor for some reason. That aluminum sill is designed to rest right on the concrete slab with a waterproof caulking underneath.
Even a PT piece of wood will rot eventually. If you just HAVE to have something underneath the sill, you might consider PVC trim or something else that would be impervious to moisture.
"Roger Staubach for President"
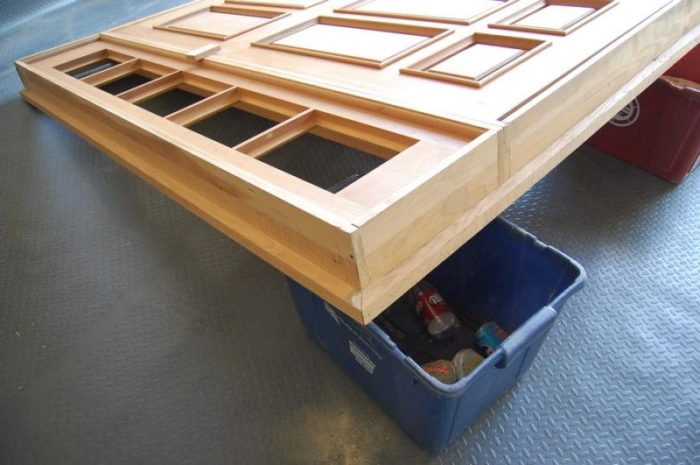
Thanks....the door came with a piece of 1x on the bottom that appears to be holding the jambs together, making it more stiff, but it did not extend the whole way from front to back of the threshold. It stopped about 2" short of the interior.....
Maybe it's just for shipping and I should put the door on the concrete floor. I will look into it.....the concrete is raised, so hopefully it won't hold any water.....
View Image
Is that where you are going to install that oak veneered door ?
In the gable end of a garage with full exposure and no overhangs or protection ?
carpenter in transition
The joker that lived at the house before me built the garage, with no overhang. Once I get the door in, I will build an overhang and side it so it looks "pimped out".....
The lumber on the bottom is for shipping,remove it.
mike
That is just shipping stock on the bottomIsolate the baootom by sealing it first and then use an adhesive caulk like Geocel to set it in on the concrete after a dry rin to be sure things are right.Be sure to level the concrete base first.
Welcome to the Taunton University of Knowledge FHB Campus at Breaktime. where ... Excellence is its own reward!
I did one of those a few years ago.
I used a drill/countersink/counterbore bit so that I could put screws between the sidelight frames and the door jamb (both sides).
I did the same for screws going through the sidelights into the rough framing.
I then used a plug cutter in a scrap of the brickmold trim to get some plugs to cover the screw heads.
But be very careful -- if you do it this way, and find a dimensional (or square/plumb)problem late in the game, it's gonna cost you.
Support our Troops. Bring them home. Now. And pray that at least some of the buildings in the green zone have flat roofs, with a stairway.
I'd be surprised if the small molding on the inside next to the windows are glued on. I'd carefully pry them off and set screws through the jamb on the interior side, replace the trim, done. A few trimhead screws on the brickmold probably isn't a bad idea as well.
I'll second that the door looks very exposed and will weather much quicker. Of course if you don't mind the maintenance it's no big deal.
Beer was created so carpenters wouldn't rule the world.
Paul,
If it were me, I'd try prying off the stops so you could run your screws in a blind location. One the stops are out, you might find that the sidelites are not nailed directly into the jamb; if that's the case, you could temporarily remove them, too, and have even more area to run the screws.
I'm not sure about running screws into the head of the rough opening. I was taught to avoid placing shims at the door head -- if the header sags, it will push the jamb down and bind the door.
I'm not sure what protocol is with a door with sidelites, however. Maybe you could find a happy medium by just shimming over the sidelits and not the door itself.
Thanks for the advice.....last night I sanded the exterior and stained it (wow, is it going to be nice).....there is really no way except the way I described based on the construction, everything is nailed together and won't come apart easily.
I have always put nails into the header to make the jamb more stiff.....this door weighs a TON.....I will put some fastners into the header on this one also considering the width of the door.
I will post pics when I am done, my $300 door has turned into a $750 door with everything it needed!
I sanded, stained and am in the process of putting clear on it prior to installation.
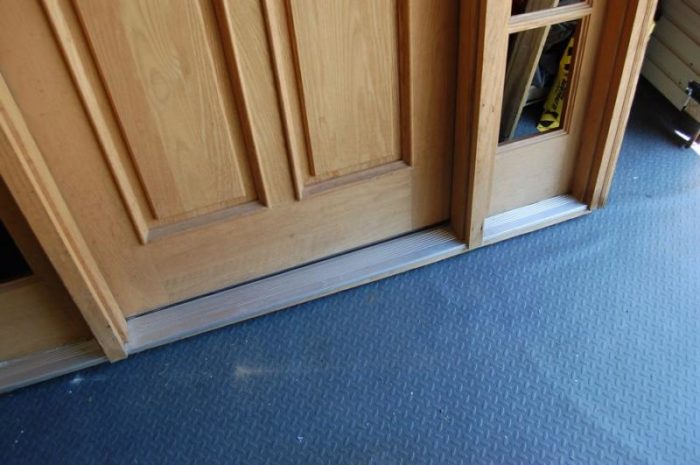
I ended up ripping a 1x and using door caulk, attached it to the bottom with screws. My threshold is not perfectly level, I will level it out with shims I cut from pressure treated lumber and caulk it once it's all set.
View ImageView ImageView ImageHere is where it will sit, so I would rather have a piece of pressure treated lumber that sits on the concrete than the bottom of the door.View Image
Paul ,
I believe the bottom pressure treat should stay if it came PT from the factory . I have seen doors done both ways, shipping cleats and the Aluminum sill sits on the floor or with the PT and that sitting on the floor. I always drill and put fasteners into the floor just to each side of the door frame itself (in the sidelight area). Over time the door bottom will get kicked, hit, the door slammed enough times to move the door bottom if you don't is my experience.
"Poor is not the person who has too little, but the person who craves more."...Seneca
The door will not be stiff enough without the pressure treated lumber, it will stay!
:-)
I don't have time for a long explantiion, but have a look at the sketch i did up for you.. this may be a good option.. what do you think..
So you are saying to put a long strip of wood (cleat) in the rough opening vertically, put another one on the door jamb, then once it's installed, screw another one from the inside of the opening into both that were installed?
Hmmmm....sounds good, but I don't think I have the design in my head, was your image a top view?
I need to shim the door to make it square also.....
I'm still thinking drilling the jam, countersinking the holes and putting plugs in afterwards.
Thanks for the info, if you can expand, that would be great!
Paul
Hey There, Yes the drawing was a top view. This techinque is a hybrid of a method used when building Log homes.. as windows need to have some 'give' to move vertically as the logs settle and shrink. I suppose you could mount the door side cleats to 1/2 ply and plumb and square that before snapping in the door and attaching the second cleat..
Anyhoo, just thought i would throw out my idea while your still in the planning stages.. would hate to see you tear apart that beautiful door :)
The P.T. cleat is for shipping, the cleat you installed will now create a 3/4" gap at the bottom of your door, below the brickmold, since it(the brickmold) won't reach to the bottom of the R.O.
your door will be 3/4" of an inch to high, creating a additional "step up" where there should be none, other than the thickness of the threshold itself.
You have also installed that cleat in the position where you would normally install the toe kick board after the door is installed, that is the area of the threshold that projects out beyond the R.O.
I would also be sure you seal the bottoms of the brickmold from weather, they are not even stained in your photo, left like that, they will wick moisture and rot the brickmold(and eventually the sidelight frames) rather quickly.
Follow Piffens advice and level your slab before you set the door, don't use shims under the door. As you already stated yourself, the door is very heavy, shims could allow the frame to sag over time, if not placed properly, and will raise your door even higher off the floor than the 3/4"
you don't want this project to be your Waterloo!
Geoff
I installed the door a few weeks ago.....thanks for everybody's advice.....
What I did Wrong
I did not level the cement floor after removing the old door, so I had to set it on shims before screwing it into the jamb, which ultimately supported the door perfectly.
I put the 3/4" piece of lumber under the door. If I would of leveled the opening first, I could of done without it. Now it's 3/4" more to step over. Oh well, live and learn.
What I did Right
Installed the door square and plumb, it opens, stays opens, and closes like a door should.....so nice.
I attached it with deck screws in the jamb, then plugged over them.
I replace the brick molding with 5/4" x 4 1/2" new brick mold, looks sooo nice.
What the old Owner did Wrong
He did not build a wall of a new garage plumb.....the top of the rough opening is about 5/8" off as compared to the bottom of the rough opening. The garage can't be more than 10-15 years old. Everything in my house is this way.
And Now the Pictures:
View ImageView ImageView ImageView ImageView ImageView ImageView ImageView ImageView ImageView ImageView ImageView ImageView ImageView Image
Paul,
that is a nice looking door!
One comment, oops, two,......that's 5/4 x5 flat casing(Oak) not brickmold...
second, you don't seem to have any drip cap on the top of the door, water will get in at the top and ruin your door faster than you think....I would suggest you mark the top edge of the header casing, remove said casing piece, cut the siding just above that line you marked on it, then either buy or fabricate a piece of drip cap that will go behind the siding(T1-11?), out over the top of the casing and then have a slight bend down the face of the casing,(if you are familiar with drip cap you should understand what I'm describing, if you're not familiar w/it check it out at the lumber yard), now re-install the casing,......also you should run a bead of caulk down the outside edge of each side casing, so no water can enter where you added the plywood (or T1-11?) shims behind the casing. NO caulking at the head casing!! It will leak!!! Drip cap only!
That is a sweet looking door!
Geoff
Here's an example of what I mean by an attractive yet very functional window head.
View Image
In Paul's case, I think it would be even better to build a stoop to protect the entire door, but that's a different topic. ;)
I thought that the trim around an exterior door was called brick mold....oh well, yes, I used 5/4" stock and ripped it down to 4 1/2", the proportions worked out very nicely!
I have trimmed all the doors I have replaced in my house in the same way using 1 x 4 Maple. It's nice to have it carry outside also.
I think I will just get some kind of ugly metal cap for the door for the time being......
I will put an overhang on my garage, either a 18" or so extension of the roof, and/or something right over the door. I did a gut rehab (well, it was mine and I did the GC and some work) on a 2-flat in my town last year, but myself and another guy built new overhangs over the two entry doors......I might do something like this but with a little more detail. Just not yet.....
View ImageView Image
Paul,
Your door looks great!
Be sure to heed Geoff's advice and get some sort of drip cap (or at least a piece of Z-flashing) to protect the door head.
Here's an image of a drip cap so you know what we're talking about. Note that since you have the plywood siding, you'll really have to get a piece of metal flashing to transition between the the siding and the cap. The drip cap in the picture has a little upward-facing "lip" that makes it self flashing. However, it's designed primarily for horizontal siding -- you'd never get the wood lip to fit up under the plywood.
View Image
Ragnar,
that wasn't the drip cap I was refering to, I meant the aluminum (or better yet lead!) type......I hate the wooden type like you are showing, I could never understand using wood to flash wood.........I think my hatred of that type of drip stems from seeing way to many of them rot before their time, but also from having worked on a lot of older homes that had metal flashings on top of the wooden decorative caps, which makes way more sense to me than just relying on the wood drip cap itself.
That door does look great!!
Geoff
that wasn't the drip cap I was refering to...
Ooops. Sorry to put words in your mouth!
I meant the aluminum (or better yet lead!) type.....
Then I think you're talking about flashings. Drip caps, by definition, are a "cap" or "crown" over the window and door heads.
I hate the wooden type like you are showing, I could never understand using wood to flash wood..
When you think about it, any sort of wood siding is "using wood to flash wood"; it's just the "fishscale" method to keep water out. The drip cap I posted works on the same principle. The one shown will work just fine provided that it is milled from a suitable piece of lumber and provided that it is maintained.
With that said, I think the best solution is to put an inconspicuous metal flashing on top of an attractive door head. That way, the metal can take the brunt of the weather, but there is still opportunity to create a beautiful crown over the windows and doors.
Edited 6/12/2007 12:39 am ET by Ragnar17
Geoffrey gave you the best advise. Take that extra piece of wood off the bottom. Go to your lumberyard and get a PVC door pan which goes down on the concrete before you install the door. Yes, the concrete must be leveled first. The PVC pan will protect your door and your brickmold will be the correct length. Silicone the pan to the concrete, then silicone or caulk on top before installing the door.