After talking with the HO and the plumber, it looks like the best thing will be to demo a large portion of the second floor in the bathroom so the drain pipes can be replaced. We think there may be a leak in the toiler drain.
Ceramic tile over inch and a half mortar bed over wood subfloor. I would like to try to reuse the subfloor.
Angle grinder w/diamond blade and a good shop vac?
Whenever you are asked if you can do a job, tell’em “Certainly, I can!” Then get busy and find out how to do it. T. Roosevelt


Replies
Id use one of those cheap pnuematic muffler cutting tools.We use it alot to pop old tiles off.It would also probably do the job on the mud bed . Its not too violent(ie sledge hammers) so u wont be rockin the rest of the house , lite and easy to control .And if ur lucky they put something on the subfloor before pouring the mud bed.
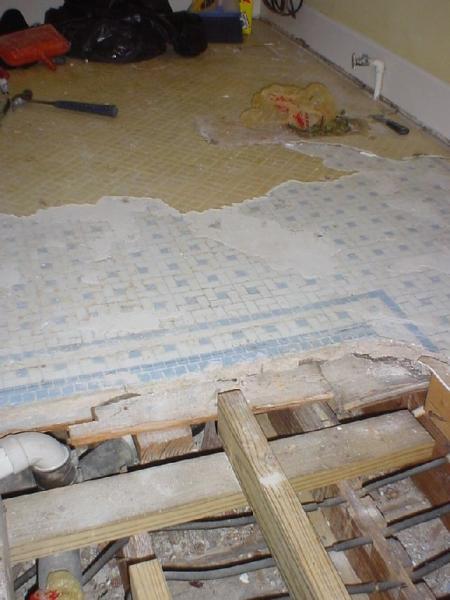
that one pictue show a rubber clamp on Pvc. that could be problem , clamp loosen up.
Brownie, that band-aid actually connects the shower vent to the cast iron y. Then there is a lead p-trap off the other part of the y to the shower drain. The whole reason for busting up the floor is so the plumber can re-do the drain lines.
Whenever you are asked if you can do a job, tell'em "Certainly, I can!" Then get busy and find out how to do it. T. Roosevelt
You've got good access to an edge, so shove a flat bar between the wood and mud, and just pry it up. That might well break it up easily. If not, try a chisel in the rotary hammer instead of the flat bar. Once the tile and mortar are lifted a little from the wood, a smack with a small sledge will shatter them easily. The old wood subfloor might not be all that terriffic no matter how carefully you demo the mud bed.
-- J.S.
That floor looks exactly like my 1929 bathroom floor here in Massacusetts. There was no subfloor. Cleats were nailed between the joists. The cleats supported boards that held the first of two mud beds. I just broke it up into chunks with a hammer drill and and hammer and pried it up. I didn't want to hit it too hard because I didn't want to crack the plaster ceiling downstairs. Slow going, but not too hard.
Al Mollitor, Sharon MA
Just what I was going to say...the original bathroom floor in my 1913 house (tile in a mud bed) was supported with cleats nailed between the joists, and no subfloor. It came out the same way, done slow and carefully to avoid dropping chunks through the kitchen ceiling below.
Edited 11/23/2004 8:48 pm ET by Stuart
I think you're on the right track with the diamond blade. The tile is harder to cut than the mud. If you cut it into large chunks (several square feet each) you can usually get a pry bar under them and take it out in clean pieces. Sometimes I bring a 6' digging bar into the house for demo like this. Nothing worse than breaking the whole thing into dust.
C-4
hard hat.
Hit the area to be remove light with a small sledge hammer first and pry against't a 2x6 that you can lay flat on 2 beam's.
Is easier that it look's
YCF Dino
Edited 11/23/2004 10:19 pm ET by YCFriend
"I would like to try to reuse the subfloor."
Why?
Jeff
Buck Construction
Artistry in Carpentry
Pgh, PA
Why not?
EricI Love A Hand That Meets My Own,
With A Hold That Causes Some Sensation.
because generally when I'd stripping something down and starting fresh ...
I like to actually start fresh.
things just work better that way ...
I've never saved a buck by trying to save a buck.
Jeff Buck Construction
Artistry in Carpentry
Pgh, PA
Oh I don't know. Partly because the edges of the boards are under the walls and would be difficult to remove and replace. Partly cuz the boards are working now, so why trash them needlessly. I was trying to avoid a suggesstion like "rip it all up with a chainsaw" ... I was looking for a more precise demolition method. If they have to go, that's fine.
Whenever you are asked if you can do a job, tell'em "Certainly, I can!" Then get busy and find out how to do it. T. Roosevelt
there's all sorta things going on underneath that subfloor that I'd want to take a look at ... especially in an old bath room.
Just circular saw thru the subfloor ... lift ... add blocking to support where needed ...
or if the old joists line up right ... split the joist with the cut line ...
check and fix what needs be ...
it's an old bath right? One sheet of 3/4 ply and you're off to a good start.
Great time to level and flatten the old floor too ...
take a look at any potential plumbing problems ...
find some hidden j boxes .... loose wires .... bags of money ....
Jeff Buck Construction
Artistry in Carpentry
Pgh, PA
find some hidden j boxes .... loose wires .... bags of money ....
So far in this floor I have fouind an old keyhole saw ... it has a very skinny pointed Disston blade in good condition, and a wooden handle with a nice curl pattern. Also found cloth covered wires that the HO thinks may still be in use ... they go right next to the drain under the shower. I did not have any kind of voltage tester so I don't knoe if they are hot.
Whenever you are asked if you can do a job, tell'em "Certainly, I can!" Then get busy and find out how to do it. T. Roosevelt
"I did not have any kind of voltage tester so I don't knoe if they are hot."
Ed, git yerself one 'o them newfangled current sensors... about the size of a fat sharpie marker and they tell you if there's current present without having to touch any of the conductors. Just hold it near the wire, switch, plug, whatever. No construction guy should be without one.
According to my Greenlee...my metal roof is 'hot'..I don't trust them, granted a false positive is better than a false negative..I always use a analog (needle) reader..my helper torched a new pair of Kliens last yr. (mine) and he had used the Greenlee to ascertain no juice..that was one false negative too many. Granted, he may not have used the on switch..he was kinda green himself.
Spheramid Enterprises Architectural Woodworks
Repairs, Remodeling, Restorations.
I've had great luck with mine, bought at an electrical supplier, a nice version that sparkies use. I have never had it read false positive or negative, it's always right, and I've saved myself (and other guys nearby who did not have one in their bags) a lot of jolts.
I suppose a metal roof might read as hot, but it's hard to imagine cirumstances where you'd be checkin' that. I'll go up on the barn and see if mine's hot.
Probably FHB should do an article on meters and testers.There are basically four different types:-- Direct contact voltage meters/sensors-- Non-contact voltage sensors-- Clamp-on current meters-- Circuit tracersEach has it's use and each can be misused or misinterpreted.A direct contact meter is one with probe wires that you connect to the supposed hot wire and a supposed ground. This is generally the most accurate/reliable, if you can achieve good contact with the "hot" and have a reliable ground.You can get "burned" (literally) if the ground you use isn't good, or if the connectionns you make with the probes aren't good.Also, keep in mind that there are low-impedance and high-impedance meters/sensors. A low-impedance meter/sensor (an incandescent light bulb or old-fashioned mechanical meter) will never read a "false hot" (like reading the tin roof as "hot"), but will not always inform you if the wire is "hot" due to leakage (a carboned switch, etc), even though that leakage is sufficient to represent a shock hazard.A high-impedance meter/sensor (neon tester or most newer digital meters) will detect most cases of hazardous leakage (in addition to detecting a "normal" hot), but can also produce a bogus "hot" reading when a wire (or tin roof) is "floating" -- ungrounded and not connected to any other wiring. This is due to "hum pickup" -- the capacitive pickup of electrostatic fields from "live" wires in the vicinity.The non-contact voltage sensor makes use of the above "hum pickup" phenomenon to detect "live" wires nearby. Unfortunately, it cannot easily distinguish between a "live" wire and a "floating" one.A clamp-on current meter measures current, not voltage. Usually the meter also incorporates probes for voltage measurement. Note that a wire can be "live" without any current flowing through it, so the clamp-on meter is useless for distinguishing live vs dead circuits. Also note that the clamp-on meter must be clamped around a SINGLE wire (not a hot/neutral pair), and will read the same on a give current-using circuit whether clamped around the "hot" or the corresponding neutral.A circuit tracer generally consists of two parts, a small transmitter that is typically plugged into an outlet, and a separate receiver that us used to trace the wires of the circuit. The most common use for this is to identify the breaker that controls a particular circuit, but is can (under reasonably good conditions) be used to trace the circuit in a wall, etc.This device, of course, does not directly tell you whether a circuit is hot, but, if you have the transmitter plugged into an outlet and you trip a breaker and the transmitter is observed to stop functioning, it's fairly safe to assume that the outlet has been disconnected, unless there's some really squirrelly wiring around.That's probably the biggest thing to look out for: Squirrelly wiring. Any wiring that incorporates K&T, or which has been obvously modified by an unskilled homeowner, or which shows signs of "shortcuts" of any kind should be suspected of having hazardous "features". This can include multiple fuses feeding a single circuit, multiple circuits in a single box, wires color-coded incorrectly, neutrals crossed between circuits, etc. Expect the worst.
Those non-contact sensors are also more sensitive at higher frequencies -- at least the first one I had was. It was sold by the Texas Association of Broadcasters, and was supposed to light up near radio or TV transmitters.
-- J.S.
I have one of those sharpie testers, but didn't have it on site that day. i will definately check the wires before getting too close.
Whenever you are asked if you can do a job, tell'em "Certainly, I can!" Then get busy and find out how to do it. T. Roosevelt
a toe kick saw will get you right up to the walls if you have to take them out.
how much time are you going to spend trying to save them though?
It's done. I used an old circ saw with a diamond dry-cut blade and a shop vac, cut the floor into manageable pieces (about 18" square) and pried them l;oose with a flat bar. Actually worked pretty well. Most of the time the saw cut through all but the last 1/8" of the mortar bed (I had raised the blade), and most of the time it cut the wire mesh, so the pieces snapped out easily. Then I had the fun of toting them through the house and down the stairs.
The floor boards are set on cleats nailed to the sides of the floor joists, so the tops of the joists are flush with the tops of the boards. Then there was a layer of tar paper and 1-1/2" of mortar, then the tile. (Left the camera home today, I'll post a pic Monday.) I'll go back with two layers of 3/4" ply.
The wires were indeed hot. I used a pen-type tester. I tried it first in a wall outlet, and it showed hot when I stuck the end into the slot. When I tested the wires, it sounded off when I was 6" away from the wires.
Whenever you are asked if you can do a job, tell'em "Certainly, I can!" Then get busy and find out how to do it. T. Roosevelt
Of course, if the floor is sound in other areas, and you don't want to reclaim the depth of the mud bed, it might be easier/better to leave it be and rip the ceiling out below instead.
Taking out the ceiling is certainly an option, and it will need repairs from the leaking anyway. But the plumber says it's easier for him to work on the floor than it is to work overhead, and half the area is exposed already.
The ceiling is 1x8-ish boards, covered with either plaster or sheetrock. It look like most of the house was plaster at one time, and almost all of the walls have been overlayed with 1/4" sheetrock.
The bathroom is already not useable, so a little more mess is not an issue. To work from the ceiling, parts of the kitchen and pantry would be disrupted.
Whenever you are asked if you can do a job, tell'em "Certainly, I can!" Then get busy and find out how to do it. T. Roosevelt
Edited 11/24/2004 1:47 pm ET by Ed Hilton
I just ripped out a kitchen a couple weeks ago that had countertop tile like that...Tile on top of a think bed of mortar. It had chicken wire staple to the plywood. Granted, it was a much smaller scale that what you are talking about, but I just ripped it up with a bar and my hammer. Small sledge might come in handy too. I was able to reasonably contain the mess, but you will definately want your shop vac working and probably a dust mask.
Young, poor, and eager to learn