FHB Logo Facebook LinkedIn Email Pinterest Twitter X Instagram Tiktok YouTube Plus Icon Close Icon Navigation Search Icon Navigation Search Icon Arrow Down Icon Video Guide Icon Article Guide Icon Modal Close Icon Guide Search Icon Skip to content
Subscribe
Log In
  • How-To
  • Design
  • Tools & Materials
  • Restoration
  • Videos
  • Blogs
  • Forum
  • Magazine
  • Members
  • FHB House
  • Podcast
Log In

Discussion Forum

Discussion Forum

Kickout detail question

DustinT | Posted in Construction Techniques on October 10, 2009 08:22am

This is a 4 year old house I have been doing some REPAIRS on.  Yes, that’s right, repairs.  It has pine fingerjointed trim (UGH), and the siding is hardiplank. 

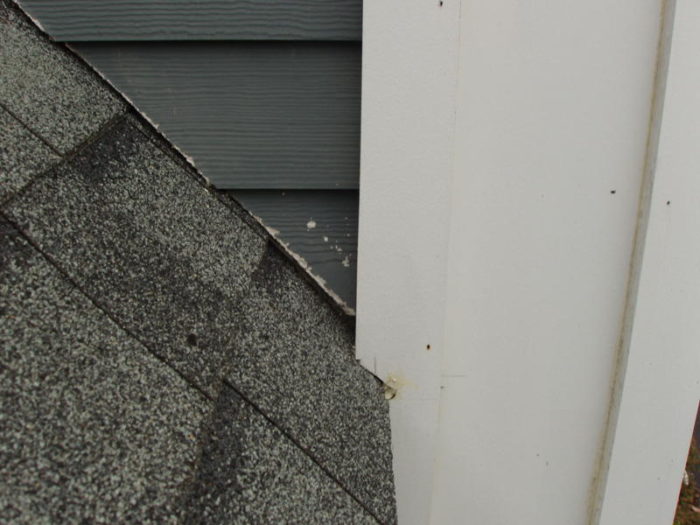
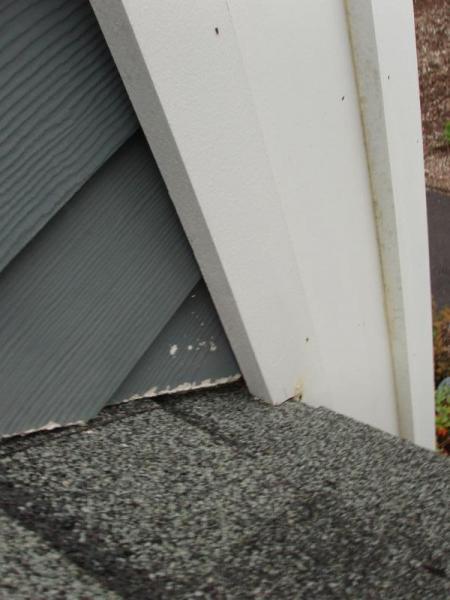
I have seen this detail a couple of times.  The garage jogs back from the main house, but not enough for the eve overhang to avoid breaking into the cornerboards.  There is no kickout, and I plan on adding one.  But to make things a lil bit complicated, there is a 1×3 that is nailed onto the 1×8 corner that serves as another diverter, kicking more water behind the cornerboard and siding.

So the question of the hour is, what sort of detail can I apply in order to put a kickout in?  I may try to form a piece of lead that tucks under the siding and roofing, but laps over the corner.  Thoughts?

Thanks,

Dustin

Reply

Replies

  1. Piffin | Oct 10, 2009 08:51pm | #1

    What a nightmare! Use a siding that won't rot and then detail it to suck all the run-off into the wall behind it!

    Either a lead wrap to divert the water out or slice right through the corner to let the water continue with flashing out.

    Did that last make sense?
    Me neither

    Whjat I mean is - if doing it new, the corner bd would have a ut at that eacve the same pitch as the roof hitting it, then the lead would run over it all the way out to outside of corner bd. Then the upper piece of CB added on up to soffit.

    That looks ugly tho sometimes, but is the best I know for keeping water out.


    Welcome to the
    Taunton University of
    Knowledge FHB Campus at Breaktime.
     where ...
    Excellence is its own reward!

    1. User avater
      Ted W. | Oct 10, 2009 09:34pm | #2

      Makes sense to me, but I'm not sure that's and especailly good thing. =)~ Ted W ~

      Cheap Tools! - MyToolbox.netSee my work at TedsCarpentry.com

    2. DustinT | Oct 10, 2009 11:47pm | #3

      I catch your drift perfectly Piff.  I think I will study the pics some more and see what I can conjure up, think I am on the right track.  If anyone else has any input or has dealt with similar, please comment!

      Thanks,

      Dustin

      1. florida | Oct 11, 2009 12:25am | #4

        I think I'd cut the trim off flush with the roof and then up 3 inches to make room for the water. The kickout would go to the outside edge of the trim before turning. It sure is a lousy detail.

        1. jimblodgett | Oct 11, 2009 02:09am | #5

          Florida said "It sure is a lousy detail."


          Clearly not professionally done.


          I don't like the way that siding sits so close to the comp roof, either.  What's gonna keep water from wicking up those cut (and unpainted) edges of siding?


          Freakin' hacks.  I bet the GC (or "owner/builder") didn't even notice. 


          1. DustinT | Oct 11, 2009 03:22am | #6

            Jim, that is the biggest worry for me with the fc end cuts being unsealed.  I have taken a drywall trowel, shoved it between siding and roof, and tryed to "squeegee" as much solid body stain as I could onto the end cuts.  I let the HO know I didn't like the detail and would try to rectify as best as I could.  After only 4 years, there is already delamination and erosion occurring. 

            I know the guy who built the place.  I have done finish work for him a bunch of times.  I mentioned that the hardi was supposed to have an inch clearance off rooflines to him once, at another home, and he said "Oh yeah, well I don't like the look of seeing the flashing." 

            As much as I hate doing stuff like this, I am glad to be working.

            Dustin

          2. jimblodgett | Oct 11, 2009 04:19am | #7

            Did they use step flashing at least? 

          3. DustinT | Oct 11, 2009 04:20am | #8

            Yeah there is step, thank goodness.

            Dustin

          4. jimblodgett | Oct 11, 2009 04:22am | #9

            4x4x12? Is that what you guys use thereabouts? 

          5. DustinT | Oct 11, 2009 08:23pm | #15

            That is common practice, yes.

          6. jimblodgett | Oct 11, 2009 08:51pm | #16

            If you get lucky, maybe whoever flashed that wall knew enough to only fasten the flashing to the roof, not the wall.  If that's the case you could pretty easilly strip off the shingles against the wall, slide all the flashing up or down the slope (whichever is easier) and run a skillsaw with a fiber cement blade up that rake to give that siding enough clearance, then reposition the flashing and shingles.

            If it were my house that's what I'd try.  A few hours work, but certainly a good investment in the long run. 

            Of course, you could deal with that disasterous corner board/step flashing detail while you're at it.

            As for that knucklehead who's more interested in how something looks than weather it performs - that's a pretty good definition of "gross negligence" in my opinion.  I don't hold it against someone who doesn't know any better, but if someone says "yeah, but I don't like the way that would look" and then chooses a detail like that...I guess I'd have a hard time respecting their opinion about anything.

            Good luck, man.  I really think what's there is correctable, but of course, the homeowner has to believe it, too. 

          7. jimAKAblue | Oct 12, 2009 04:30am | #17

            2" gaps might be appropriate in wet climates like Seattle. They are absolutely unnecessary in the more arid regions of the southwest.Have you ever left any hardi siding closer than 2" to the shingles?

          8. MikeSmith | Oct 12, 2009 04:52am | #18

            hardie has two things they are promoting.... both will never happen on my job... first,....the 2" gap.... we keep our siding 3/4" off the roofing.... all siding... including hardie

            the second is hardie eliminating caulking at the butt joints and trim.... makes for a very unfinished look... again... it will never happen on our jobs... i'll switch mfr's if hardie  pushes the issueMike Hussein Smith Rhode Island : Design / Build / Repair / Restore

          9. jimAKAblue | Oct 12, 2009 04:58am | #19

            Welcome to the world of hacks. Who woulda thought....? Ironically, I worked in a sub that had me leave the proper Hardi spacing for caulk. They did it on one job and when the regional boss saw it he demanded that we eliminate the gap and the caulk on all subsequent jobs. Of course, I had no objection to that. After all, what good would that expensive drainage plane be without a few water entry points?

          10. jimblodgett | Oct 12, 2009 05:47am | #20

            "Have you ever left any hardi siding closer than 2" to the shingles?"

            Yeah, we usually lay a 2x4 flat on the shingles and side to that, so I guess we're a strong 1+1/2".  I like to use a 1x or 5/4x trim board at the bottom of that angled siding sometimes, too, with the fiber cement above that.  We did that on a very high dormer last year that I doubt will get much maintanance over the years. 

            It's not just for the sake of the siding.  It also leaves enough room for a second layer of shingles without altering the siding 20 years from now.   

          11. jimAKAblue | Oct 12, 2009 04:50pm | #21

            Welcome to the world of hacks LOL!

          12. User avater
            Dinosaur | Oct 11, 2009 08:03am | #13

            Take a jamb saw to that Hardi and get it up off the shingles. Follow the cut right through the 1x on the cornerboard. Turn the lower part of the 1x back into the fascia.

            Dinosaur

            How now, Mighty Sauron, that thou art not broughtlow by this? For thine evil pales before that whichfoolish men call Justice....

          13. User avater
            jonblakemore | Oct 11, 2009 04:57am | #11

            I mentioned that the hardi was supposed to have an inch clearance off rooflines to him once...Actually, it's worse than you think. Hardie is now calling for 2". That seems excessive to me, but it's better than down on the shingles like that installer did.http://www.jameshardie.com/pdf/install/install_plank_north.pdf 

            Jon Blakemore RappahannockINC.com Fredericksburg, VA

          14. jimAKAblue | Oct 11, 2009 06:46am | #12

            Hardi was calling for 2" back about ten years ago. I had to do it once. Of course, no one was happy and we had to go back and add a trim board to cover up the decidedly large "gap". So, the facts are this: anyone NOT LEAVING A 2" GAP IS A HACK! I admit, I am a hack because we only had to leave that 2" gap once...after that the inspector forgot about that detail.

  2. MikeSmith | Oct 11, 2009 04:39am | #10

    that's quite a hack job....

    View Image

    Mike Hussein Smith Rhode Island : Design / Build / Repair / Restore
  3. AitchKay | Oct 11, 2009 05:39pm | #14

    One way to make a kicker is shown on p. 88 of FHB #200 (Jan. '09).

    It doesn't provide for adequate overlap at the top edge, though -- a couple more folds are needed so that the kicker can slip behind the step flashing, flat to the wall, instead of just being jammed up to the step flashing lap at a 45º angle.

    Hard to describe -- a shallow v-shaped fold is needed, what would be called a tuck or a pleat, maybe, in sewing.

    AitchKay

Log in or create an account to post a comment.

Sign up Log in

Become a member and get full access to FineHomebuilding.com

Video Shorts

Categories

  • Business
  • Code Questions
  • Construction Techniques
  • Energy, Heating & Insulation
  • General Discussion
  • Help/Work Wanted
  • Photo Gallery
  • Reader Classified
  • Tools for Home Building

Discussion Forum

Recent Posts and Replies

  • |
  • |
  • |
  • |
  • |
  • |
View More Create Post

Up Next

Video Shorts

Featured Story

An Easier Method for Mitered Head Casings

Making mitered head casings is a breeze with this simple system.

Featured Video

Builder’s Advocate: An Interview With Viewrail

Learn more about affordable, modern floating stairs, from design to manufacturing to installation.

Related Stories

  • Fire-Resistant Landscaping and Home Design Details
  • A New Approach to Foundations
  • A Closer Look at Smart Water-Leak Detection Systems
  • Guest Suite With a Garden House

Highlights

Fine Homebuilding All Access
Fine Homebuilding Podcast
Tool Tech
Plus, get an extra 20% off with code GIFT20

"I have learned so much thanks to the searchable articles on the FHB website. I can confidently say that I expect to be a life-long subscriber." - M.K.

Get home building tips, offers, and expert advice in your inbox

Signing you up...

This site is protected by reCAPTCHA and the Google Privacy Policy and Terms of Service apply.
See all newsletters
See all newsletters

Fine Homebuilding Magazine

  • Issue 332 - July 2025
    • Custom Built-ins With Job-Site Tools
    • Fight House Fires Through Design
    • Making the Move to Multifamily
  • Issue 331 - June 2025
    • A More Resilient Roof
    • Tool Test: You Need a Drywall Sander
    • Ducted vs. Ductless Heat Pumps
  • Issue 330 - April/May 2025
    • Deck Details for Durability
    • FAQs on HPWHs
    • 10 Tips for a Long-Lasting Paint Job
  • Issue 329 - Feb/Mar 2025
    • Smart Foundation for a Small Addition
    • A Kominka Comes West
    • Making Small Kitchens Work
  • Issue 328 - Dec/Jan 2024
    • How a Pro Replaces Columns
    • Passive House 3.0
    • Tool Test: Compact Line Lasers

Fine Home Building

Newsletter Sign-up

  • Fine Homebuilding

    Home building tips, offers, and expert advice in your inbox.

  • Green Building Advisor

    Building science and energy efficiency advice, plus special offers, in your inbox.

  • Old House Journal

    Repair, renovation, and restoration tips, plus special offers, in your inbox.

Signing you up...

This site is protected by reCAPTCHA and the Google Privacy Policy and Terms of Service apply.
See all newsletters

Follow

  • Fine Homebuilding

    Dig into cutting-edge approaches and decades of proven solutions with total access to our experts and tradespeople.

    Start Free Trial Now
    • Facebook
    • Instagram
    • X
    • LinkedIn
  • GBA Prime

    Get instant access to the latest developments in green building, research, and reports from the field.

    Start Free Trial Now
    • Facebook
    • YouTube
  • Old House Journal

    Learn how to restore, repair, update, and decorate your home.

    Subscribe Now
    • Facebook
    • Instagram
    • X

Membership & Magazine

  • Online Archive
  • Start Free Trial
  • Magazine Subscription
  • Magazine Renewal
  • Gift a Subscription
  • Customer Support
  • Privacy Preferences
  • About
  • Contact
  • Advertise
  • Careers
  • Terms of Use
  • Site Map
  • Do not sell or share my information
  • Privacy Policy
  • Accessibility
  • California Privacy Rights

© 2025 Active Interest Media. All rights reserved.

Fine Homebuilding receives a commission for items purchased through links on this site, including Amazon Associates and other affiliate advertising programs.

X
X
This is a dialog window which overlays the main content of the page. The modal window is a 'site map' of the most critical areas of the site. Pressing the Escape (ESC) button will close the modal and bring you back to where you were on the page.

Main Menu

  • How-To
  • Design
  • Tools & Materials
  • Video
  • Blogs
  • Forum
  • Project Guides
  • Reader Projects
  • Magazine
  • Members
  • FHB House

Podcasts

  • FHB Podcast
  • ProTalk

Webinars

  • Upcoming and On-Demand

Podcasts

  • FHB Podcast
  • ProTalk

Webinars

  • Upcoming and On-Demand

Popular Topics

  • Kitchens
  • Business
  • Bedrooms
  • Roofs
  • Architecture and Design
  • Green Building
  • Decks
  • Framing
  • Safety
  • Remodeling
  • Bathrooms
  • Windows
  • Tilework
  • Ceilings
  • HVAC

Magazine

  • Current Issue
  • Past Issues
  • Magazine Index
  • Subscribe
  • Online Archive
  • Author Guidelines

All Access

  • Member Home
  • Start Free Trial
  • Gift Membership

Online Learning

  • Courses
  • Project Guides
  • Reader Projects
  • Podcast

More

  • FHB Ambassadors
  • FHB House
  • Customer Support

Account

  • Log In
  • Join

Newsletter

Get home building tips, offers, and expert advice in your inbox

Signing you up...

This site is protected by reCAPTCHA and the Google Privacy Policy and Terms of Service apply.
See all newsletters
See all newsletters

Follow

  • X
  • YouTube
  • instagram
  • facebook
  • pinterest
  • Tiktok

Join All Access

Become a member and get instant access to thousands of videos, how-tos, tool reviews, and design features.

Start Your Free Trial

Subscribe

FHB Magazine

Start your subscription today and save up to 70%

Subscribe

We hope you’ve enjoyed your free articles. To keep reading, become a member today.

Get complete site access to expert advice, how-to videos, Code Check, and more, plus the print magazine.

Start your FREE trial

Already a member? Log in