Help!
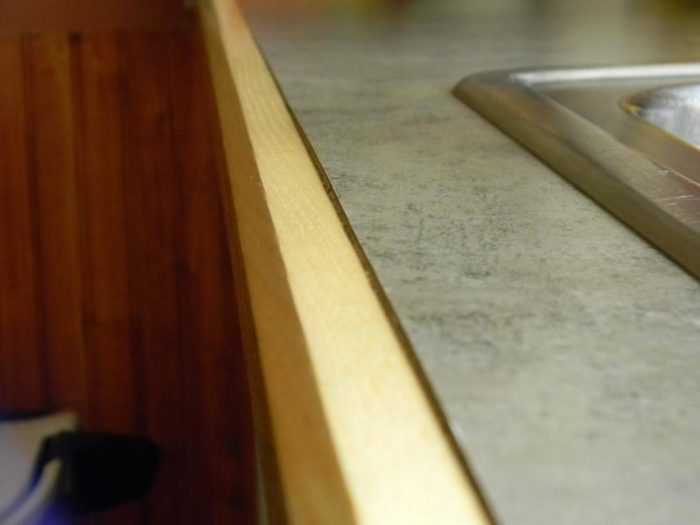
I recently installed a formica counter in my kitchen. Built the top myself gluing the formica to a piece of 3/4″ high-pressure particle board and faced the front of the counter with a length of ash. I epoxy glued the ash to the front of the counter along with some pocket screws to hold in place. The problem is that water got between the ash and the laminate in the area in front of the sink and now a section of the laminate has buckled up due to expansion of the particle wood beneath. What to do?? It has buckled up about 1/8″ and extends back by about an inch. I tried clamping down the laminate and it will go down to a certain extent but the wood has expanded due to water and when I release the clamp the laminate bows up again. In hindsight I should have probably coated the face of the particle board with poly to seal it before installing the ash trim. Anyone have any suggestions?
Thanks.
Frank


Replies
similar experience
I had a similar problem, but along the back side of my sink where the caulking failed. Mine was a lot worse than yours. Here's what worked for me.
First of all, I don't see how you can do anything effective without removing the wood edging. If you're trying to avoid that, I don't know what to do.
Take off the edging. Dry out particle board really well. Then get a really big C-clamp, or clamps. Soak particle board down thoroughly with a wood hardener, e.g., MinWax Wood Hardener. Make sure you get enough on to soak down into all the separated area. Then clamp the snot out of it. Use really heavy cauls if you need to spread the clamping force some. Then add more hardener until the particle board won't soak it up any longer.
I would use the wood hardener as a sealant, also, to seal the rest of the area around the sink. I think you'd probably have a better chance of getting a strong glue joint with the hardener.
The damaged area on my countertop was predominately under the lip of the sink, so it was easier to hide. That said, tho', when I took the clamps off, you would have had to put a straight edge on the countertop to see that it wasn't perfectly flat. I also used the hardener to seal an exposed split in the laminate that I created when taking my sink out. Completely waterproof, so far, but only about 1 yr since the repair was done.
Was away for a few days and just now got to read all the responses.
I did find the wood hardener at HD this afternoon. This looks like my easiest fix if I can get some of the expanded particlebrd removed from beneath the laminate. As I said before, I epoxied the ash trim to the front so removing it will probably not be fun. I would assume the wood hardener will not affect the laminate in any way but I do have a leftover piece (the cut-out section for the sink) so I can conduct some experiments first. Thanks for the advice!
Frank
Somebody posted a link a while back that gave a thorough discussion of the wood hardeners. Can't find it in my bookmarks right now. Think it was probably over at Breaktime Classic. Anyway, IIRC, some of the hardeners, like MinWax, are styrene based. (May set up to become polystyrenes). No solvents involved in their composition that would attack laminate. I'll keep looking for the link. If I find it, I'll post.
Ed
Lesson learned file
For your lessons learned file:
The edging attaches to the substrate first. Then the formica goes over both and seals the joint, then you rout the edge profile on the edging, (which trims back the formica), while leaving the joint covered.
Or, use something like mdo, or hdo plywood for the substrate that is water proof.
Joints that can weep water will. Substrates that can swell will.
I would think hard on Dan's idea of making a feature area......
But be sure to take care of the NEW seams you will make with the feature-whether it be any solid surface.
Perhaps a bump out in the area would further suggest it's planned effect. Do the sink base too if you can bring that into a pleasing complement to the design.
I don't know that I've ever repaired a water swelled laminate job, but I followed a countertop company that did just was suggested. It had the fancy lay on beveled laminate edging. The damage was located at the sink centered seam. When they had finished, it looked good. They did it in place. It lasted.
I've seamed several in those area and never had a problem. You are at the mercy of many strangers that don't make it a habit of theirs to wipe up spills. They think it impregnable.
Best of luck.
Another option would be a piece of stainless stuck under the front edge of the sink and somehow brought forward to a nice edge. You could dig out the laminate under it and no one would ever know.
It occurs to me that another option would be to neatly cut away the trim piece, then somehow hog out the OSB from the front edge (maybe using a MultiMaster), allowing the laminate to be pushed back down. Fill the hogged-out space with epoxy (like you were doing rot repair), then replace the trim piece.
Not easybut,...
There is no easy fix. Remove the sink and counter top completely.
You built and installed it so you know what your doing.
Rip the ash noseing off, taking the smallest bite out of the p-lam you can, That gets the edgeing out of the way and give you a clean front to work with. Use a heat gun to release the contact cement enough to lift it off of the swelled area. Sand and scape the area down to level. Be very carefull with that step because you are in the weakest area of the top, where it is very narrow. Once you are satisfied the bad spot is fixed, reglue and reset the p-lam.
Before you reapply the edging you need to plane or belt sand the face edge of the top and particle boad. The most common mistake in applying any edging to a laminated top is assuming that the flush trim bit cuts the p-lam exactly flush with the oarticle board and it is smooth. They don't ! They transfer every bump and saw mark in the particle board to the p-lam edge. Those little irregularities become the weep points for water to get under or behind the p-lam. Make that joint smooth and your new edging, or reworked old edgein will go back on "tight and right".
Since you expoxied the edge on the first time, you will want to do the same agian. Just be more liberal with the epoxy. A nice squeeze out bead both top and bottom will help insure a moisture proof joint.
Never thought about using the heat gun to melt the laminate glue to release it. Good tip.
What I did before I routed the front edge to not transmit all the bumps was to install a few layers of tape to the edge to make it as smooth as possible.
I really hate to remove the counter but your right, I built it and I should be able to remove it and fix it.
Still can't stop kicking myself about this one. I'm always so careful to the point of being anal and now this!
Thanks for the posts so far.
While you've got it apart, coat the bottom of the substrate with varnish or some such to seal it from moisture, both in the area of the sink, and above the dishwasher.
A layer of tape works sometimes, but all flush cutting bits are not created equal. Most leave a 1/64" or smaller lip overhanging the substrate. It is that little edge you file off when building a normal top with a laminated edge. When you are doing an applied edge that litte burr can be a problem beause it hold the edge off the substrate just that tiny amount. It is a water trap and capilary action does the rest.
I understand the desire to hide the phenolic edge of the p-lam top with an applied edgeing. I build Wilson Art Perma-Edge tops. The one with the fancy bevel laminate or wooden edges applied. WA built that line of products based on hiding that ugly phenolic top edge line. One of the main points stressed durring the perma edge certification course was planing that top edge burr down to exactly flush with the substrate. They were even marketing a special line of tools to use with thier system. Fortunately for me they were very similar to tools I already had in my shop, so I didn't get sucked into buying anything they had, But the point was well made about the care that must taken with applied edges.
For those that want to do an applied edge with the laminate on top of it I recommend color core laminates. They have the color running all the way through the laminate, and if you don't burn them when routing a decorative edge, you virtually eleminate that ugly phenolic edge line.
One additional warning for p-lam around sinks. Beware the bottom of the slab. If it isn't sealed and gets wet it will cause the same swelling problems. It just takes longer to show up and by the time it does the damage is ussually to extensive to manage for a decent repair.