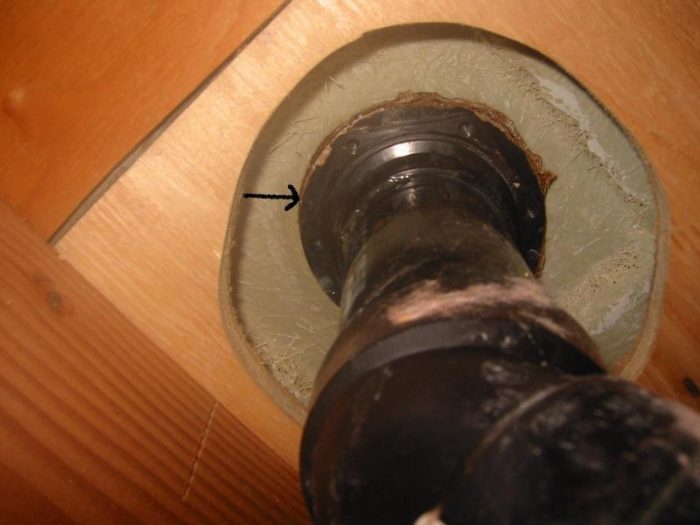
I have a built in fiberglass shower unit. I have a small leak at the interface between the plumbing and the shower unit. (see the photo and the arrow) I have no idea how to stop the leak. I’m not sure putting the wrench to that ABS nut is going to do it, and even if it did I can’t fit a wrench in there. It will be a disaster if I have to remove the unit. Any advice?


Replies
Plumbers putty behind the cover...
I could not see yer pic to well, but I bet that is all ya knead.
Spheramid Enterprises Architectural Woodworks
These are the days of miracles and wonders, this is a long distance call...........
Why look here?
Was the shower drain basket already installed in the F/G unit when purchased? Or was it installed by the plumber?
I usually see a large hex nut on the bottom of a shower drain assembly. Your pic shows only some sort of flange with "nubbins" in place if a hex nut. Secondly it appears that the ABS pipes are cemented directly to the drain assembly and the drain assembly possibly glued directly to the shower unit (?).
I would offer two options....
Plumbers epoxy putty, (made by Duro )available in the adhesive and glue departments of a good hardware or building center. It is a two part epoxy putty ribbon, usually colored gray and yellow. As you kneed the the ribbon together the the colors mix, when the ball of epoxy turns a uniform green then it is thoroughly mixed.
Clean the bottom of the shower drain assembly.
Form/roll the mixed epoxy putty into a a long enough "rope" to go around the underside of the shower drain assembly. Press it into place and massage it into the assembly to make sure it bonds to all the perimeter.....allow it to set.
Also, Is the bottom of the shower stall properly supported to prevent the flexing of the pan and fracture of the drain seal. Many shower mfg. require that the base of the shower be set in a concrete slurry to prevent such flexing?.
Second option.....cut the drain line above the elbow far enough to allow for a coupling to be glued back in. Remove the shower drain assembly....understanding that it has not ben cemented/glued to the shower stall pan. Purchase a new shower drain that has a neopreme gasket in its center to accept the short section of ABS pipe with the coupling. Available at a building supply center.
Install the new drain assembly with bath grade clear silicone, snug the nut (do not over tighten) and allow to set for several hours to firm up. Then coat the ABS replacement nipple with silicone and slide it into the gasket in the center of the drain assembly. Couple/glue the nipple to the existing drain line and support with pipe strap.
From in the shower stall tighten the expansion ring against the neopreme gasket that has received the new ABS nipple. Snap in place the new chrome drain plate cover. Voila!
...............Iron Helix
I put this shower in myself. The basket was attached to the unit when I bought it. I made sure the shower base was supported when I installed it 7 years ago. Thanks for the tip, I think I will try the epoxy putty.
If this is the type of shower base fitting that has the neopreme insert I would remove that inner nut, clean with denatured alcohol and caulk on the ledge of that insert with clear silicone rubber, trying to push the silicone down on both sides of the insert, then replace the nut. I would clean with denatured alcohol and a little brush then try forcing silicone rubber under the drain flange on top, also in the area of the leak underneath - just get a blob there then try to work it in with your finger. If you decide to try this, I would advise after cleaning to mask everywhere you don't need the silicone rubber so you can both vigorously force it in, and avoid cleanup - the stuff is a mess to clean up. I'm not saying this is any better than any of the other suggestions - just a method I have had success with.