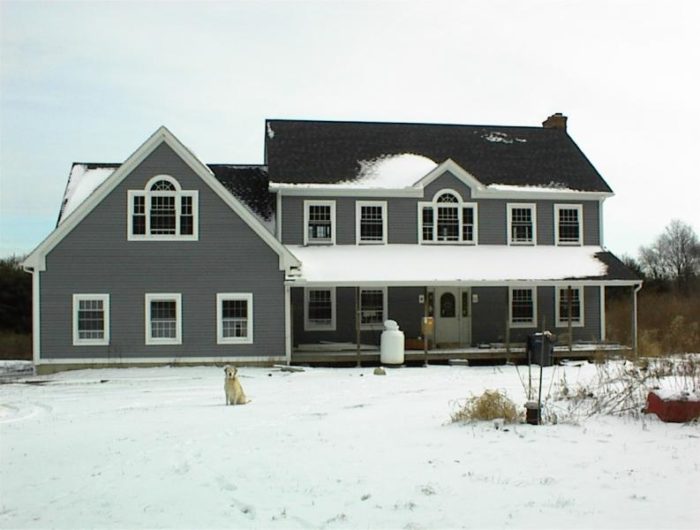
Hello everyone and Happy Holidays to you all.As some of you know I’m G/C ing and partially building my new home,and (it’s not as easy as some of you novices might think it is)anyway here is the problem.
When I ordered the windows(vinyl) I was on a tight budget and couldn’t really afford the Anderson I wanted.The windows I picked from the window company were in a mock wall display and were there top of the line vinyl window.What I did not know is that they were replacement windows with a snap on nail flange.
When I brought this to the attention of the window company and the framer that installed them they both said not to worry about it.
Well I’m worrying now,the nail flanges leak like crazy at all the 45s and about 2″-3″ away from them.the 2×6 sills that they sit on are starting to show water damage.The company went belly up(go figure)and I have no idea if there is a fix for the problem.I have about 45 windows
Any help would be appreciated.
Thanks Greg
Lead,Follow,or Get the Hell Out of the Way!


Replies
Here's the inside shots
Lead,Follow,or Get the Hell Out of the Way!
# 9 went sideways for some reason
How the heck do you reduce the size of the pic?Lead,Follow,or Get the Hell Out of the Way!
Wow.
The install looks wrong. I think I can see daylight from the inside shots. If that's vinyl siding and I'm not seeing things, there's a spot where there's a hole in it, from a errant saw blade perhaps. It appears there's no flashing at all over the attached flanges. The windows above the porch roof are too long, they end too close to the porch roof to not be a problem with water entry.
You might be able to pull off the exterior casing's (aluminum?) and flash with peel and stick membrane starting at the bottom, then both sides, then the head. You should try to get back behind the siding. You are past just caulking. Best of luck.
When you fight with the guy that set the windows, do you have the installation instructions so you can show him the proper system, provided they came with them? Did the supplier or the manufacturer go out of business?
Remodeling Contractor just outside the Glass City.
Quittin' Time
Edited 12/28/2004 10:57 pm ET by calvin
Calvin :Yes that is daylite you are seeing.Its at all the 45s in the corners plus several inches beyond.
No flashing or peel and stick tape over the flanges either.
I questioned the home designer and she told me the windows over the porch roof were fine.They looked too low to the roof line too me.What do I know (shes the one with the degree)
That's vinyl casing on the outside of the windows,it can be peeled back a little to get at the nail flange.
No install instructions came with the windows.
The manufacture was the suppler too.It was a local company that went under.
GregLead,Follow,or Get the Hell Out of the Way!
Correctly flashing those windows above the porch roof will be a crapshoot at best. I'd solicit the advice of Hazlett or greencu on what they'd think would work. I have a feeling the window's would have to come out, area flashed up into the window openings, windows set........overflashing.
I really think the casing should come off, the flanges flashed with peel and stick membrane behind the siding. Again, best of luck.
Any recourse in the guy that set the windows in the first place? They're wrong, they leak.........Remodeling Contractor just outside the Glass City.
Quittin' Time
The nail flange snaps on the front of the window so even if I apply peel and stick tape on the nail flange it wont solve the problem.
GregLead,Follow,or Get the Hell Out of the Way!
On the front? not into a groove in the side of the frame?Remodeling Contractor just outside the Glass City.
Quittin' Time
Yup in front.
The only thing I have come up with for a fix is to take off the lineal outside,take off the window starter strip,take off 1 or 2 of the nail flanges,then silicone the snot out of the gap between the window and the R/O,install peel and stick tape bent in at a 90o ,Then do the other 2 flanges,Then reinstall everything back to the 45 or so windows.I'm turning on the gas to my oven as we speak to stick my head in.
GregLead,Follow,or Get the Hell Out of the Way!
I new that they just didn't look right but kept getting shot down every time I question it.
I probably could go after the guy that set them but was looking into other options.Lead,Follow,or Get the Hell Out of the Way!
I'm thinking that if you can be convinced and assured that the original installer could do them right the second time, that's the way to go. If he just caulks the #### outta them and it stays dry till the next heating season, then you'll be doubly ####. There's no interior finish yet.
Did he side the house too?Remodeling Contractor just outside the Glass City.
Quittin' Time
I see the house is in coventry, ct. Anyone here on BT near coventry that could lend greg a hand?Remodeling Contractor just outside the Glass City.
Quittin' Time
No he didnt side the house,but he did roof it
GregLead,Follow,or Get the Hell Out of the Way!
No he didnt side the house,but he did roof it
Are the roof shingles "right side up"?
Yeh but he used staples and thats another storyLead,Follow,or Get the Hell Out of the Way!
I'm near southwestern Ct.
Don't know where Coventry is.
I could charge Greg for my hands, and I have nothing to do right now...........
I wish I could lend but........If you're interested Greg, give me a hoot, I'll look you up on the map.
Eric
[email protected]I Love A Hand That Meets My Own,
With A Hold That Causes Some Sensation.
Eric I might just take you up on that I'm trying to get all the info I can before I make a decision.
Thank You GregLead,Follow,or Get the Hell Out of the Way!
Greg,
Call me tomorrow in the am if you can.
Or drop me an email.
Eric Paulson
914-953-5306
[email protected] Love A Hand That Meets My Own,
With A Hold That Causes Some Sensation.
Greg,
In post 33 you show a picture of a window (I assume that was an extra window). Can you take a side view picture?
Also, regarding the "aluminum casing". Is it aluminum? I am still not sure how it is fastened to the window and how it is fastened to the house.
Here is an idea: Rip off all of the "aluminum casing". Get some sort of "normal nailing flange" attached to the sides of the window. Install water and ice shield over the flange and tuck behind the siding. Install 5/4 flat stock casing (maybe use a vinyl composite) with all the belts and suspenders mentioned above...
I will try to get some more shots in a couple of days I'm working a double shift and I wont be able to get out there till this weeked.
The casing vinyl
Thanks GregLead,Follow,or Get the Hell Out of the Way!
U gonna let us know what ya find, right?
Jeff Buck Construction
Artistry in Carpentry
Pgh, PA
Look above...........I KNEW there was someone (another Greg) near him!
Woulda been glad to take a look, never got the call though.
EricI Love A Hand That Meets My Own,
With A Hold That Causes Some Sensation.
Visited with greg last sunday, looked at window leaks, over coffee and donuts.Great guy, but frustrated, as anyone would be in this situation.Framing job was tight with no shortcuts.
It looks like the framer thought it wasn't his job to flash windows, and the siding guy didn't know any better.The sider did a nice install, looks wise, but installed like they did in the seventies.
The flange runs all around the outside of the window, and mitered at every corner.From the inside, there is a quarter inch space, at each corner.
At a minimum, all the windows need a drip cap bent to cover these holes.It would be best to remove vinyl siding, and flash correctly, but time is money.I'm glad there wasn't wood siding or hardiboard on this house.
Edited 1/16/2005 9:44 am ET by GZAJAC1
Some pictures taken around sliding door. Door was anchored thru jambs with screws and shimmed. Vinyl casing was BUTTED to sliding door jamb.Greg asked the installer about this, and he said they do it like this all the time.
Some other vinyl siding details that will cause problems in the near future.
Looks like peeling paint on vinyl siding.Siding replaced once, but this reappeared. Looks like the skylite is the culprit.Any solutions?
Greg, the rippled siding. Looks like what happens when the gas grill is too close........not there I'm sure. You mention peeling paint..........?
In the skylite shot, is that water/ice coming out of the soffit and dripping down the siding?
Very nice of you to offer a looksee to this homowner. He needs some help sure nuff.Remodeling Contractor just outside the Glass City.
Quittin' Time
Calvin
Nothing coming out of soffit, rolling off gutter. There was alot of ice on the roof and in the gutters that day.Do you think the skylite is causing the ripples. I am familiar with the gas grill detail. My wife surprised me by cooking dinner on the gas grill after she rearranged the deck furniture for symetry.
greg in connecticut
Greg, Man, I have no idea. I've never seen vinyl siding ripple except when heat was too close. There's ripples on the side wall too. Beats the heck outta me. And again, nice job going over there and offering some help. It's a pity more of us can't do that here with some of these off the wall problems that come up. Much easier to look and see in real life.Remodeling Contractor just outside the Glass City.
Quittin' Time
Speaking of melting siding. Here are a couple of spots on one of the Community Rehab houses whose owners have asked me for a bunch of extimates to fix.The only thing I can figure is the sun did it. On the first pic, the owner says that area had distorted siding before she bought the house and it was replaced. But the same pattern just reappeared.Rich BeckmanAnother day, another tool.
Rich-
When you figure out how to fix that one on the deck, let me know.I have the same problem in a similiar area on my deck.
Greg in Connecticut
The wonders of Vinyl siding
Greg,I don't know if this is causing the problem at my customer's house yet or not, but...The guy at the lumberyard says he has seen cases of vinyl siding melting like in our pictures when there has been Thermax insulation in the wall with the foil face facing out.Seems like a bit of a reach, but he has always been pretty reliable about stuff.Rich BeckmanAnother day, another tool.
A lot of Rhode Island influence here, ala Mike Smith.Homeowner is strapping all his ceilings, and blowing all the walls and ceilings, just like Mike Smith advocates.
I look at this job on sunday, monday pick up prints for a couple large customs, and a 90 unit condo. All of them show strapped ceilings, have only seen this once in connecticut in thirty years.What are the chances that Mike Smith's sphere of influence is moving into Connecticut? Is breaktime being read by our learned brethren from the architectural Community?
Greg in Connecticut
greg... i blame piffen.
.. good pics..
unfortunately.. it looks like the problem is lack of overlap of responsibility.. the guy with the plan of how to detail ALL of the flashing was never on the job...
View Image
also.. the subs were working with what was there ????
the example of this would be the exterior door with the 908 casing (brick mold ).. we'd normally order the door without casing and field apply it to match the rest of the house
the door above /... i guess they shoved the jambs outside so they'd have something to BUTT against , right ? instead of flush with the sheathing so it could be splined and cased ?
hmmmm ...the deck ledger is absolutely going to be major source of leaks..
hope someone can come up with a plan to salvage something
Mike Smith Rhode Island : Design / Build / Repair / Restore
Edited 1/16/2005 11:30 am ET by Mike Smith
Edited 1/16/2005 11:33 am ET by Mike Smith
Mike
While looking at the slider it appeared to be ready for a snap in fin.Maybe just thrown away.I haven't done that type of installation since the seventies, and the aluminum sliders.
As a responsible sub, I try not to let this happen. I might not be the best business man, but craftwise I'll never leave something like this. If I don't have confidence in the guys following me, we do it ourselves.
I think there is a growing trend to work like this, maybe a new job classification or business.
The homeowner is very handy and done a lot of work himself.I have offered to show him and his friend the siding installer how to fix a majority of these items.
He has spoken of you and your presence on breaktime as a learning experience. Is there a Mike Smiths' guide to Fine Home Details on the horizon? It would be nice to have another published author onsite.
Waiting for the turkey to finish cooking in overcast Connecticut
yeah , right .. every day i find something else i didn't know...or something i could do better..
i learn a lot more here than i give
i think ribs and chops will go good for game time..
that.. and a fresh guinessMike Smith Rhode Island : Design / Build / Repair / Restore
Greg,
I don't do a whole lot of work with vinyl windows, but when I do I often place them inside a traditional wood frame. That is, I set them within a wood frame on a sloped sill. I don't use the nail fins; I either order them without the fins, or cut them off with a knife. The vinyl unit is secured by stops both inside and out. This results in the face of the vinyl unit being set back 3/4" from the face of the exterior sheathing.
This might be a drastic fix for your problem, but pieces of it might be incorporated to fit conditions on your house. The most beneficial part is setting the window back from the sheating, where it will be more sheltered from the weather. The exterior can then be trimmed traditionally.
Hi Ragnar:Thanks for the reply
How would you seal the unit from the weather on the outside?
Thanks GregLead,Follow,or Get the Hell Out of the Way!
Unless you want to remove all your siding and start over, the only solution that I can think of now is to seal the gaps with foam. The foam is both an adhesive and an insulator.
Make sure you properly brace the inside framing of your window to ensure that the foam doesn't squeeze the framing tight enough to seize your windows.
Gabe
greg.. i think you have a problem with the window installation and the vinyl siding.. between the two of them the flashing is incorrect
you should take a representative window on the side and remove the vinyl siding,
tehn you can show the flashing detail
any half-as*ed window with nailing flange should be able to be installed in a waterproof manner...
these should not be leaking
the window installer & the siding sub both share this problemMike Smith Rhode Island : Design / Build / Repair / Restore
the window installer & the siding sub both share this problem
I agree with what you say except for this line.
The responsibility lies squarely on the GCs shoulders. If I allow work to continue over a bad installation, it's my baby and I have no recourse to recover or to blame.
Neither one of us would have allowed the work on the windows to proceed passed the first nail without it being done right.
Gabe
damn.. i hate it when you're rightMike Smith Rhode Island : Design / Build / Repair / Restore
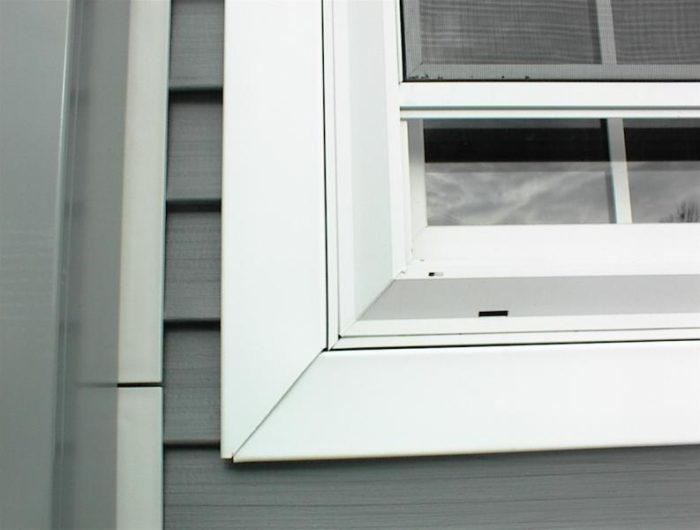
Hi Mike:
There is no flashing over the nail flange(some have t-vek tape)
Basically there is 3 1/2" lineal,under that the window starter strip(that snaps the lineal in place),then the nail flange which is nailed into the t-vek covered sheathing.Then the nail flange is snapped on to the front of the window.
I cant figure out if the nail flange was supposed to be a 45o or just over lap at the corners.
Thanks GregLead,Follow,or Get the Hell Out of the Way!
PS - there are different kinds of peal and stick flashing tapes. There is one less expensive one called MoiStop E-Z Seal - wouldn't use it in this case since the situation already sucks so badly. Only 1/2 of the width of the tape has the adhesive on it which makes it easy to work with and the adhesive is kinda thin but it costs only $15 a roll (6" x 75'). There is another brand - Don't remember the name - that is extremely sticky, kind of thick and stretchy, a bit hard to work with, but sticks like hell. I'm sure someone else here has the name of the good stuff. It is about $24 for the same sized roll. Matt
matt.. we buy Grace and cut our own stripsMike Smith Rhode Island : Design / Build / Repair / Restore
Hi Gabe:
I thought about the foam but I wasnt sure if it was a good waterproofer
GregLead,Follow,or Get the Hell Out of the Way!
3 things have to be present for water infiltration.
Water, path and pressure/vacuum.
Water is obvious and so is path.
Pressure can be gravity or pressure differential.
If you block the gap, you eliminate the path. Seal the window and you eliminate the pressure/vacuum.
Closed cel polyurethane foam is water proof to the needs of your application.
Gabe
Greg,
I can sympathize with you. I had to make my framers rip out the two windows they had installed before I got there that day. They had installed them about about like your guys did; even after giving them copies of Marvin's install instructions the night before and telling them that I wanted them followed to the letter. Of course they threw a hissy fit about how much extra work this was but they did it.
If you don't have any window install instructions, see this link, especially the the link about 3/4 of the way down in the article about installing for rough weather.
http://www.taunton.com/finehomebuilding/pages/h00111.asp
or go out to Pella's website for install instructions including flashing.
Good luck,
Dennis
Thanks Dennis great info
GregLead,Follow,or Get the Hell Out of the Way!
What a sad story, :-( but other than the fact that the windows were not flashed - which should be the builder's responsibility to see that it is done - by someone - I don't see how this is the window installer's fault. If flashing tape were on site the day the windows were installed and the installers had refused to use it, that would be another story. I think that a good part of the problem is just plain old cr@ppy windows... I never quite got how the window flanges attached, but maybe if they were installed with a good grade of caulk in between the mating components, this wouldn't be happening. Not that I'm advocating caulk as a perm fix for anything, but there seems to be a new generation of "lifetime" caulks appearing that defy classification and that exhibit characteristics of extreme adhesiveness (is that a word), and elasticity. One such caulk is OSI Quad. At $5.50 a tube, it's not to be wasted... GE makes one too...
BTW - someone correct me if I'm wrong, but I believe that silicone caulk is not chemically compatible with some (all?) of the bituminous flashing tapes.Matt
Hi Matt:
I will take the responsibility as the role of builder.I'am acting as my own G/C This is my first house I ever built,so its all on my shoulders and I knew that going into it. What I didn't expect was to be redoing other peoples work.I paid over $18,000 for the framing (which included installing the windows)and the roof and paid mostly cash doing the framer a favor.
I think it was BossHog who had the house from hell I'm sure I can beat his story hands down.But on the other hand I would still build another one if the opportunity arose in the future.I think the building bug has bit me,and I can see why you guys like to build.
Thanks GregLead,Follow,or Get the Hell Out of the Way!
Gregg
the only way to get a permanent fix on those windows is to get under the siding. Get used to the fact that a lot of that siding has to come off.
Before you pull all of your hair out I think its going to be an easy fix once you get your system down. Vinyl siding can be unlocked at any point so it does'nt all have to come off.
You might want to consider installing heating cables along that porch roof to keep accumulating snow from the base of the windows
good luck
Thanks those heating cables sound like a good ideaLead,Follow,or Get the Hell Out of the Way!
those heating cables sound like a good idea
If you use an interior switch, put a light fixture on it (like a night light); write "porch roof snow melt" on the shade while you are at it.
Other wise, later, someone will wonder out loud "what dummy put this switch t' nuttin 'ere" . . . Later somebody down the road after that will wonder about "them wires ina porch ruf" . . . Occupational hazard of my occupation not being around (sorry Bubba)
I'm not seeing a "nailing flange" in those pictures.
What I think I see ... for some odd reason ... is vinyl J Channel installed tight to the window ... between the window unit and the wider aluminum trim?
doing absolutely nothing aside from spacing the aluminum trim away from said window?
I thought that's what I was seeing from the inside pics ... the "cracks" ... all seemed to be at 45's ... like someone tried to miter them ... which ... I think is what happened.
IF ... that's the case ... U have no "nailing flanges" what so ever.
Nailing flanges are set into .. usually beat into with a scrap of wood ... grooves that are cut the whole way around your window jamb .... once pounded in ... they make the "replacement" window look essentially like a "new const" window ... with a nailing flange all the way around that holds the window tight against the wall ...
were the windows nailed thru flat flanges that laid ontop of the sheathing?
or were they nailed/screwed thru the sides of the jambs into the 2X framing?
from here .. it looks like someone installed new windows as they were replacements .. and skipped the nailing flanges all together?
IF ... I'm seeing this wrong .. and the flanges are there ... just someone decided to miter the corners as opposed to do it the right way and overlap them ... them a bit of bituminus(SP?) flashing tape will be a decent fit. Just dig out and tape all the corners ... then ... tape the whole window.
U are looking at basically residing the house. Pop it off to get to the windows ... tape the flanges ... properly lap the felt/house wrap ... run felt splines for extra protection ... run the trim/J and put the siding back on.
It's actually not too bad a project ... sucks paying twice for the same job ... but I'm guessing that's what you gotta do until U sue the original idiots ...
Now ... just gotta find out for sure what's really wrong .. to see who screwed what up.
I'm really curious if that is a nailing flange or just J stuck on there ....
Jeff
Buck Construction
Artistry in Carpentry
Pgh, PA
Jeff what are you doing this weekend?????hmmmmmmm
Yes there are nail flanges there sh*ty ones at best.They are nailed into the sheathing then snapped into the front of the window, yes you heard me right the front.I have been to a lot of window places lately and havent seen one window with a flange like this one.
At all the 45s I can see daylight & an inch or two away from the 45s I'mstarting to think that the corners should have been lapped not 45d is that the way they should have been done?
I think sometimes the expasion and contraction of the vinyl makes it worse at times.
I dont want to strip the siding and rehang again /Why you ask?cause its already been done three dam times I will say it again this house has been sided THREE times. I must have p*ssed someone off in a prior life or something lol
Thanks greg
Lead,Follow,or Get the Hell Out of the Way!
Heres a shot of the window and the grove near the outer edge that the nail flange snaps into.
In case your wondering I havent gone over the edge and chopped out a window for the picture YET! haha
GregLead,Follow,or Get the Hell Out of the Way!
Greg,I don't see any way those windows can be made satisfactory without removing the siding around them.I know you don't want to hear that or do that...But if you really want them right....Remove the siding and then do what it takes to flash them properly. Could be little more than the correct application of window tape (bottom to top).Bet you wouldn't have to remove as much siding as you think.Rich BeckmanAnother day, another tool.
What you're describing doesn't sound like a nail flange slot but more like the slots Marvin uses at the front of their replacement windows for installing bent aluminum trim to cover the old wood exterior trim/framing.....
what brand are the now defunct windows?
juct curious ...
at this point ... well ... I dunno?
I'd take a hard look at seeing if any custom bent aluminum could tie in somehow to the windows ... or ... if the flashing tape could be placed ... just so .... that it'd stick and stay put.
Foam ain't gonna do you much good as a primary defense .... might make for a great secondary barrier from the inside ....
with nothing else painted I'd hate to even think about any caulking ....
with properly installed windows and vinyl ... there's no need for any caulking ...
dig one out .. maybe those goofy nail fins do indeed work and just need a healthy dose of flashing tape around them ... then .... use some felt splines as backup ...
Jeff Buck Construction
Artistry in Carpentry
Pgh, PA
Jeff what the heck are felt spines anyway?
The window company was Landmark Windows out of Hartford
Hey while I'm at it.When you set a window is it ok to just let the window just rest on the interior 2x6 sill if the sill is level?That's the way these are theres no room for any foam or chalk on the bottom of the sill.Lead,Follow,or Get the Hell Out of the Way!
pieces of tar paper ... aka felt paper ... about 4 or 6 inches wide ...
length cut as need be .... that help flash and redirect any water that get's to them ...
Fine by me to set the windows tight to the sill .... expecially if all the sills are level .. and all are level with each other .... that's what we're shotting for here ... good framing.
here's a link to a FHb article that shows some splines down the page a bit ...
I just googled "tar paper splines" ... and got directed back to this site.
http://www.taunton.com/finehomebuilding/pages/h00150.asp
it's the article about building Rain Screen Walls .... using the felt splines is one of the details shown ... I read that article and didn't even remember the part about the splines ... just the way we've always done them ...
Jeff Buck Construction
Artistry in Carpentry
Pgh, PA
Jeff, have you built a rain-screened wall as described? WOW, the time, the labor, teh cost! Great idea, and nice insurance, but . . . Can anyone afford it?
For the owner in the article it must be a relief to ahve fixed his problem. But, most people don't surfer that situation. So to invest X $ for a 1 in a 100 chance of a problem is pretty hard to justify, NO?
It is true that people do complain about paint not lasting five years or maybe they complain about eight. Perhaps these are cases where teh siding was not back primed or perhaps a screened wall would make paint last 15 years.
Interesting idea. I just don't know how to do the calculations to see if it would pay.
actually I have ... as en employee ....
not for one of my own projects ... yet.
One of the designers decided he'd like to use sheets of concrete board on a couple exteriors for a style/rail/flat panel old fashion look ... with lotsa built up band boards and trim .... some parts of the trim were 4 and 5 "layers" thick ... all stepped in or out for shadows ...
the rain screen was used to vent the concrete board sheets ...
not that hard at all ... the bitching and moaning took longer than the install ...
just throw a vent/screen at the bottom ... run some furring ... vent/screen the top ...
and away ya go.
the window/door, corner and band boards was all built up as I said ... so the fattening needed was all part of the plan .... no time or money lost there ...
I can't see how it cost much more to do at all .... very little materials ... very little time.
Jeff Buck Construction
Artistry in Carpentry
Pgh, PA
Greg,
"At all the 45s I can see daylight & an inch or two away from the 45s I'm starting to think that the corners should have been lapped not 45d is that the way they should have been done?"
One of the first things many window install instructions say is that the nailing fins do not stop water intrusion. On the Marvins we installed last week the nailing fins only extend the length of the window and not past it on both top and bottom and sides. So there is about a 1" square area on each corner of the window where there is no nailing fin at all; and this makes the opening at your 45's seem tiny. Marvin supplies small adhesive foam patches to put over the corners but the real thing that keeps the water out is proper flashing.
Regards,
Dennis
Hi Les:
The frames around the windows are pretty tight already.The main problem I think is the nail flange and the 45s .Its just a bad design.It snaps in at the front of the window not the sides.
Does any body know if there is an after market nail flange available???
The lift is an excellent idea!
Thanks Greg
Lead,Follow,or Get the Hell Out of the Way!
Hi Greg,
Took me a while to figure this one out! I see your problem as being two fold; 1) Poor installation and 2) Poor window design (see attachment). To fix:
1) Add a drip cap and/or flashing and window tape as mentioned above. However, this will NOT solve your water problem completely. Because of....
2) The nail flashing design makes it very difficult to seal since there is a gap at the OUTER edge of the window corners. (I peeked at my vinyl Andersons and they too have a diagonal joint but it's tight and overlapping.) Water will find a way in there as well as around the entire perimeter.
I agree with injecting the inside of the rough opening with foam. This will create sort of a "backer rod" support for caulking applied from the front which will create a water seal. I would caulk the corners as well as the whole perimeter. Not the best seal but easier than sonic welding it! Hmmmm, now there's another idea..........
Hope this helps........ E
The nail flashing design makes it very difficult to seal since there is a gap at the OUTER edge of the window corners. (I peeked at my vinyl Andersons and they too have a diagonal joint but it's tight and overlapping.) Water will find a way in there as well as around the entire perimeter.
Took me a while to figure this one out! I see your problem as being two fold; 1) Poor installation and 2) Poor window design
Absolutely right.Just leary about using the foam right nowLead,Follow,or Get the Hell Out of the Way!
Greg
My compliments to the half a**ed framers and siders who did this great installation. They should be ashamed.Typical not my job syndrome.This type of installation happens to full time GC's also, who are suppose to know better.
I've worked on quite a few installations like this, Landmark in particular.I'm usually the guy thats brought in after the other guys have applied the bubble gum fixes, and expected to perform miracles.
It is my experience that just caulking from the outside, blowing foam from the inside etc just agravate the problems, and force the water to come out somewhere else.The words mold and rot will come up in a lot in your conversations.
It is my experience with that window, with that trim detail, you will not be able to stop water leaks without stripping siding.A lot of the mulled units leaked at joints, and will need head flashing.The units did all ship with an adhesive backed strip that was applied over corners after installation. It is evident the framers knew better, and threw them away. If you installed any casements, and they don't work correctly now, fix them now. The casement units don't improve with age.I've installed probably 500 of these units, although not Andersen quality, certainly not the worse vinyl out there.
I've never seen the flange installed at the front, always from the side. It's been about five years since I installed these, maybe they changed the design. No leakers in five years,taped sides, added head flashing under tyvek, taped in.These flashing details were mine, other framers installed with notape no flashing.I fixed those installations.
Greg in Connecticut
Edited 12/30/2004 5:15 am ET by GZAJAC1
>> The units did all ship with an adhesive backed strip that was applied over corners after installation. It is evident the framers knew better, and threw them away. <<
OK - that explains it. Personally, I think that a good exterior flashing job (tape, etc) will fix this problem. While I don't relish the idea of removing all that siding, I could have maybe had it off in the time people took to type all the stuff in for this thread.
To the initial poster: A few words of warning should you decide to use the poly foam: 1) as stated before, be very careful, because that stuff will expand too much and ruin your windows by binding the sashes. That's why they now have a "minimal expanding" flavor. 2) when that foam gets on stuff (ie: your windows) it doesn't come off - or at least not easily. It could make a real mess of your windows, not to mention your hands, eyes, etc. The stuff is not easy to work with. One of the common brands is called "Great Stuff" but most people who have worked with it don't really think it is so great... Personally, I wouldn't do it. Or, maybe try one and see how it goes. Matt
Great stuff is a one shot homeowner product....there are several brands of comercial foam guns available, they use screw on resevoirs, you can use half a can, put it away for months, come back & use the rest, unlike Great Stuff which must be used at once (that's if it isn't already hard in the can when you buy it).....
greg...... i go back to my original post... strip the siding on a side window... get either greg or eric to come show you how they should be flashed .. then do the same to all of them
do not foam any of these windows UNTIL you have solved the flashing problem...you may have to remove the windows to fix themMike Smith Rhode Island : Design / Build / Repair / Restore
Thanks Mike point taken
GregLead,Follow,or Get the Hell Out of the Way!
Hi Greg:
Thanks for the info.So you know about landmark window systems?The adhesive strips are what's got to be missing on the mulled units they leak too.So I got to ask what the heck is the proper way to do them?
I wonder if after market nail flanges can be purchased ,some thing a little more normal?
Thanks GregLead,Follow,or Get the Hell Out of the Way!
Greg
As I said in a previous post the windows themselves are not that bad.I don't think you need a different flange,exterior trim or new windows.
You should just bite the bullet, pull the casing and its locking channel off, and flash the windows with tyvek tape or better yet the grace material.Add a metal flashing and tape at the head.
You do not want the water to stop at the plywood, but at the housewrap.
I had a customer who OWNED an insulation company send his guys into foam the windows. He calls me to tell me I did a lousy job on the install. Ended up cutting all the foam out with a sawzall, what a pain.
If you need some advice, email me and I'll take a ride over. I'll visit my niece, she's in the same town.
Greg in Connecticut
If a window is protected adequately by an eave from direct wind and rain I wouldn't worry about flashing it.
never mind the air infiltration!!????....
I usually place a good bead of Hilti foam next to the outside flange, framing and side of window. This seals it up nicely for air infiltration. I don't use a lot of foam because it tends to expand the space between the framing and jamb extension, if you are using one, and makes the trim a little uneven. I then finish off insulating the gap with fiberglass, the caulking around the interior trim on both edges seals things pretty well.
Again if those windows are out of the elements I would save time and money by doing the above.
Les:
Putting new windows in has crossed my mind>Just peel back the 3 1/2" lineals and pop them in.Only thing is the $$$ and that I installed alarm sensors in the windows and I don't really want to do them again if I don't have to.
I' going to take another shot with the lineals off just to make it more clearer.I don't think the foam is a primary option.
Thanks Greg
Lead,Follow,or Get the Hell Out of the Way!
Les I was considering some pvc trim as a possible option .Lowe's and depot carry some stuff by Royal that's not too bad.
And just in case I have missed any body THANK YOU ALL FOR THE REPLY'S!!!!
Greg
Lead,Follow,or Get the Hell Out of the Way!
wane... i get it ..
you just finished reading Norman Vincent Peales " How to Win Friends and Influence People"... right ?
That's funny, I was just looking for his "The Power of Positive Thinking" this am.
Must have passed it along.
EricI Love A Hand That Meets My Own,
With A Hold That Causes Some Sensation.