Since I’ve effectively worked myself out of a job for several days, I’m going to start from the beginning, the master suite addition that spawned “screen porch” and “Kitchen/Dining Room Rehab”.
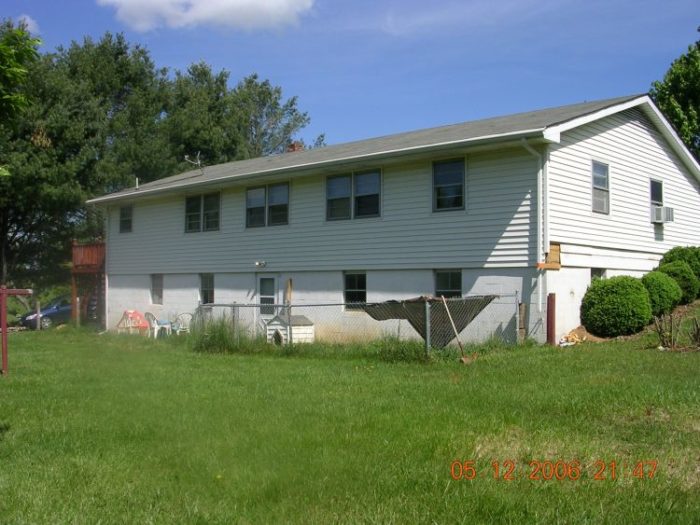
Here it is, the 3/2 ranch, a staple of modern Southern living in the 21st Century. Window on left is spare 10×12 BR which will become new MB. Window w/ AC unit is existing MBR (12×14). Back-to-back small closets seperate both rooms.
Addition will extend from this end 20 feet, be flush with rear wall, rooflines will plane together in back, and step back two feet in front. MBR dimentions will be 20×28.
Built in 1972, average quality, but they love the location. Once they convinced me that this was really what they wanted to do and would be content to spend the rest of their lives here, we got to work.
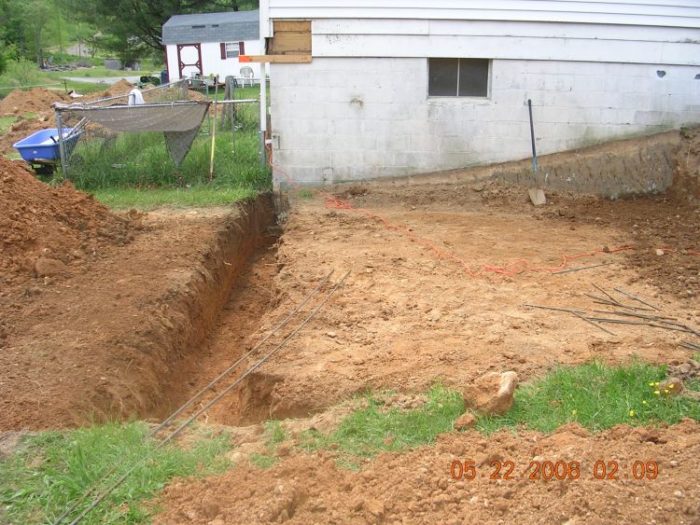
First order of business was a complete new septic system. $6000.00 overage on the very first day–nice. Used the septic contractor to dig a half crawlspace and footings.
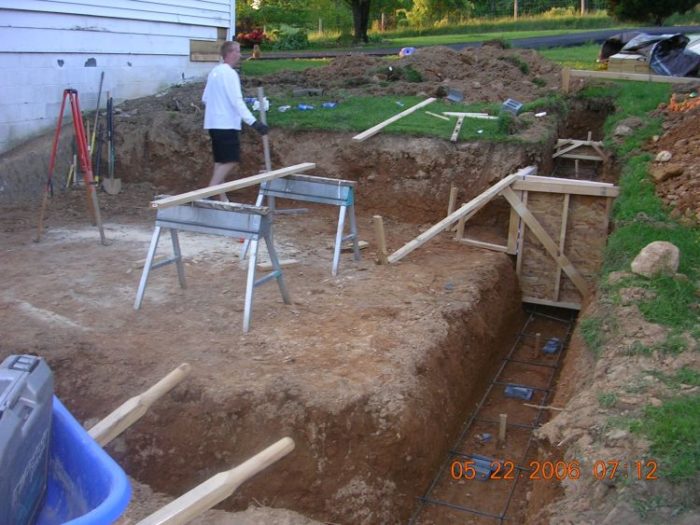
Brother Andrew trying to be helpful, but he’s more of an inside guy. Footings passed, ready to pour. One ready-mix locally, 40 miles away, 2-week lead time! Didn’t know this since I’d only recently come back to this area. Got very lucky and got in on a cancellation.
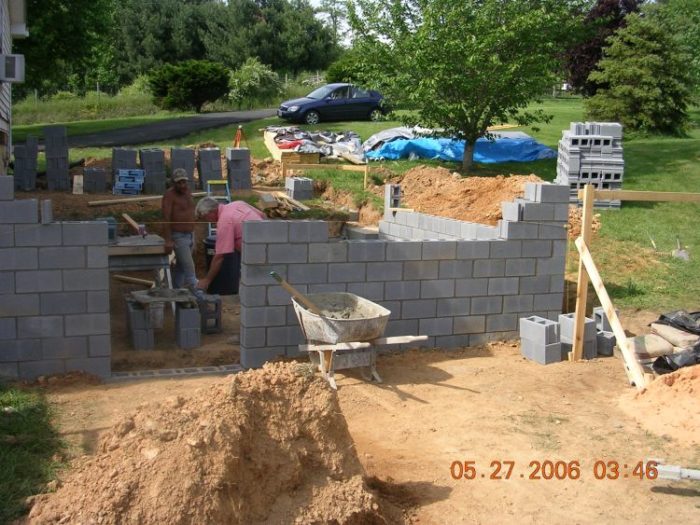
I had all the block spread out and stacked, all James had to do was show up and start laying. 440 block, 1 mixn, 1 layn, 11.5 hours.
Next day I set my anchor bolts to the layout of my plate material (masons CAN’T get it right ’cause they ever know what lengths your gonna use), cut in my girder pocket, and commenced to framing.


Replies
Used the septic contractor to dig a half crawlspace and footings.
That's one heck of a deep crawlspace! Or is the step up the crawlspace?
jt8
"One of the fondest expressions around is that we can't be the world's policeman. But guess who gets called when suddenly someone needs a cop." -- Colin Powell
Sorry to be confusing. The first 20 feet is walk-in height (if you're under 5'6" tall), the step-up is true crawlspace.
David,
Looking good. You have done quite a bit of work on that house. It is nice to see an organized job site. This gives folks a look at some pics of proper sequence of work.
Chuck S
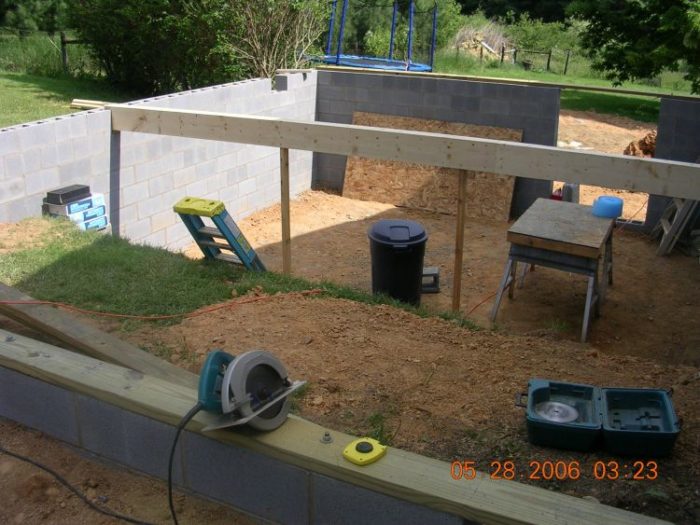
2x10 spf joists, 16" O.C. Since there's no headroom downstairs anyway, I went with the drop girder for ease of build. Rim joist gets doubled over the crawlspace entry.
View Image
Had to hang the rear plate 1" beyond the foundation to compensate for the original siding behind the vinyl on the existing house. Otherwise, it wouldn't be the seamless transition I'm looking for. Nothing worse than an addition that looks like one.
View Image
I used 2 runs of mid-span blocking in lieu of x-bridging; can see the back run if you look hard. Notice the existing structure is stripped back to the sheathing, so as to get as close to new work as possible. Never like to cover over anything if it can be helped. Speed is not a legitimate reason for covering something that was never meant to be covered.
View Image
Wall height dictated that I only had 8.5" for the 6 foot header needed in the rear. Since I insist on box headers (stubborn), I had to sandwich a 5 1/2"x 3/8" plate between two 2x6's. Maybe not necessary, but for the extra 50 bucks I sleep better.
View Image
Rental scaffold delivered for the solo ridge-raising. Plywood exposed on house where front wall will tie in. I only open up what's necessary to complete the task at hand.
View Image
View from the backyard. Opened up just enough eave to explore the wall height. Since the orig. rafters are 2x6 and I'm using 2x12, the HAP is VERY different, as is the wall height.
View Image
Setting just enough 2x6 sole plate to erect a kingpost to support the double 1 3/4"x 12" LVL's.
Lookin good! What's happened there in the last ten months?!
Give us more!
Forrest
It's definitely been an adventure. Not often you get the oppurtunity to basically do what you want without those pesky budget constraints.
View Image
Took about 2 hours to safely work these LVL's back and forth and up. Had to put a temp. strut under the house end until the interior framing was added/rearranged. Straightened it by spotting a few rafters and pushing w/ 16' 2x10. I forgot how important it is for LVL to be stored PERFECTLY flat.
View Image
Live in the solution, not the problem.
David,
Great looking work. A lot of folks have no clue to solo froming.
Did you use that special birdmouth cut that you showed earlier?
What is the best way to square up the gable end of the ridge? I also let the ridge run wild but it is always a cluster f*** with plumb bobs snd lasers.
Chuck Slive, work, build, ...better with wood
Pretty much like you said Chuck. If you'll notice in the next-to-last picture there's a diag. brace on the kingpost running paralell with the ridge, but next photo it's gone. That brace was just to stabilize the KP during the raising process. I built the KP to create a "saddle" of sorts at the top so I could fine tune to DAP once everything was up.
Leaving that inner point on the seat cut of the birdsmouth is a must for solo rafter raising--especially with 18' 2x12's. My brother did help some with pushing them up.
I hate cutting the ridge back after it's up but most often that's the safest bet to get it right.
View ImageLive in the solution, not the problem.
Got about an hour to kill before the NCTS race, so I'll try to get a few pics up. This is one he!! of a chore on dial-up.
View Image
I enlisted my brother's help to run the rafters up. Poor kid got a lesson in toe-nailing he'll never forget!
View Image
I think he actually enjoyed himself.
View Image
Got the front half of the roof sheathed and papered, then moved to the outlookers for the flyrafter in back.
View Image
Here I'm explaining the importance of the new and old planing together and getting ready to make the tie-in. On this project it was simple as scabbing a 2x6 to the existing gable rafter and butting the OSB. Couldn't easily stagger back, since my horizontal rows weren't aligned with the existing ply.
View Image
Moved inside, stripped the gable wall clean, and prepared to permanently support the end of the ridge.
View Image
Since the area between these 2 windows will become a new hallway into the MBR, I needed to support the ridge from the top of a substantial header. Double LVL's is probably overkill but as always, I sleep better knowing that it's more than enough.
View Image
Not going anywhere now. The BR on the left was a spare, and will become (is now) the new master bath. 6' Jacuzzi tub, 6' double vanity, linen closet, enclosed toilet area, and a swivel-based, wall mounted flat-screen visible from both tub or toilet.
View ImageLive in the solution, not the problem.
David,
Keep the pics coming. I like that double lvl and ridge support.
Are they 2X10 rafters?
View Image
Chuck Slive, work, build, ...better with wood
2x12's Chuck. The BI said I needed them to get the required R-38. Truthfully, I don't know if his info on the code or that r-value are correct, but I wasn't in a position to argue. I started to use TJI's but they're WAY too proud of them things. Over $100.00 for an 18 footer! 2x12's were around 27.00 I think for SPF.Live in the solution, not the problem.
Where were we?
View Image
Here's a shot of the new hallway framed up. It's actually an extension of the existing hallway now that the back-to-back BR closets are gone. You can also see here the 2 new small WIC's which will have pocket doors. His & Hers.
View Image
After getting the new hall lined up with the old, I framed for an attic access and hung just enough DW to isolate the mess.
View Image
The old hall ended just to my left where the wood floor stops. In this case it worked out that the BR wall of the old closets were about 14" out of alignment of the new hall, thus making perfect temp. support walls for the ceiling. I'd rather be lucky than good most any day.
View Image
Then closed it off with a 2x4 frame and OSB. They were still using the MBR just behind the plywood scraps I've nailed over the old window in the right of this shot.
Live in the solution, not the problem.
Edited 2/18/2007 10:32 pm ET by davidhawks
Looking good David. The reason I asked is I thought it was a snow load or span issue.
Chuck Slive, work, build, ...better with wood
Certainly not snow load. A 6" accumulation once every 10 years is about the norm in these parts. As for span, the existing rafters were only 2x6 over a 2 foot wider span. I actually had 2x8x18's on the job and the BI questioned whether or not they were for rafters when he inspected the footings. Glad he did, that would have been a he!! of a lot of firring.Live in the solution, not the problem.
Nice work David....when y'all are finished I have a....
David
I'm enjoying the slide show, keep up the good work.
Hell, I may even learn something about framing!
Doug
Thanks Doug, but if you want to learn solid framing techniques I suggest checking out "quarter deck" or "oval wall framing". Those guys are the cat's meow. Unfortunately I'm mostly limited to what I can do by myself or with very minimal help from friends.
In my past life I developed a particular aversion to employees and the accompanying headaches.Live in the solution, not the problem.
Not to be critical, but - The LVL in picture #41 in post #11 should be braced to keep the top flange from moving. Obviously you may have done that later on after that picture was taken. But I didn't see where it was addressed.
I have the same goal I've had ever since I was a girl. I want to rule the world. [Madonna]
Not sure what you by "flange" Boss. Are you saying that there needs to be some sort of anlge brace to keep the LVL header from "flopping" over one way or the other?Live in the solution, not the problem.
"Are you saying that there needs to be some sort of anlge brace to keep the LVL header from "flopping" over one way or the other?"
Yup. Beams need their top edges restrained for 2 reasons.
First - So the thing doesn't just fall over. It would never fall over during "normal" conditions. But if it was bumped it could, and an earthquake certainly could knock it over.
Second - The top edge of a beam is in compression. If it isn't restranied, it can buckle sideways. That won't likely happen in the short term, but certainly could happen over several years.
Hillary Clinton told Time magazine that she sympathizes with Martha Stewart because they're friends. Apparently, Martha used to come by the Oval Office once a week to try to get the stains out. [Jay Leno]
First of all, let me say that I appreciate your comments. I thought about what you said and for the life of me I can't think of any situation in "conventional" construction where what you describe doesn't exist.
Floor joists have their top edge secured by the subfloor, rafters are obviously tied in with the roof deck, and properly installed ceiling joists have strongbacks to hold them on layout and minimize twist.
Looks like I'll b making a trip up to the attic before it gets hot again.
Thanks
Live in the solution, not the problem.
Always happy to hear that soemthing I posted was helpful.God knows I wasn't hired for my looks.(-:
Q: What is the difference between a friend of Bill Clinton and a five-pack-a-day smoker?
A: The smoker will live longer
This partition, at the end of the hallway as you enter the BR, acts as a "buffer", and contains switches for all the lights inside and out. OSB end panels to prevent racking.
View Image
The trapezoids were an after-thought that I suggested after picturing how large and blank this gable was about to look. Morning sun hits 'em perfect around 8:30.
View Image
Getting a hand from "little" brother.
View Image
Then SIL decided that she needed a pair of Veluxes. Would that be Veluxii?
View Image
The skylights were about $300.00 each. The remote control blinds for each one was closer to $400.00.
Yes, the rest of the hangers got installed.
View Image
Here I decided to "flatten" the peak of the vault with 2x4's to lessen the possibility of the drywall joint cracking. What I really did was double the oppurtunity. So far, so good.
View ImageLive in the solution, not the problem.
David,
That OSB on the buffer wall returns is great thing to do. I will do that in the future. Will the bed go in that area?
I only use Velux, mostly the manual vent model but have never dealt with the remote control blinds. Is it a low voltage system?
The window detail at the gable end is a nice design feature.
Chuck Slive, work, build, ...better with wood
Yes, low-voltage. I hid the transformer in one of the WIC's, and installed the "remote" keypad in that partition, where it can be reached from, as you guessed, the bed. The wall opposite the partition is wired in a mirror image, so they can flip-flop the bed/entertainment center arrangement if they are so inclined.
edit: shoulda thru-bolted the wings of that partition as well.
Live in the solution, not the problem.
Edited 3/5/2007 11:05 pm ET by davidhawks
Gonna be taking a couple of weeks off from my brother's place to start some projects down in Carolina, so I thought I'd wind this thread up and bring it as current as I can.
View Image
Rather than try to match the decade-old 3-tabs, H.O. chose a 50-year OC dimentional for the entire structure. Good heavy shingle. Adhesion like nothing I've ever seen! Especially in July.
View Image
Double-5" vinyl to match existing. One day Ima gonna buy an aluminum pick I swear!
View Image
My 6'4" brother said in the beginning, "If I can't have anything else, I want a six foot Jacuzzi tub". This space was the old spare BR, approx. 10x12.
View Image
Dry fitting everything in anticipation of the tile-setters. #6 solid equip. ground for the whirlpool motor? Oh that's right, copper industry has lobbyists too.
View Image
Floor completed, waiting on me to finish mechanicals and close platform sides.
View Image
Six-foot his & hers. Small linen closet on left, toilet "closet" to the right.
View Image
Remote control Hunter w/ the long droprod is the cat's meow.
View Image
Semi-finished. Gonna try to get some furnished shots sometime soon. SIL has great taste and has it looking SHARP.Live in the solution, not the problem.
David,
Looks good. You are right about needing a pic.
Chuck Slive, work, build, ...better with wood
David,Thanks for posting these threads. They've been fun to follow and you've done some great work here.Good luck on your projects in Carolina.Best,
Steve"anyhoo ... to any of the girls here who can't hit a nail with their purse .... ever think of actually trying ... and practicing ... instead of looking to see which screws match yer shoes?" ~ Jeff Buck 3/13/07
Looking good! Can't help but notice that the date on your camera is wrong . . . .
You are posting in real time, to stay honest, aren't you?
Forrest - picking
Sorry to disappoint Forrest. When these were taken, I still thought Breaktime was something they gave factory workers @ 9:15 and 1:45.
BTW, what the he!! are you doing on the puter at 9:30 AM??? Its pouring rain in Statesville, so I've got an excuse.Live in the solution, not the problem.
It's "second cup" time. I just walk across the street.
Forrest - commutin' hard
It's good to be king...once in a while.Live in the solution, not the problem.
Those gable windows are a nice touch.
jt8
"The flower that follows the sun does so even on cloudy days."--Robert Leighton
Velux, man!
We is brothers in the space-time continuum!
Forrest - someday gonna' install a fancy one with auto-blinds.
David did you get everything from Lowes in Mt. Airy Or Galax? I was working in your neck of the woods when you were working on that addition.