Hi,
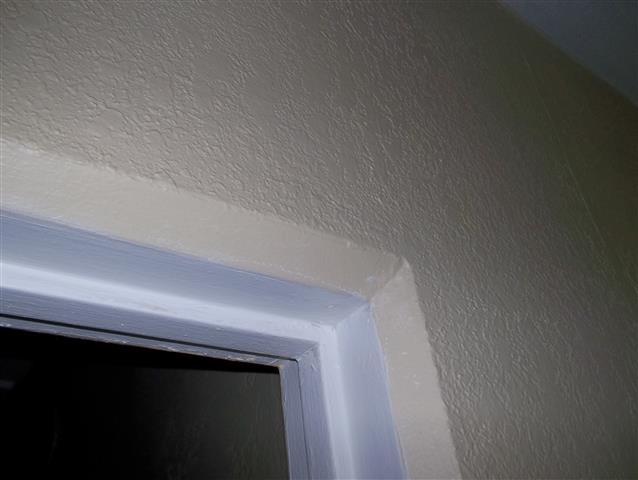
My home is a fifties ranch style. I want to replace all the trim and add casing to the doors. The doorways have a metal trim that’s plastered into the wall. There’s a 45 deg and a 1/4 round. Not sure on how to block it out for a nailing strip without changing the opening size. I was thinking of ripping a 45 deg strip to glue to the 45 deg to square it off. For the Qtr round I was going to buy a cove bit and make a cap that covers that, squaring that off. All suggestions appreciated.
Thanks,
Mike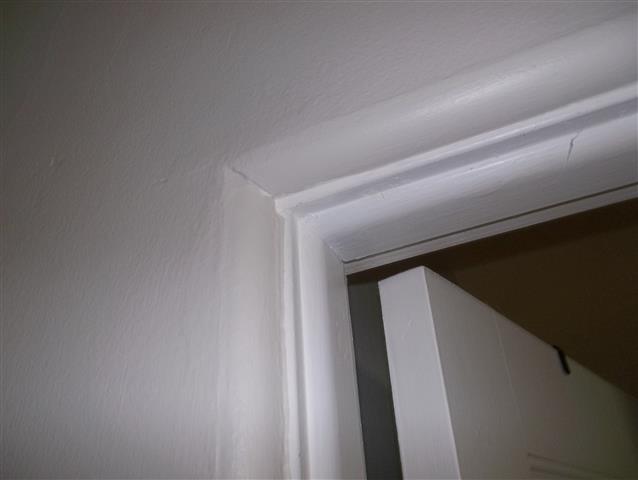


Replies
While it's tempting to keep and work around the odd 45 and 1/4 round details, it's almost always better to trim back the plaster and remove those areas so you can add rectangular wood jamb extensions, although on the hinge side you're going to have big problems if you try to add jamb extensions because the hinges work best if they are set in the normal location rather than inset like yours are.
The hinge side is the main reason the best fix is cutting any nails holding the jamb in place and taking it out of the opening. Then a jamb extension can be added to just one side of the existing jamb so the hinge is moved out in a more conventional location.
The standard way I'd approach this is to look at how the door fits the opening so any existing problems can be corrected while it's all taken apart. Take the hinge pins out so the door can be set aside. Mark a nice line around the plaster shy of the rough opening of the framing by 1/4" and using a diamond blade in a mini-grinder cut down to the wood and remove the plaster.
Then use a sawzall to cut through any nails holding the jamb in place and remove the jamb. I'll then use a utility knife to cut through the paint and any caulking on either side of the door stop and carefully pry it off the jamb and set aside.
Measure the wall thickness and add 1/16", which is what we want the jamb to be when we're done. The edges of the existing jamb must be square and clean - if not I'll pull the jamb apart and run through a table saw to just barely take off any odd angle. Then glue the new jamb extensions on so everything is flush. When the glue is dry sand the glue joint flat and fill any gaps with bondo, spackle, or the wood filler of your choice. Now put the jamb back together and it's ready to go back in the rough opening.
At this point it's just like hanging a pre-hung door and your jamb will look good as new with fresh paint if it was filled and sanded well.
On the stop side of the door, remove the existing stops, install stops that are so wide as to extend to the surface of the plaster. Install casings wide enough to bridge from the stop to the plaster. On the door side of the opening use jamb extensions.
Thank you. But how do you attach the jamb extensions on the door side?
Mike
Don,
Thank you. Unfortunately I have about 10 doors to do and the house is occupied and the disruption would be too much for my wife and I. 1or 2 doors probably would be doable.
Mike
I don't see anything wrong with the metal casing. You could strip the paint off it and repaint if the paint is bothering you. Add some trim to the doors and be done with it. Life's short, why complicate things?
Keeping things clean in this kind of surgery is always a challenge - any time you're cutting through plaster and freeing door jambs there will be dust that needs to be dealt with. Ideally you'll have a shopvac and helper to hold the hose right at the place you're cutting to suck up dust as it's made. I also keep a box fan in a window creating negative pressure in the area, essentially sucking out any dust that gets past the shopvac before it has a chance to drif into other rooms. After plaster is cut out and after the door jamb is taken out I'll carefully vacuum the opening.
To pull and rework just one door complete with trim and paint would take an entire day, so it's not an easy fix, but when you're done it can look like a brand new door and jamb if you care to take the time to detail everything well.
If I had to do this I'd consider making up jamb extensions that were appropriately dadoed to mate with the metal, fasten them to the back of your new trim, then glue them to the metal as you install the trim.