More affordable thermal break in climate zone 6 with Bonfiglioli inspired walls
My partner and I have been designing a home in central Maine (climate zone 6). Originally we had been planning on using 2×6 studs with rockwool batts in the cavity and then wrapping the exterior in 3″ rigid rockwool boards. With the price increases over the past few weeks, we’re now looking for a cheaper way to a decent thermal envelope. We’ll be doing most of the labor ourselves and with friends and family.
I’m interested in Stephen Bonfiglioli’s wall design that puts the thermal break on the inside in the form of foam strips on 2×6 studs and then uses 2×8 batts to fill the stud cavity. One challenge with it though is that the 1″ x 1 1/2″ strips of EPS foam that he uses would only give a thermal break of ~R-4 and I believe in our climate zone, the code requires an R-5 thermal break. I realize that the Bonfiglioli wall doesn’t make a complete thermal break at the corners — I’m waiting to connect with the local code enforcer about this, but I kind of doubt that he’ll care about that.
Attached are a few mockups of some variations on Bonfiglioli’s wall that would have at least an R-5 thermal break. I’m very inexperienced, so I was hoping to get other’s take on which (if any) of these designs might meet somewhere at a reasonable intersection of simple and cost-effective. If we go with one of these walls, we’d also be adding a poly vapor barrier between the drywall and whatever material would be on top of the foam strips.
1. 1 1/2″ x 1 1/2″ EPS foam strips covered in 1 1/2″ strips of 1/2″ plywood or OSB: If we went with this design, I’m guessing we’d need to use 2 1/2″ drywall screws to connect to the studs or nailers behind the foam strips. We’re planning on using 1/2″ ZIP sheathing on the exterior of the house, so we could use some combination of waste from that and standard plywood. The foam would have to be custom ordered, but it sounds like there are a lot of manufacturers who do that. This design would require a 2×2 nailer and a 1 1/2″ x 1 3/4″ nailer in every corner.
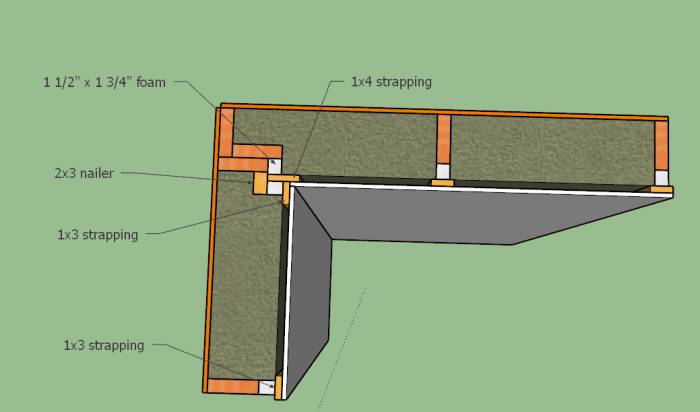
2. 1 1/2″ x 1 3/4″ foam strips with strapping: This design would use 1x3s centered on the foam strips on the studs like in Bonfiglioli’s wall, and each corner would have foam strips offset behind one 1×3 and one 1×4 with a 2×3 nailer behind the offset 1×3.
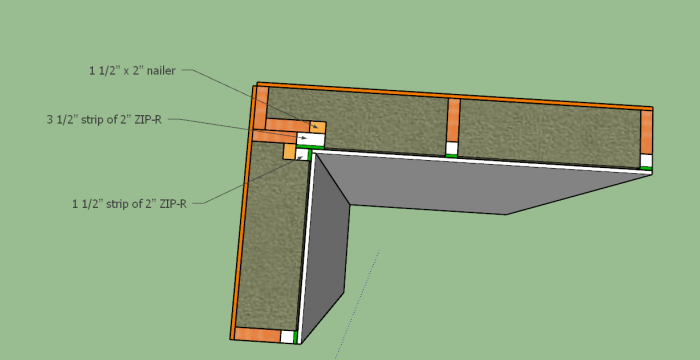
3. 1 1/2″ strips of 2″ ZIP-R with two 1 1/2″ x 2″ nailers in the corners: This design seems the easiest to me and obviously creates the best thermal break — although I’m a little hesitant about cutting up all that polyiso with a table saw and spreading that crap all over the place. My worry with this is that there would be a 1/4″ gap between the batt insulation and the drywall with nothing preventing the batts from bowing toward the drywall. I don’t know if this is something to even worry about, but it seemed like this could result in a small gap in insulation at the top of the wall.
4. 1 1/2″ x 1 1/2″ foam strips with strapping: This one is just like #2, but with thinner foam and a 1 1/2″ x 2 1/4″ nailer at the corner. This would cause the batts to be compressed by 1/4″ where they overlap with the strapping, but I’m guessing that isn’t much of an issue.
What do you all think? Any of these seem like the right choice to you or should I be going back to the drawing board?


Replies
We went with Zip R6, 1" of foam inside.
Have a look at T Studs, they're two 2"x3"'s with joining dowels & I think can come in as thick as 8" (2x8). Can then be spray foamed in the gap.
Would be worth comparing cost to R value.
https://www.tstud.com
https://codes.iccsafe.org/content/IRC2021P1/chapter-6-wall-construction#IRC2021P1_Pt03_Ch06_SecR602
Has a note in figure R602.3(2) Framing Details that allows deletion of intersecting backup studs at corners provided you use wood cleats, metal drywall clips, or other approved devices.
You might want to look at clips like these:
https://www.amazon.com/Corner-Back-Drywall-Back-up-Clips-300-Pack/dp/B00PJYV1LE
Then you can apply your foam spacer, strapping, and drywall, on one of the studs, using clips to secure the drywall on the adjacent wall