a customer would like me to refinish his hardwood floors it has a couple of gouges in it Im assuming to fill it with wood filler/putty, sand it with a belt sander and then put a couple of coats of poly on it, any sugestions from the experts cause i never done it before its about 13×15 plus a closet and hallway, do i need a special sander or edger ,baseboard trim is off at the moment
Discussion Forum
Discussion Forum
Up Next
Video Shorts
Featured Story
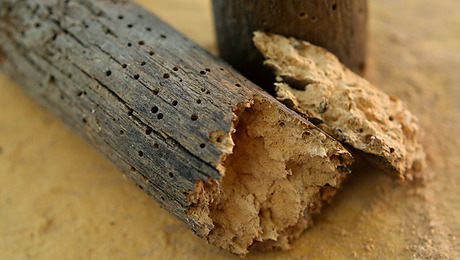
Learn how to fight wood-boring beetles and prevent home infestations with expert advice from Richard D. Kramer, an authority in pest control.
Featured Video


Highlights


"I have learned so much thanks to the searchable articles on the FHB website. I can confidently say that I expect to be a life-long subscriber." - M.K.


Replies
How bad are these gouges?
Normally for a scratch, you sand deep enough to get rid of it.
With a really deep gouge, I would repair it by replacing the flooring in that spot.
Filler will always show, and amplify the damage to the eye, IMO.
Commercial sanders can get away from you if you are not experienced with them and do more damage. easier to use are the four or three pad orbital units that you can rent
Welcome to the
Taunton University of Knowledge FHB Campus at Breaktime.
where ...
Excellence is its own reward!
gouges are 1/4 maybe 3/8 deep 3 of them, i told them wood filler wouldnt be the same they seemed ok with it, dont i have to sand with the grain with a belt sander does it matter what grit i use
Well, you won't be sanding out a 3/8" gouge. And tho' you might be able to use filler, you shouldn't. If this is typical hw flooring, if I wuz in your shoes, I'd be thinking about replacing the boards that have gouges or, if that's impractical, making some dutchmen for said gouges. Done carefully, these can be almost invisible.
Mike HennessyPittsburgh, PA
That is too deep to sand out. It needs surgical replacement. You can use a Fien multimaster to do it easily or use uility knife, sharp chisle and patience to lift the damaged ones out, then fold new ones in.Another way I have repaired this sort of damage is to make a guide for router and use it to take 3/16" off th etop where the gouge is, and rip same thickness on TS of a piece matching the grain, then glue it down, cover with plastic, and weight to hold while glue kicks.Sanding a floor that size with a belt sander sounds like torture to me, and I think most belt sanders would leave machine marks - not a perfect flat surface.
Welcome to the Taunton University of Knowledge FHB Campus at Breaktime. where ... Excellence is its own reward!
"Another way I have repaired this sort of damage is to make a guide for router and use it to take 3/16" off the top where the gouge is, and rip same thickness on TS of a piece matching the grain, then glue it down, cover with plastic, and weight to hold while glue kicks."
Zactly. A dutchman. Fun AND effective. ;-)
Mike HennessyPittsburgh, PA
I would use big pad sander on all of the floor, sand the current poly off first, sweep it up, and then go over the whole floor a second time just taking a speck off the untreated floor. I would then sweep this sanding up and mix with glue in a slurry and pack in the gouges so it is well proud of the surface. Next day, I would sand smooth. If this does not please - take a board out of the closet and use to repair - easy to do with a multimaster.
ManuelLabor79
You are really over your head here and it shows by what you think are the correct ways and tools to do this.
That's OK I'm sure you can do a great repair you just have to change your plans a little bit..
First the gouge will show and attract your eye to it, so either you do a dutchman (described earlier) or accept the fact that no matter how good you are your work won't look good..*
Next refinishing. Don't use a belt sander! Please! No matter how carefull you are the belt sander isn't the correct tool for the job.. It would be like using a chisel to cut a board. Rent a professional sander.. not one of those drum sanders.. they require too much skill and experiance to operate without leaving gouges in the wood. The rental place should have the newer square pad sanders (about 20x24 inches) or DA type sanders. Those are simple to use and do an excellant job even for a complete novice. With the square pad type you won't need an edger.
When you are there you will need to grab one of every grit they have from 36 grit right up through 120 grit. Don't skip grits, it's false economy and you will wind up with scratches showing through.
Now start with the 36 grit and remove all the existing finish. Then use each grit to sand the deeper scratches off with the finer grit (goes really fast once the old finish is gone) switching grits is really quick too, there is nothing to attach tilt up the sander slide the old grit out. and slide a new grit under and set down the machine. Takes me about 30 seconds to do..
When you finish with the 120 grit give all the dust a little while to settle and then carefully go around and vacum up the dust the machine didn't pick up.. really do a good job here.. It pays off. I then go around with a slightly damp towle and wipe the whole surface to get every last bit of saw dust up..
OK now comes choice time. You can go ahead with your idea to use polyurethane.
Polyurethane smells for an extended period of time, slow to dry, Looks cheap and plasticy and relatively soft compared to shellac. Plus any scratches etc. in order to do invisable repairs require complete resanding.
Shellac on the other hand is pleasant smelling that is completely gone inside of an hour, instead of three days required to complete the refinishing you can do the whole job in about 4 hours. Another words the whole job could be done and over with in one day!
Shellac is safe, you've been eating shellac covered candy and pills all of your life.. IT's really beautiful! The finest antiques are all finished in shellac. Tough, durable, and insanely easy to repair should any damage occur.
It's been the finish of choice for centuries prior to the creation of polyurethanes (and all their marketing hype)
PLus shellac is extremely easy for complete newbies to do.. If you want I give you simple, can't screw up directions.
Im glad I posted my ideas so i can read all of your ideas so I can now plan accordingly having the correct info thanks alot
do I apply the shellac after sanding and staining is complete right, thanks for your suggestions sounds great ill be trying it this week
yes, but put down a little shellac first.. you might not want to stain. IF you do it's really simple to wipe up shellac with denatured alcohol..
Remember the steps.
over thin the shellac,
flood it on fast, wait 15 minutes.
sand lightly w/220 grit to remove the little nubs.
apply second and third coat to fix any slight errors in the first coat coats..
should be done in 2 hours..
customer wants to stain with a dark color .so i rough it up with course grit , use differnet grits then stain, little shellac then sand again 220 then shellac again?
After a coat or two of shellac, sand with 220, vacumn and tack the dust off, then do your stain, let dry thoroughly before adding top coats of shelac. Make sure the shellac you use is dewaxed for the first coats.If you can find the same wood species and grain pattern, it is VERY wise to try this on a sample board first to be sure the customer likes it.
Welcome to the Taunton University of Knowledge FHB Campus at Breaktime. where ... Excellence is its own reward!
And if you can't find a sample board, just do it in a small area (about 1' by 1' to 2 by 2). The shellac dries fast, and the final color will look pretty similar to what the wet stain looks like.If they don't like it, sand it off and do over. But make sure the lighting is sufficient and is similar to what the room will have.
Hi Frenchy,
Reading the floor repair/finishing thread with great interest as I'm about to embark on exactly the same exercise,only its not discreet gouge damage,but all over small scratches etc,so I'm starting from scratch.[no pun intended!]
I would welcome your instructions for the shellac finish.The poly that is the existing finish didn't wear too well at all.
With thanks
Robin
Glad to help,
First let's look at what caused the finish to deteriorate to ensure either it won't happen again or you can deal with it easily in the future..
If it's something that won't change shellac is by far the easiest finish to "FIX" So you are moving in the right direction..
However you should know that shellac while dry enough to walk on quickly, does take about 30 days to really harden up to achieve it's full ability to resist scratches and marks. Poly tends to be softer and remain softer thoughout it's life..
Now sanding the old finish off isn't that difficult but don't rent one of those drum sanders.. It really takes skill to do a flawless job with them. Skill and technique..
However the flat sanders aren't so sensitive, in fact they are perfect for do-it-yourselfers. I've only used the square ones (about 20x24) but I've heard nice things about the round DA pad type (except your need for a finish sander with them to get into the corners) The square ones have no such issue..
When you rent one get the coarsest grit they have avialable(you may need several sheets if the floor is large enough or rough enough) most places will take back unused sheets) and one each of the various grits up to the polishing screen. (about 120) It's false economy to skip grits!
Start with the coarse one and remove all the finish. Level off the wood if there are humps etc.. Now it starts to get a lot easier. Then switch to the next finer grit. All you are doing is changing the scratch marks from deep to shallower. Basically once over lightly is all that's required. Then switch to the next grit and repeat. etc. You are done when You've almost got a sheen on the wood.. (changing grits is really simple you raise the sander slide the old grit out and the new grit under and set back down.. It might take a whole 60 seconds!
Here's what's going on.. the first grit made deep valleys' pretend they are 10,000 feet deep. The next grit removes the peaks but still leaves the valley's but now they are say 5,000 feet.. next grit cuts them down to 2500 feet followed by 1000 feet etc. and you are finished when the valley's are all gone and the wood almost has a sheen on it.. the reason not to skip a grit is because if you skip say the second grit it wouldn't take you twice as long to achieve the same thing with the next grit but 10 times as long.. You're trying to remove those 5000 ft. peaks with paper intended for 2500 feet.. OK time to head out and return the sander and buy the shellac..
What you want is a gallon of Zinnser's blonde (clear) Bulls Eye for every 500 sq.ft. you will do.. I buy mine at Home Depot because it stays fresh (important). You'll also need two gallons of Denatured alcohol that's really important! Not paint thinner or anything else, denatured alcohol.. I like to apply it using a lambs wool applicator but have used nice wide paint brushes as well. Heck you probably could apply it using your socks and when finished throw your socks in the washer and they will come out just fine.. <grin> (But wow! would it ever be cold on your feet!) You will also need one of those 3M sanding sponges. 220 or fine grit (yellow ones) (one for every 500 sq.ft)
At this point my shoes are off and I'm in my stocking feet.. no sense making scuff marks with shoes. Don't worry your soxs will come out fine in the wash even if they wind up coated with shellac..
Now get out the vacum and clean up all the dust.. Nice thing about the newer square pads is they create less dust than the old drum sanders did.. Take a towel dampened in denatured alcohol (ditto with regard to coming out fine in the wash) and wipe up the floor completely. Dust is your enemy.
OK, stir up the shellac, a minute will do nicely (30 seconds if you're rushed) and pour the shellac together with the denatured alcohol . You now have three gallons of mix..
Now comes the indy 500 of painting.. Fast is important, neat isn't! Flood it on like you're mopping a floor. Don't try to carefully paint it!
Do not ever stop and go back over it!
If you miss a spot, don't fret, keep going and get it with the next coat. You see each coat melts into the previous coat and "fixes" itself.. (one of the things I love about shellac)
The first coat will dry in about 15 minutes.. Now run your hand across the surface.. feel those nubs? that's wood fibers raised by the first coat and they sand off really easy. Using your 3M sponge a quick wipe or two erases them. My rough rule of thumb is a second to a second and a half per square foot so sanding 500 sq.ft should take around 10 to 15 minutes.
Don't bother fixing uneven finish spots. Remember the next coat will melt the first coat and your time will have been wasted..
Now take a dry towel and wipe up the little residue (white powder) then apply the second coat. Remember fast! Like you're mopping a floor! This coat will take about 1/2 hour to dry. When it is then check again to make sure you got up all the nubs. If you missed some go ahead and just sand them off and wipe up the residue. Now apply the third coat. (FAST)This will take an hour to dry.. each following coat doubles the time required to dry.
3 coats is all I do but you might like it thicker.. That's fine but thicker doesn't mean stronger or more durable.. In fact if you get it too thick you can start to cause problems for yourself.. (I'd say anything above say 5 or 6 coats is too thick) Let your paint brush or applicator dry (don't clean) Next time you need it, soak it it denatured alcohol for a bit and it will be fine.
When dry you can gently place furniture and rugs if you hasve to or let it harden a bit before returning them (excellant excuse if you are used up and just don't have the energy to move all that furniture..)
Now to deal with scratches, simply dampen a clean soft rag with denatured alcohol and rub briskly for a few moments. scratch-be-gone!
(If small children are watching make sure you say Abbra cadabra alakazam! and smile with a flourish!)
Now if you want to gild the lilly you can either color sand or french polish for the ultimate finish..
One warning, french polishing a floor will try the muscles of anybody and the patience of everyone including the saints..
I'd wait a month before waxing.. Paste wax is best. Many floor waxes have some pretty nasty chemicals in them..
Edited 10/9/2008 8:07 am ET by frenchy
Frenchy: Great post and VERY informative. Since I am about to do a floor myself a few quick questions: What applicator do you use to apply the shallac very fast? What is color sand and/or french polish? Thanks, Mike
I buy a lambs wool applicator on a pole because I hate to get down on my hands and knees.. HomeDepot sells them as do many other places.. Treat them like a mop!
Color sanding is sanding with finer and finer grits of sand paper untill you're actually shining instead of sanding.. start with 320 grit and go through 4000 grit..
French polishing achieves the same thing only you use the friction of rubbing to achieve it.. rather involved directions which since I've only followed them once I'm not comfortable giving.. (but I'm not kidding about the work required..)
The differance in work is massive and yet once waxed it would be a rare person indeed who could actually spot the differance..
Do you color sand after the application of shallac?Mike
Yes
I'm sorry I didn't do a clear job of explaining color sanding.. First you probably won't need to ..
I have only done it to see if it made a big improvement and it didn't so I don't..
Second when (and if) you color sand you must use a sanding block.. you cannot achieve the same thing with your bare hands.. Now I have hard rubber sanding blocks because they are shaped to fit my grip but still provide the required flat surface. But a 2x4 will work as well even if it's not as nice to hold onto..
When sanding all you are doing is taking off the tops of things.. The first sanding takes the longest and then like your sanding the floor for finishing each next grit is much easier..
What you do is sand untill you have a uniform whiteness (wipe off the residue to look carefully to make sure across the area you have removed all the shiney areas all across the floor then switch to the next finer grit.
Thanks - since this is a master bedroom - and I am unmarried - I think a finished floor will be more than enough. I'll leave the color sanding to perhaps the next owner? I am about to start this project in 30 days - wish me lots of luck. Mike
Goodluck and have fun..
(yeh, I agree a bedroom is definately not worth the effort)
Only place I would ever consider doing it would be some giant room with a grand piano in the corner and bare wood floors as the feature.
French polish? no way... ever!
Now Ralph Lauren has his whole house French polished but then he has about a zillion bucks and made the cover of Architectual Digest. Plus his home ( the one in New York) is 17,000 sq.ft.
Pheeewwwww! can you imagine the work involved?
Edited 10/9/2008 3:56 pm ET by frenchy
Hey Frenchy,
Hard to know what to say!
My greatful thanks for such a thorough reply. I'll do as you do and use a l'swool applicator on a handle,thus avoiding some of the backbreaking stuff, as the old backbone is just that..old. :-) added to which,I'm no Ralph Lauren...money,property and everything else included,so I probably won't worry about getting someone to french polish my few measly little floors!
Thanks again,
R
Glad I could help, please let me know how you liked the work..
Frenchy: Again thanks. Its a winter project and so I'll be trying it soon. If I have questions I will post them here and perhaps you can be my mentor? I will not french polish unless my french maid agrees to step up and do it for me - on second thought - NO!Any suggestions on stain once I get the floor sanded?You instructed me to start with 36 grit paper and then climb the ladder to 200 grit without missing any in between. What would you suggest for the numbered grit papers from 36 to 200?Thanks, Mike
you might need to use 24 grit to start depending on your floors.. and I think they only go up through 120 grit (which is really a polishing screen)
I'm sorry but I failed to memorise the variuous grit steps between
I think it goes 24 , 36, 60, 80, 100 & 120 polishing screen.
Sure! I'll be glad to help any way I can.
As for stain.. that is really up to you.. what I would do before I put any stain on is do a test spot, just a little small 1 foot square where I tried first a clear or blonde shellac and then an amber shellac. ( the two commonly avialable shellac's)
If you like them, leave them. If you don't then simply wipe up the shellac with a rag soaked with denatured alcohol.. (comes right back up in minutes with no sanding!)
None of my floors have any stain and the differance between raw wood and the first thin coat of shellac is awsome.. You can't believe how much that wood pops! It's absolutely magic!
Again, thanks. My house was built @ 60 years ago and the floor of choice was thin slat maple. I have a feeling - a hope maybe - that when sanded and finished they 'pop' as you say. Do you remove the molding before sanding or do you tape? The more you talk about the magic of shallac (sp?) the more I am anxious to begin and see the end result.Mike
Sorry - shellac
either way works.. or if you forget you can simply wipe it off with a denatured alcohol soaked rag later..
(Don't ya just love it?)
I finished the floor it came out pretty good, although i was disappointed with the square pad sander it really didnt seem to take anything off
please describe further what you mean by take anything off.
Did the 24 grit remove the old finish?
I started with 36 grit its what the hardware store suggested the old finish seemed to still be on the floor and after each grit it looked as if i was sanding down the wax cause of the whitish film look after i was done i mean it came out ok i was just expecting more wood dust and bare wood to be showing i basically smoothed it over stained sand shellac
OH then you didn't get to the bare wood with the first grit,, each grit from then on simply removed scatches.
I'm sorry. You're right..
what I would do is remove all the shellac using denatured alcohol and then sand to bare wood and follow the instructions from there on..
ah so i should have stripped the floor first then started with the sanding good thing customer didnt complain too much it came out pretty good anyway took me most of the day now i know for next time thanks for your help
I am very sorry, I didn't make that clear.. the first sanding is removing the old finish down to bare wood, each follow up is simply to remove the scratches.
I hope you saved the sandpaper.. you can use everything except the first grit (24 grit) for more than 2000 sq.ft. I think if it didn't get beat up and contaminated even more than that..
Frenchy: Since I am in this instructional loop also, one more question: "what I would do is remove all the shellac using denatured alcohol and then sand to bare wood and follow the instructions from there on.."If I do not know if the old floor has any shallac on it is there a simple way to tell so I do not have to do the alcohol process first. Should you always start with 24 grit first?Thanks, Mike
Shellac always soften (even after 100 years) quickly with a denatured alcohol soaked rag. If it's not shellac then yes you should sand the finish off to the bare wood.
Finishes done prior to WW2 are most commonly shellac.. following WW2 various finishes were used. Most finishes now aren't shellac with a few high end exceptions..
Thanks. I suspect mine is akin to a poly finish of some type. Waiting for cold months to do this job.Mike
I've had GREAT success in filling bad holes.
It all started many years ago when i drilled a hole in the wrong place for a newel post on the bottom step for a volute ...on the rounded oak step. I FREAKED!!!
Thank god it was my own house. What I did was to fill the 3/4" diameter hole with wood putty then I got out a furniture touch-up kit I had coincidentally just bought at the lumber yard I was taking Saturday morning classes at for veneering work in the Bronx (Constantines). I think that lumber yard which sold mainly veneers was the oldest yard in NY (I think i t's finally gone now). Anyway...they gave me a big discount b/c I took classes there.
It was similar to this but not as extensive
http://www.constantines.com/index.asp?PageAction=VIEWPROD&ProdID=260
There's all kinda touch up kits you can buy just keep looking
http://www.constantines.com/index.asp?PageAction=VIEWPROD&ProdID=156
http://www.constantines.com/index.asp?PageAction=VIEWPROD&ProdID=1995
I used a kit that also had colored powders you mix up and use with very fine artist brushes and finishes.
I filled the hole...gently sanded it to blend it all into the real wood..I colored the area exactly like the main part of the step...then I took a fine 000 windsor newton artist brush and mixed up some blacks and browns and painted in the grain attached to the real grain around the filler.
When my wife walked in I asked her if she saw anything wrong with the bottom two steps...she didn't notice it at all and she used to be a commercial artist (water colors). I defied anyone to find it!! amazing. took me less than an hour and well worth it in a lot of instances.
That kit was invaluable in a lot of situations I came across. Course now that everything I do is so perfect I don't need it anymore...lol
http://WWW.CLIFFORDRENOVATIONS.COM
http://www.ramdass.org
"I am Andybuildz and I approve this post"
Edited 9/26/2008 12:57 pm ET by andybuildz
Like the others have said, don't try it with a belt sander. Even if it was only an 8'x8' room a rental sander is the way to go. Get a sander with dust collection to save a lot of time cleaning up.
As for the gouges, I think it depends on the grain and lighting in that area. Fillers work well if the grain is rather wide and it's in a smooth spot. Much harder are areas with tightly spaced grain. Fill the area, spot sand and wipe with mineral spirits on a rag to see how well the filler will work. Better to cut out a section, match a wood plug with similar grain, or replace the board in question.
Beer was created so carpenters wouldn't rule the world.
When renting the floor sander. get several sheets of each grit. Return what you don't need. Particularly the first pass when you are removing the old finish can gunk up the paper.