I’m pretty sure it’s wind-related…
This is the third winter with this roof. So far fine, until the huge wind & rain storm we had a couple of weeks ago. Wind blew a couple of semi’s over on one of the bridges; they clocked 107 mph on a 3,000 ft. peak across the valley from me.
Anyways, went in to the shop the next day and a big ole wet spot on the floor, about 4 ft. diameter . Good news is it (barely) missed the cast iron table on the bandsaw. Looks like it ran right down the side of a beam, the sheetrock on either side was dry and there is only the slightest gap. We’ve had a bunch of rain since and no more leaks.
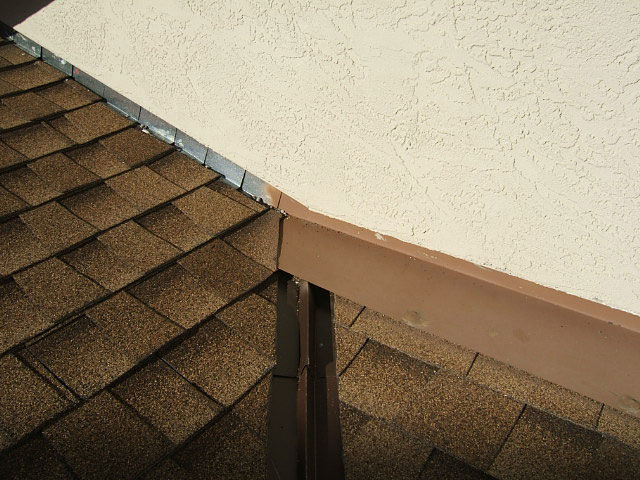
I’m thinking it blew up the valley pictured and came down the wall. Nothing else makes sense; all the flashing is good tight. FYI, the flashing over the valley is about 6″ wide.
Question 1 – does my theory make sense?
Question 2 – if so, what’s the best fix. My instinct is to blow some Great Stuff up there but I’ve been hanging out here long enough to know that could lead to worse problems with trapped water. So, what’s the non-hack solution?
Edited 1/13/2008 10:12 pm by wrudiger
Edited 1/13/2008 10:13 pm by wrudiger


Replies
I think you are making a pretty good assumption as to the source of a leak.
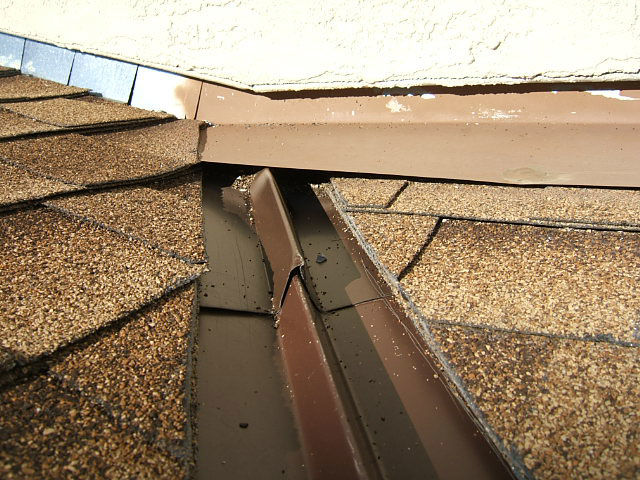
1) What does the end of the valley flashing that terminates under the side wall flashing look like?
Does it have an "Upturn" to prevent water from being blown beyond it?
2) Do not use Great Stuff or any expanding sealant at the seam between the two valley flashings. All that will happen is it will lift the top piece and create a leak source.
If I wasn't going to open the top of the valley up completely and re-flash then I would do this:
I would try to lift the shingles on the left side of the valley flashing at the seam and see if I cannot get far enough to the side of the flashing to fasten the top piece down under the shingles. (will probably require popping a few shingle nails and lifting the shingles out of the way then replacing them ) It is quite possible the top piece of flashing doesn't have enough lap over the bottom piece to prevent water from traveling up hill in a high wind.
I also would use a sealant between the two pieces of valley flashing , trying to get it as far up into the lap as possible.
Gutter caulk or some product like that ( a high quality caulk meant to bond to metal)is what I would use.
Just looked at the pics again. Take a close look at the junction where the side (step) wall flashing terminates against the end wall flashing at the top of the valley, that is another possible source for wind blown water entry.
They can't get your Goat if you don't tell them where it is hidden.
"1) What does the end of the valley flashing that terminates under the side wall flashing look like?
Does it have an "Upturn" to prevent water from being blown beyond it?"
Although I didn't state it very clearly, I was guessing that there is no "upturn". No idea what's really up there - hard to see.
I think you are on to something with the area where the wall and step flashing come togehter. Great ideas - thanks!
I would be proud to have done that flashing job, but it is better than too many I have seen.
Try to do this without disturbing much stuff.
I think the main cculprit is the top end of valley under that wall head flsshing. You could squirt some great stuff there to block wind from pushing water uphill too far. I would use a tube of geocell myself.
Another way would be to cut a piece of meta to fit the center rise of the W valley and bent to an L so it fills the gap and under the head flashing. Then poprivet it in place. No ccaulk. That stops wind driven rain, but if there is such a heavy raion that it is not flowing off fast enough, it ould still back up a bit.
Maybe caulk, thenn the flashing riveted.
I would have ended the head flash on the right side of the vally and started the step flashing one ourse lower so they both would be laying down on the flats instead of heald up, and would have an upturn in the valley. Check whether the first step flash piece laps over the head flashing by a few inches. If not, fit a slip in there.
Welcome to the
Taunton University of Knowledge FHB Campus at Breaktime.
where ...
Excellence is its own reward!
Another reason wht "w" valleys are not good. This one has exposures that are not wide enough.
If it were mine I'd stripm back this area and make perfectly sure of the underlayments everywhere, including behind the step flashings. Then reshingle with a v valley with wider exposure.
They used I&W on all slopes less than 4/12; I'm pretty sure this is one of them. Overall, from my somewhat limited knowledge, they did quite a bit better than average job with this one exception, which only had issues in a very uncommon windstorm. AFAIK, the "w" valleys are pretty common here in CA.
I think Piffin got it - failure to flash the wall above the valley. I'll give his approach a try, and hopefully won't have to put it to the test any time soon!
Is the step-flashing laced properly to each course of shingles. From the picture the first three don't align with the bottom of the next shingle above, similar to the step-flashing farther up-hill in the picture. My question is does the first piece of step-flashing under or on top of the first shingle to go over the headwall flashing. My experience would tell me to install it on top of the last valley shingle. I use a long screwdriver to probe under the headwall flashing to check for an upturned valley. One other thought are the "ears" trimmed from each valley shingle ( each shingle cut at an angle needs the top point trimmed off at an opposing angle to the flow of water usually 2 to 3 inches ).
I prefer, when possible, to inspect the leak from the attic, looking for a water trail. Or with the help of another person test the area with a garden hose, flooding the area from the bottom moving up slowly till the leak is located.
How much metal is overlapped where the pieces of valley meet? How much metal is overlapped where the first step-flashing goes over the headwall flashing?
Hope maybe these other ideas help you.
Greg in KC MO
Greg,
Thanks for the great tips on what to look for and how to inspect the flashing.
The attic area there is inaccessible, so that's out. We have survived 3 winters with very heavy downpours with no problems; it was just that one storm with the very high winds so I have a strong feeling it has to do with flashing around the valley. It's supposed to be dry this weekend so I'll get up there and inspect more closely.
Wayne