All
I did a thread earlier on Rotten Marvins.
http://forums.taunton.com/tp-breaktime/messages?msg=112965.37
I haven’t posted pictures since that thread, the the uncovering of rot and poor construction continues. So I am going to post some pictures from the last 2 weeks.
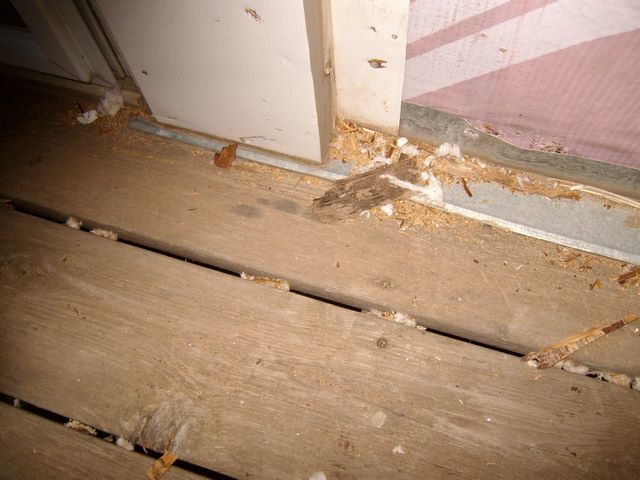
After we tore out the studs, plates and removed the deck ledger we found rim joist looked like this. The link above will show what the damage loked like with just the siding removed.
This is a side view
This is how the deck was originally flashed in 1995.
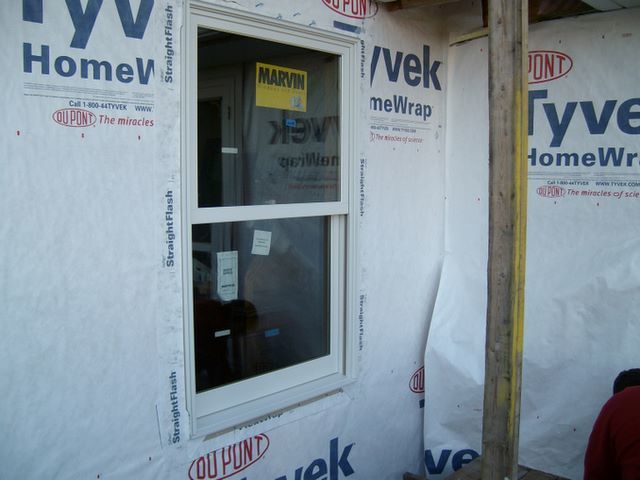
This is how the window looked after we were done rebuilding and flashing. Click on the link at the top of this post to see what that corner looked like when we started. That post shows damage with the siding off. Posts on either side of that link show the before and after tearing out stages.
In later posts I’ll show that we continued to uncover damage.
Rich
Edited 12/10/2008 10:50 pm ET by cargin


Replies
All
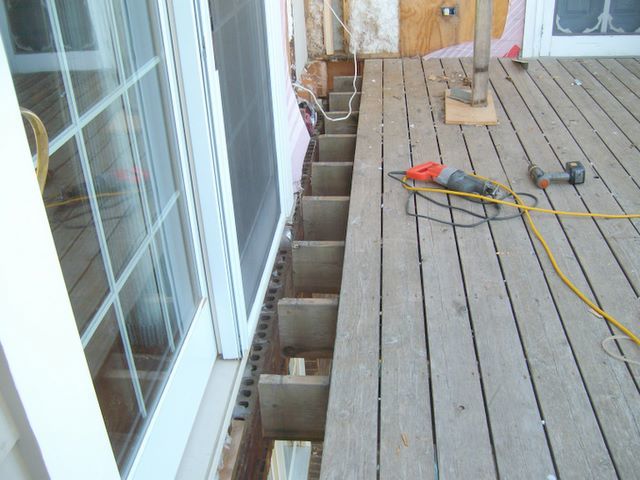
The deck is 45' long. All the flashing was done as pictured, over the top of the deck board. We loosened up the deck in 3 stages, by putting a double 2x6x 20' beam with 3 jacks under the deck. The we removed the hangers, cut the deck joists back about 1 1/2" then tore out the ledger board, rim joist and plate.
The house joists were run past the basement wall by about 2 1/2" then the rim joist was installed. A 2x4 plate was then installed underneath and a brick facade was laid up to that plate so that the siding of the house fell just over the brick.
A major repair was done 5 years ago as told in this post. http://forums.taunton.com/tp-breaktime/messages?msg=112965.1
Here are more pics as we tore the rest of the ledger board off.
View Image
We installed Ice and water behind the treated ledger board. I had 2 sliding glass doors on to the deck. The sill of the doors was flush with the top of the deck boards so I had to find some way to seal that joint. I shot a bead of urethane in the corner before I installed my 1/2" plywood sheathing, then the I&W, then I took a 6" strip of Protecto Wrap Peel and Stick roofing and sealed it to the bottom of the door sill with a heat gun.
View Image
This is cross section view of the deck ledger, plywood and rim joist.
View Image
Edited 12/10/2008 10:53 pm ET by cargin
All
Here are more pictures as we moved down the deck.
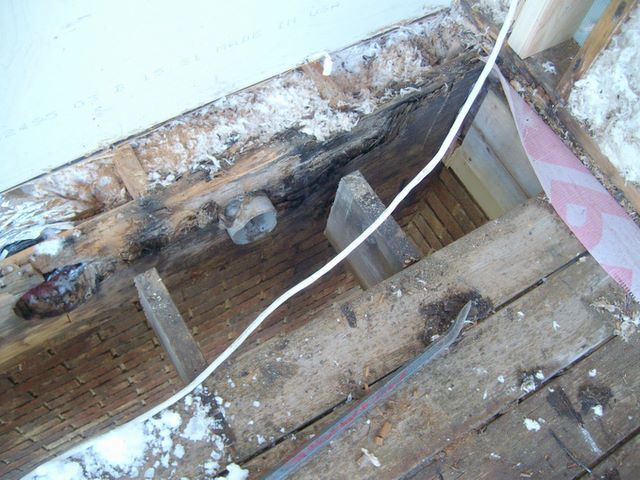
As we got to the south sliding glass door (3 panel) we discovered this repair block had been installed 5 years ago. This door is on the south corner of the house and is about 11' wide. So the whole corner of this 2 story house is supported by this header bearing on either side of this door. So keep in mind that this is a one of those bearng points.View Image
This is a view of the king stud and cripple with the 2x6 repair block and rotten plate removed.View Image
This is a view of the double ledger and flashing that we installed. I ran the Tyvek long on to the I&W because we could not finish each section in a day and I wanted to protect the open house from the snow and rain we could get. After I installed my flashing over my Tyvek (I know jump on me) I used straight flash and a heat gun to seal the top of the flashing. We covered the ledger with the Protecto-Wrap roofing membrane to isolate the AQC from the galvanized flashing.View Image
Rich
Edited 12/10/2008 10:55 pm ET by cargin
BTDT.
It does take a dang good carp to hold the roof loads up while one is chopping out the bottoms of the studs, rim joists and even floor joists. Not to mention dealing with the fungus.
I had to do mine from the inside. Freakin' exterior was bricked. Water falling off the unguttered roof onto the deck would splash up against the brick. Then migrate thru it and the thin mortar joints to soak the sheathing behind. No tyvek then in the early 80's.
Tore out all the material until we was starring at the backside of the brick veneer. Then coated it's backside with hydralic ceement before rebuilding.
Tuff job. I feel for you.
pete
It does take a dang good carp to hold the roof loads up while one is chopping out the bottoms of the studs, rim joists and even floor joists. Not to mention dealing with the fungus.
It was simple, I held the roof load with one hand, held up the deck with my foot, removed rotten framing with my free hand and a flat bar and I spit clorox at the mold. LOL
Even though it's been cold and the work is dirty I have been enjoying this job. I feel for the HOs though.
Rich
All
Hee are more pics of the damage under the last slider.
This is how the window was flashed 5 years ago.
View Image
This picture shows that the housewrap was torn just above the ledger board the whole length of the deck. Ignore the dates on the pictures, my camera was set for the wrong date.
View Image
Rotten plywood under ledger board.
View Image
Rim Joist under repair block, bearing point for the king stud and cripple.
View Image
When they did the repair 5 years ago the slider flange was somehow destroyed so they used duct tape to create a flange.
View Image
Rich
Looks like some very poor workmanship! Thank God for the idiots that keep everybody else in work!!!!!!!!
Second that emotion. On the one hand, I feal for the owner because sometimes the damage as so far past the budget to fix, and I just can't donate time and material all that often. On the other hand, stupidity has been keeping me really busy lately. Great thread, keep them coming. I have a new found respect for renovation carpentry, I've been working with a group of guys that continue to impress me just about every weekend. It's an entirely different set of skills to unbuild and rebuild, not just build.
We are about 85% on a job that originally just started out as a new deck. The original deck was actually three little decks, one made of wood, and the other two wrought iron, with one being a second floor landing with flight of stairs to the first floor landing, and another flight of stairs to the yard. The second floor landing was pitched back into the house with improperly installed metal flashing. The original wooden clapboards were taking the brunt of the run-off and the original owner's fix was to cover the whole house in vinyl. That was probably about ten years ago. Somebody had rebuilt that section of the house probably from the inside: there was one original post left (house is probably about 80 years old) and the "new" studs were pressure treated. I found out why by the time I got to the old post, it was crawling with terimites and carpenter ants. I've seen what termites can do, but this was the first time I've ever discovered an active colony. The "new" studs were the only reason that section of the house was still standing. I believe the repairs had been done from the inside because by the time I got past the vinyl, the original siding and sheathing boards were so bad, it looked like someone had just glued mulch to the side of the house. I have never seen anything that bad. Before the job kicked off, we knew that there would be some rot because the second floor landing was no longer attached to the house. I've got a picture on my phone and I will post it as soon as I figure out how.
Keep up the thread. I live for this stuff!
Question about the ledger flashing. How are you isolating the metal from the P.T. wood and why didn't the joists get cut to allow the flashing to not be cut at the joists? I can't see the entire detail but it looks to me like water could intrude to the flat top of the ledger, I use a narrower ledger than the joists and flash it first over a peel and stick, cant the flashing and butt the joist over the flashing.
shell
How are you isolating the metal from the P.T. wood we used peel and stick roofing material (protecto wrap) and why didn't the joists get cut to allow the flashing to not be cut at the joists? I don't know how you would do that. Please post a picture.
I can't see the entire detail but it looks to me like water could intrude to the flat top of the ledger, I use a narrower ledger than the joists and flash it first over a peel and stick, cant the flashing and butt the joist over the flashing.
I can't visualize this, again please post a picture. That's why I posted this so that I can learn from others.
I have sheathing then 18" of I&W, Tyvek, then my ledger, the ledger has a peel & stick cap then my metal flashing goes over the peel & stick.
and why didn't the joists get cut to allow the flashing to not be cut at the joists?
We cut 1 1/2" off the joists so that we could get the ledger off and the rim joist off. There were 5 pipes sticking thru the ledger, some could be removed and some had to stay. It was hard enough to get the ledger and the rim joist out with the 1 1/2" of play.
Rich
Looks like your flashing will be flattened by a deck board, thats why I use a ledger thats ripped 3/4" lower and I install the flashing over that (and peel and stick). You have cut the flashing at each side of the joists and allowed it to be flat. I flash over the ledger and butt the joist to the flashing. I actually cut a small notch 1/8" wide to not let the top of the flashing touch the joist. I assume you will put peel and stick over the flashing before the deck boards are installed that would contact the flashing.
here is the step by step way i do it.
Bolt ripped -3/4"ledger to wall over I&W to isolate P.T ledger from house
Install peel and stick over top of ledger
Install flashing over ledger with 5 degree cant at top to allow water to fall off top of flashing.
Notch top of joist 2" down by 1/8" to clear flashing bent over ledger
Install joists flush with borttom of ledger
Counter flash ledger with I&W, put Jamsill pan under door over I&W, bring WRB over I&W
Make sure decking is installed to not have small rips at area above ledger since decking is unable to be nailed at lowered ledger.
Install siding to be 1" above deck board so leaves and trash can be washed in gap and over flashing.
Your ledger flashing will not work, Once water gets plugged up at house and first deck board, the water will weep in the flashing cuts at side of joist butting ledger. Maybe you have a full drainage plane all the way to the dirt but I don't see it.
shell builder
sounds like you have a good system.
I will try that ripped ledger board and canted flashing next time.
I do have I&W behind the Treated ledger board.
Thanks for the input.
RichView Image
You've torn out all that bad stuff above the brick line. You do know that there's bad things behind them bricks too, dontcha?
Has the HO been noticing puddles of water downstairs?
pete
That's what I feared too.
The house wrap and the plywood seem to be untouched by the moisture.
I have had my face in it real close for quite a while.
Rich
On your pic 1339, showing the metal flashing over the wrap, then tape sealed, what would you think about handling that by slitting the wrap at the top of the flashing, then sliding a piece of either wrap or Protecto up under the wrap and over the metal flashing? The argument would be that you'd have the lapping correct, with no depending on the tape sticking forever everywhere to seal against water. Of course, the roof above probably eliminates most instances of water against the siding anyway. Just wondering.
Dick
You are right. I was just lazy. I have 18" of I&W under the ledger board and I didn't want to cut that when I cut the Tyvek.
I plead guilty of depending on the straight flash to pass the test of time. LOL
This is an important topic so I thought I would try to get some discussion going.
Arcflash wants the thread to keep going but it took me about 1 1/2 hours to post.
Rich
I love this stuff. Probably lots of other readers have learned a little something from your work. I'm amazed how bad the rot is.
Dick
Of course, the roof above probably eliminates most instances of water against the siding anyway.
This job started because the Marvin windows leaked so badly from the second story that the 1st repair was done when the house was only 8 years old.
The house wrap (owens-corning) was done with the x cut and folded in. Still the middle joint of the middle 2nd story window leaked so bad, either thru or under the housewrap that the window below and the faming to the plate had to be removed.
I tell all this in the 1st link. http://forums.taunton.com/tp-breaktime/messages?msg=112965.37
So your point about doing the lap right is not without merit. Water can get behind the siding. I just thought that the bitumen staight flash would be a good seal, and still keep a good air seal for the exterior of the structure.
Rich
Edited 12/10/2008 11:07 pm ET by cargin