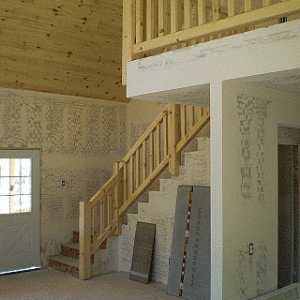
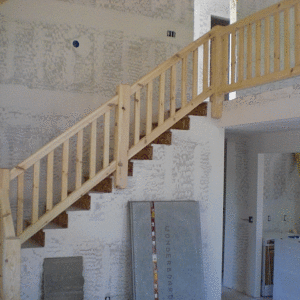
Quick question… I am doing all of the finish work on a 1400 s/f cabin that I am building that’s located in Alpine, Arizona (eastern edge of the state….almost in New Mexico). I am working on this project during my vacation days/weekends as I work at a bank for my daily gig. I live in the Phoenix area and typically make the trip up to Alpine 1 to 3 times a month. For the last month or so I havnt been up their due to work scheduling issues and the fact that there’s about 36 – 48 inches of snow on the ground up there… Anyways….I am trying to get some things done down here at my place here in Phoenix that I can do ahead of time. I am going to need to install some stair railings and was hoping someone could tell me what the overall length I should make them. I am going to need to make one going up from the main floor to a 42″ x 42″ landing and then one up to the second floor. Just curious if any of you experts out there can tell me how long to make them be looking at the attached pics…. Thanks, Adam
Discussion Forum
Discussion Forum
Up Next
Video Shorts
Featured Story

Fine Homebuilding is excited to be the official media partner of the 2024 Building Science Symposium series! This event offers builders, tradesmen, architects, designers and suppliers to discuss topics ranging…
Highlights
"I have learned so much thanks to the searchable articles on the FHB website. I can confidently say that I expect to be a life-long subscriber." - M.K.


Replies
Since these pictures are of a completed railing system I assume you are talking about wall mounted rails for the 2 flights. I make my wall mounted rails slightly longer than the distance between the uppermost nosing and the lowermost nosing. I am guessing you haven't measured this, so i am no help.
It's a simple geometry
It's a simple geometry problem. The railing is the hypotenuse of a right triangle, plus some extra for your cuts. Pythagoreans theory, A squared + B squared = C squared, C being the hypotenuse.
A would be the distance from post to post or post to wall, B is the height from the top of the first tread to the top of the tread where the rail stops. You know the depth of the treads, the overhang and the height of the risers. Should be easy to guestimate the rail length knowing these.
I'm assuming you are talking
I'm assuming you are talking about a wall-mounted railing, and not the post-rail assembly in the pictures. If not, ignore this post.
I recently did a wall-mounted railing on a similar stairway in my own place, and I found that half the battle was calculating the lengths AND the angles. Code, at least where I am, calls for continuous railing from at least as far up as right above the nose above the topmost riser to at least as far down as right above the nose above the lowest riser. This means that for your configuration, not a straight run, you need two level railing sections to turn the corner as well.
Further, there must be returns into the wall at each end. Presumably the returns are to keep loose sleeves from catching on the butt end of a railing without the return.
Finally, code calls for the height of the top of the railing down to the nose of the stair below it to be 34-38". I made mine at 36".
All of the above can be found online easily. You'll also find the rules on allowable railing cross sections, for hand gripping.
I did a lot of layout on the wall itself, using strips of painter's tape at places where ends of rail sections would be. With a level I measured up from the nosings to locate the ends of the four railing sections, making marks on the tape. With the level and a long straight board I could get the rise and run of each of the two non-level sections. Using the inverse tangent function on a calculator, with the tangent of the angle above level being rise/run, I thus had the change in angle at each of the places where the rising and level railing sections met. Bisecting each angle told me how to make the miter cut at the ends of the joining sections.
Some railings are built with a short level piece extending past the topmost riser, creating yet a third angle cut. The return would be mitered into the end of that short piece. My assembly didn't have this, as the rising section ended too close to a window, and any short piece would have interfered with drapes.
Keep in mind when you measure the lengths of the railing sections that the lengths will be longest at the bottoms of two sections that join so as to go from level to a rising section, or at the tops of two sections that join so as to go from rising into a level section. A level-level joint that turns a 90 degree angle, at the inside corner of the landing or for the returns at top and bottom, are just 45 cuts.
I used railing bolts to join the sections, except at the short return pieces. I wanted to be able to remove the railing later, in case I needed clearance for moving something large up or down the stairs. I glued up all but one of the joints, relying on just the bolt in the last one. The wall brackets were attached at appropriate places to support the assembly to the wall. I think there were two of the glued joints where I held off gluing until I had enough of the brackets in place to support the whole thing for a final check of angles and so forth. When all looked fine, I separated those last bolted joints, spread the glue, and bolted it back together.
My wife did the final sanding, staining, and finish. It looks nice, but I think I am most pleased with the appearance of the mitered joints. It all came out right.
1400 sq ft cabin, I'm
1400 sq ft cabin, I'm assuming that this is the only staircase. What is shown meets code, no need for a wall mounted rail.
Yes, I am talking about the wall mounted railing. I am assuming that code requires this...maybe not?? The hand-hewn railing that you see in the pictures has a hand railing made using 4x4's...I was thinking that this might not meet code as a standard railing due to the difficulty one might have in grabbing onto it. Maybe I'm wrong. I thought that if an elderly person was going up/down the stairs that the 4"x4" railing might be difficult to grab onto. I'll have to check with the county building department.
Dickrussell: I did the same thing as you about 10 years ago on a previously built cabin. I just used some wood glue and 2" brad nails to attach the returns. After a good sanding and several coats of waterbased poly it looked great.
Even if what I have is already within code, I may go ahead and install the railing against the wall. Someone who's 70 years old (my mom for instance) would surely appreciate the more grippable (sp?) railing that would be attached to the wall.
Thanks for the replies....
Problem is that I am 225 miles away from the cabin so I can't take any measurements....was hoping someone could give me some ballpark estimates of what length I should make them....was planning on getting some standard stair railing at the HD this weekend, cutting in the returns, gluing them in place and applying a few coats of poly....I am just looking for a rough estimate 8 foot? 9 foot? 10 ??
Thx...
You are correct about the size of the handrail being too large. This is a link which you may find useful, http://www.stairways.org/pdf/2006%20Stair%20IRC%20SCREEN.pdf. To determine the length of the handrail the previous person outlined the process.
If the tread width is 10" (not counting nosing) and there are 10 treads then the run is 100" (width of run X number or treads= total run)
If the rise of each step is 7 1/2" then the rise is 75".
Handrail length 125, pitch 36.9° (riser height X number of risers = total rise)
If the rise of each step is 7 3/4" then the rise is 77 1/2".
handrail length 126 1/2", pitch 37.8°
A^2 + B^2= C^2