I just started a set of straight stairs. Nothing dazzeling but I though I would post the process for those who might be interested in a simple staircase.
I just started a set of straight stairs. Nothing dazzeling but I though I would post the process for those who might be interested in a simple staircase.

There are a number of ways to achieve a level foundation and mudsill.


"I have learned so much thanks to the searchable articles on the FHB website. I can confidently say that I expect to be a life-long subscriber." - M.K.


Replies
Thanks Barrie,
Im always interested in stairs, in this case I dont have housed experience, and you never see the jigs.
-zen
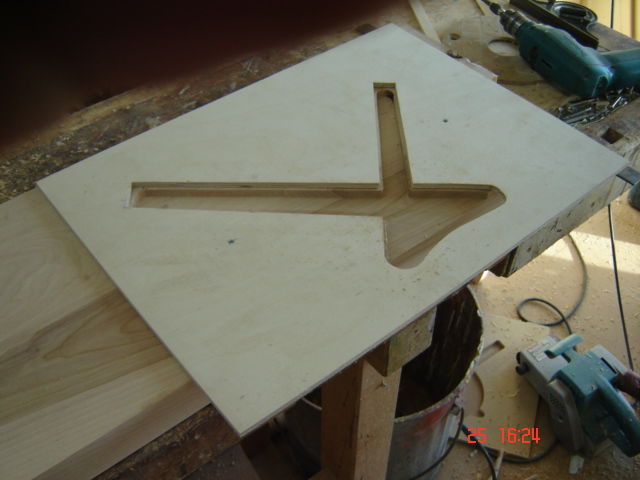
I make the jig out of MDF or thin ply. This is the only jig I use. I route the housed steps with a 3/4" bit and a 1" collar. The jig is cut accurately to allow for the 1/8" and the wedges which hold everything in place. the indexing mark is placed randomly on the upper edge of the jig. The jig is always referenced from the top edge of the stringer. Route the first step and riser then acurately measure and locate the jig so that the run is correct, the rise should be automatic but check it anyway!!!! I screw the jig to the stringer in inconspicuous places. Find the indexing mark on the jig and make a second mark on the stringer. Measure the distance between the two indexing marks and repeat this the length of the stringer. Route the rest of the treads and risers by locating the jig according to the indexing marks on the stringer. They should all be the same.
I was going to post more photos but they have disappeared. I'll take more and post later.
Looks nice Barrie. Why do you prefer the collar to the bearing guided bit?
Mike
I have never used a bearing guided bit and it may be similar to Stan in that I am slow to change. I have other jigs for other applications and I use the collar every time. Certain things can be done by changing the collar size while keeping the bit in place. Cutting depth doesn't change while you cut at different distances from the jig. This may be one reason.
That makes sense, that you can do different operations and the depth stays consistent. I do a lot of pattern routing with a flush-bearing bit, but it's usually a single operation setup.
I like the looks of your wedged scarf joint. Like Sphere, I thought you were going to show the old board-stretcher trick of a long scarf joint. Is that joint structural or do you back it up with another board?
Thanks for the pics. Keep 'em coming!
Mike
I think I explained in my missplaced posting that another 5-1/2" piece is added, spanning the joint, to make a total for the stringer of 11-1/2". As the joint is now, it is a very strong piece and would certainly support a great load. In a housed step/riser situation where everything is glued together from floor to floor, I have no fear in this setup. However if this was for an open set of stairs it would be better to beef up the stringer to 2-1/2" and possibly use the end to end scarf joint on two pieces, ensuring that the scarf joints on adjacent sides are going in the opposite directions.
A few more pics. Stringers done, treads and risers ready for assembly.
OK, Barrie, you got me. What is that little bevel on the riser face edge all about? Or am I misreading the pic?
The bevel on the riser allows it to wedge itself into the groove on the bottom of the tread. This forces the tread backwards into the riser above and itself forward into the routed face for the riser. It takes less than 1-1/2 hr to assemble the whole staircase.
Edited 3/29/2005 5:59 pm ET by Barrie
Man that's tight!
Just curious, have you seen or considered Stan Foster's pocket screw method as an alternative to your tongue-in-groove method of attaching the riser to the tread?
Mike
Barrie: Nice work..... I like the dado for the riser.....but if it just had pocket screws added it would then give it some incredible strength. It makes the riser act as an I-beam.
Plus...the pocket screws would force the face of the riser tight to the front.
I like the exact even nosing reveal your methods gives. Cant argue with that at all. Very nice.
Stan
There are three reasons why I cut back the ends of the tread nosing. 1- When I cut back the end of each nosing I make sure that the amount I cut back is just slightly less than the depth of the dado. This ensures a tight fit at the front of the nosing. 2- it is not necessary to have the end of the dado identical in profile to the nosing. 3- if the tread shrinks back, it will not reveal the dado.
Oh, really? A plowed groove into the bottom of the tread, that receives the top edge of the riser. Do tell. How many successfull stairs have you built with this method?
I hope we can see it in the picture sequence.
I ask this because a guy I hired to do some finish work on some stairs I wanted built, criticized me for being a hack for wanting the detail done that way. Said it was a sure way to get squeaks.
But hey, he was the carpenter. I was just the stupid guy with the checkbook, and the half-baked ideas I had dreamed up on paper.
My little hallucination had the riser edge buried about one eighth inch into a plowed dado of about 5/16".
I have never had a call back for a squeeky set of stairs. The bevel on the back edge of the riser makes it act as a wedge in the tread dado. Everything is glued and should remain solid for a very long time.
barrie... pretty cool.. keep 'em comming..
what is your stringer material ?.. looks like 2x stock..
I found one photo. I guess I do use another jig...a rafter square with stair stops.
Barrie: Nice technique. I use a bearing guided bit...but have always wanted to go to the collar method like you are doing. I just am slow to change....
Stan
I rub a little wax on the jig surface. The router slides effortlessly so that you can completely feel your "cut".
what's the wood? Maple 10/4"? may be birch?
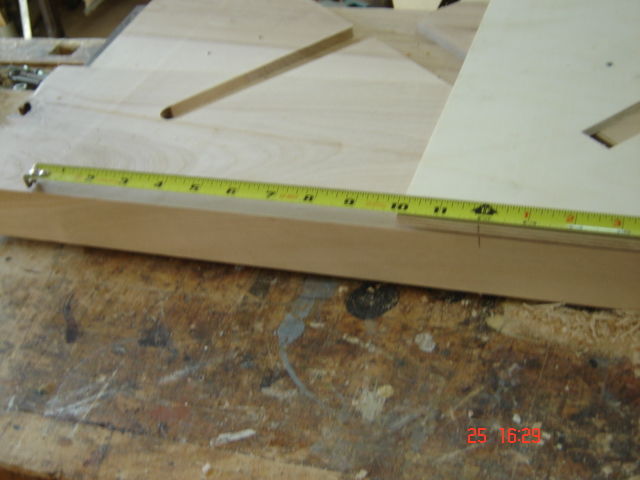
The wood is 8/4 yellow birch. The main stringer is 1-3/4" x 11-1/2" x 168" long. The wall stringer is the same length but only 7"8 thick with a double edge to appear to be 1-3/4". The doubled edge allows 7/8" of trim for uneven walls. I'm not thre yet but will post photos when the time comes. I have lots of trouble finding stringers this long so I have an old technique to increase the length of boards. I'll post this monday (I hope).
great.. and can you post that "double edge that makes the 7/8 look like 1 1/4 ?Mike Smith Rhode Island : Design / Build / Repair / Restore
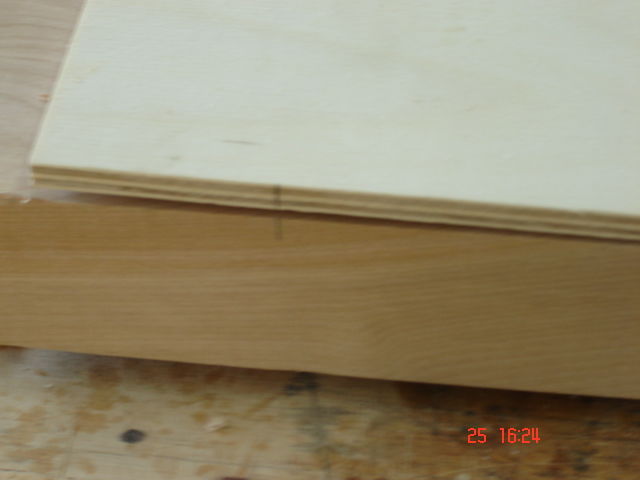
When I make the 7/8" wall stringer, I make it 2" wider than needed. The extra 2" is cut off and glued to the backside , along the top edge. The grain is the same, the color is the same and it appears as one 1-3/4" stringer, identical to the outside stringer
Barrie,I like your double stringer technique. A very elegant solution to a problem I have come across.
Jon Blakemore
More than likely the wall is not straight. The double edge gives me something to trim with ease and avoids the use of moldings to hide gaps. I hate to have to do this. The wall stringer is bolted to the wall wherever the studs are. A spacer equal to the remaining gap prevents the bolts from twisting the stringer. The underside of the stairs are covered with panelling or other finish to conceal all the wedging etc.
Barrie,In the picture of the scarf joint, what is the 2.5" sq. piece running through the center?
Jon Blakemore
That thing in the center of the joint is wedges which are put in from opposits sides. The wedges force the joint together. The two 45 dergee cuts must "hit home" at the same time. To ensure this, I assemble the joint as tightly as possible and clamp it so that it won't move. I then make a single handsaw kerf at both 45 degree joints (see photo in earlier thread).
barrie.. so after you clamp , but before you glue.. you run your handsaw in the end cuts which makes the kerf distance the same on both ends ?
View Image
and what do you do with the wedge holes after the glue sets ? some kind of decorative button ?Mike Smith Rhode Island : Design / Build / Repair / Restore
The wedges remain in place and are glued there. If one 45 degree hits before the other one, there will be a gap and the joint is not solid. Both ends must hit at the same time. With the joint glued, the long scarf contact areas must also be in full contact for full joint strength.
FYI...in traditional non-glued scarfs like that, the wedges are left proud and tightend as needed.
I be guessin his are flush cut being a stringer and not a beam.
Spheramid Enterprises Architectural Woodworks
"Sell your cleverness, Purchase Bewilderment"...Rumi
That is correct, Sphere. As a detail the wedges could be left proud and chamfered but in this case they are cut flush.
I understand now.Keep up the pics. This is good stuff.
Jon Blakemore
Thanks for the posts Barrie, that scarf joint is amazing.
This is a photo of the finished set of stairs.
pretty handsome.. do you have a 3/4 view from the side ?Mike Smith Rhode Island : Design / Build / Repair / Restore
The staircase is made with cherry treads ,railings and newel posts with birch risers and stringers.
nice .. would you consider that "craftsman " style ?
View Image
i saw a gorgeous curved stairway in a lighthouse today..
i'll see if i can get some pics.. i'd guess 1890 or so..Mike Smith Rhode Island : Design / Build / Repair / Restore
I take no credit for the way it looks as I was following the plans of the architect. By the way Gene...no squeaks yet.
That is some beautiful work Barrie.
That joint that you made where is it located in the finished product?
DaneI will always be a beginner as I am always learning.
The scarf joint is about half way down on the outside stringer.
Wow cann't even see it or is it behind that railing?
DaneI will always be a beginner as I am always learning.
Thanks, It is alway good to see new stuff from us wood whittlers.
I bet the old trick,is take a wider board and diagonally rip it, reglue and stretch it to length? Narrower now, but longer. God knows, I have had to do that when things just don't work out as planned. With some species, it is real hard to tell ya did it.
Keep up the good work.
Spheramid Enterprises Architectural Woodworks
"Sell your cleverness, Purchase Bewilderment"...Rumi
If that isnt his trick, Id love to see some pics of what you mean.
-zen
Can do either way..I'll be in my ersatz shop building a scale model of the spheramid today. I'll get a pic or two to show ya how it's done.
Scale Model of 3/4"=1' will be fun stuff. I am swipeing some BIG Stainless mixing bowls for the sphere..DW was just warned.
Spheramid Enterprises Architectural Woodworks
"Sell your cleverness, Purchase Bewilderment"...Rumi
Although that trick would also work, I am keeping mind that this is a post and beam home full of mortise and tenon and other large joining techniques. This is an end to end joint common in barn building. Of coarse, the longer the joint the better. This one is 30" long and is 6-1/2" wide. Another 5-1/2" piece will be glued over this joint to create an 11-1/2" wide stringer. I put a chamfer on the joint to emphasize it. In this house I don't want to hide the joint.
Ok I got cha..I have done that scarf joint myself many times, Tho' I dont glue it, and use opposing wedges in the sq. cut out.
One app. was a pair of 20' 6x14 Doug Fir beams that we used for a ridge..needed to get 36'..wall to wall.
I also use that for 4x6 on some decks where the top plates are too short. In that instance, a post is somewhere close by (G)
I belive it is called a "running scarf" But it's been awhile since I heard anyone actually name it.
Nice job.
Spheramid Enterprises Architectural Woodworks
"Sell your cleverness, Purchase Bewilderment"...Rumi
In my much dumber azz days I cut up way to much nice river birch in Va.
It pains me to think how much good stix I could have had, all to firewood.
Also if your in wood country your could hook up with a local mill to put some special on hold for you. Local mills always run across some great stuff.
Nice scarf.
Here is a pic of one from a site about shipbuilding.
View Image
The key to the joinery cuts, in getting the "points" to seat to their notches, both bearing equally, is probably as Mike Smith questioned.
Lay it out, cut it as close as you can get, then clamp-fit without the wedges, while you carefully run a handsaw into each point-notch interface. The same-sized kerf on each side now guarantees a fully bedded joint on both ends.
That method would have to consider the kerf and what it does to alignment of top and bottom edges, so one would have to lay out accordingly.
Another good way to get it dead nuts would be to cut one side, then rough out the other board to outside your layout line, clamp them both up together, get out the router chucked up with a pattern bit, trim flush, and clean up the inside corners with a razor-sharp chisel.
As you adjust the fit the top and bottom edges become uneven and require jointing again.
WOW!! Talk about learning something new. This type of joint would work in repairing broken floor or ceiling joists as well.
As always I see such beautiful work here in BT. And the way others who do the same type of work want to learn from each other. This is great stuff. Keep it up guys and gals.
DaneI will always be a beginner as I am always learning.