Support for Dissimilar Sized Joists
We’re planning a 2-storey addition along the entire 38′ length of the west wall of an existing 1.5 storey house. The existing house has a poured concrete basement, and the first floor is supported by 2×8 full dimension joists with a central beam. The addition’s joist span will be 12’4″, and though the code would permit me to go with 2x8s on 12″ centres, I’d like the floor a little stiffer than the code minimum (because the floor finish will probably be ceramic tile). So I’m going with 2x10s on 16″ centres.
To complicate matters, the existing house is brick veneer, and the first course of brick starts at the TOP of the sill plate. So even if I went with 2x8s, I’d have the same trouble finding/making a place for my new joists to bear on.
I’m considering two options to support the addition’s joists on the existing wall once the brick is removed:
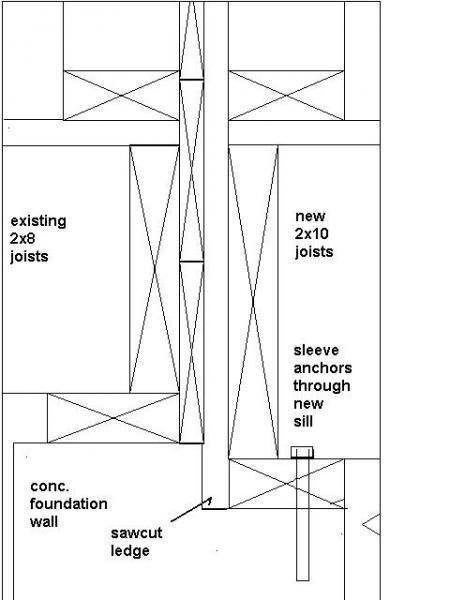
Option 1: remove brick veneer, saw the concrete wall to the required level and set a new 2×4 sill plate to support the new 2x10s. Bolt the sill to the existing wall using sleeve/wedge anchors. Install a conventional header (rim?) joist on top of the sill and install joists as normal.
Option 2: remove brick veneer, notch joist ends to bear on existing concrete, install a 2×4 or 2×6 ledger board by bolting with wedge/sleeve anchors to the existing concrete, so the un-notched portion of the joists have something to bear on, then install continuous blocking between the joists to take the place of the missing header/rim joist
I’ve attached sketches of both methods if my description isn’t clear.
Option 1 is 2×38′ of concrete sawing, plus it weakens the existing wall under the existing joists- not something I fancy. Option 2 is far less work, leaves the existing wall intact, and should transfer the loads from the floor into the foundation wall just fine- plus the ledger isn’t really bearing 100% of the load, it’s merely keeping the joists from splitting at their notches.
Any other options? Any reason you see that a building inspector/plan reviewer dude would not like option 2?
Thanks in advance for your advice!


Replies
I would install a doubled 2x8 ripped to size above the existing brick foundation, holding it flush with the foundation. I'd then hang all the new 2x10's off of it using joist hangers. This is a very common situation (bottoms of joist not aligned).
blue
Warning! Be cautious when taking any advice from me. Although I have a lifetime of framing experience, some of it is viewed as boogerin and not consistent with views of those who prefer to overbuild everything...including their own egos
Additionally, don't take any political advice from me. I'm just a parrot for the Republican talking points. I get all my news from Rush Limbaugh and Fox and Friends (they are funny...try them out)!
First of all, I really don't see the advantage to you of going for 2x10 on 16's instead of 2x8 on 12's--you'll have at least as stiff if not a stiffer floor with that many more joists. You're adding 25% more wood by going to 12" centers while bumping the joists up 2" only give you 20% more wood under your floor. Yes, I know that 20% is in depth section, but the old rule of thumb still ought to work in your favour. If you're still worried about cracking any ceramic finish floors, you can install them over Ditra.
Second, why don't you simply remove the veneer and bolt on a 4x4 ledger with sleeve anchors, then support that ledger with a stud wall down to the footing on the outside of the foundation wall. This way you can just hang the whole addition on that ledger and not have to worry about notching or concrete sawing or whatever, just a bit of digging which you'll have to do anyway (I'm assuming here you're also expanding the basement under the new addition).
Dinosaur
'Y-a-tu de la justice dans ce maudit monde?
Blue:
Nice solution! Only one question: can you fit all the hanger fasteners for a 2x10 hanger on a 2x8? If I remember correctly, the fastener holes stop a fair ways above the bottom of the hanger, but exactly how far I'd have to check. I won't have to rip much off the 2x8s- by my measurements, the brick ledge is exactly the same thickness as the existing wall's sill plate, which is full dimension 2", so I'd end up ripping ~1/2" off the new 2x8s to make the new header.
Dino:
Whether I go with 2x8s on 12" centres or 2x10s on 16" centres, I'd still need a means to tie the new header joist to the concrete wall- or would I? Would bolting the new 2x8 header joist through the existing 2x8 header joist (with spacers if necessary) be sufficient so that I wouldn't need to bolt on a ledger? If so, then I'm going with 2x8s for sure!
Here's why I figured I'd be better with the 2x10s: I'm planning to staple up PEX under the subfloor and I would like two tube runs per bay. Two tube runs per 12" bay would be overkill, and one wouldn't quite be enough. And the span tables tell me I can do up to 13'6" with 2x10 x 16" oc whereas I'd only be just barely good enough at 12'6" max span for 2x8 x 12" oc. With the 2x10s, the extra wood's in the depth direction which should give me a stiffer floor. Plus the 16" centres will give me more room to run plumbing etc. too. It just seemed like a better way to use the extra wood.
You're right- I am putting a basement under the addition, and have to underpin that long wall. A sub will dig the main hole but the u/pin slogging will be done by hand, so I will be doing some digging- so much that I'll be totally sick of it before I'm done. If nothing else, that wall under the ledger would be useful as a place to chase wires...So: I have to run this wall down to the footing: how do I do the floor slab? The new wall must land on the footing, not the slab, correct?
I'm not following you about that 'header joist'--not a term used around here. Do you mean the rim joist? If so, it's kind of optional in this scenario as long as you've got solid blocking (full 2x8 blocks) between the joists at the ends and cross bracing every 5-6 feet. You'd want a rim joist at the outboard end; but it's not really necessary up against the concrete foundation wall. In any event, I don't see the utility in connecting it through to the existing floor in the old section. Any nailed connection would be in tension and worthless; you'll get more holding power from nailing the joist bottoms to the ledger.
Installing that ledger is no big deal. Buy yourself a Bulldog and have at it; you'll be done before you know it. Theoretically, you could build a stud wall up against the outside of the foundation wall and skip the ledger and nail the joists to the top plate of that wall. But lag-bolting a ledger to the concrete wall will give you a more solid connection laterally for the entire new section as you'll be nailing in shear into something that is held onto the face of the foundation wall very well.
I consider that supporting wall essential to this set up, as you will be dropping a two-storey structure on top of that ledger. Not the kind of load you want to hang on just a few bolts, no matter how beefy....
As far as the supporting stud wall going down to the footings or the floor slab, I should have said floor slab. I was thinking both ahead of and behind my assumptions simultaneously when I wrote that....
You definitely don't want to pour a slab on top of the foot of a stud wall already in place...although I've seen it done (couldn't believe it when I did see it; the so-called builder's justification was that he didn't want to pour the slab until he had a floor over it to protect it from possible rain. Aside from the fact that floors don't keep rain out, I had to wonder whether he'd ever heard of a tarp...).
Finally, on the 12" vs 16" joist bays and the PEX--I assume you're doing that for under-floor heating. So in a 16" bay you've got 14½" of clear space; you wanted to put in two tubes; that makes it 7¼" say 7" OC for the tubes. Why don't you just lay out the same 7" OC spacing working around your 12" joist bays? Some bays you'll have one tube, some you'll have two. But upstairs on the floor you'll have more even heat distribution.....Dinosaur
'Y-a-tu de la justice dans ce maudit monde?
Dinosaur:
Your explanation is very clear. Yup- delete the word "header joist" everywhere I said it and replace it with "rim joist"- that's what I meant. Funny that when I looked it up, neither my copy of Carpentry and Building Construction, nor the Ontario Building Code, refer to what we're talking about as a rim joist, so I got confused.
Fortunately, there's an advantage to underpnning in my case: Once I'm done, I'll have the top of the existing footer, well above the new floor slab, as a good landing place for the supporting wall. Good thing too- dunno if the building department guys would like me landing that supporting wall on top of the floor slab, since it'll have foam insulation under it in this case (PEX in the slab too...)
We agree that the supporting wall is essential in your design- I wouldn't hang my two new storeys entirely off bolts in that old concrete either. In my idea, I notched the joists so that they'd be resting on top of the concrete, and the ledger would just resist their desire to split where they're notched. But before your post I was wondering if I could get rid of your bolted ledger by bolting a new rim joist through the existing rim joist, which is of course nailed in shear to the existing sill plate which is bolted to the top of the foundation wall. You're right that my nailed joints would be in tension and hence useless unless I also used hangers...which pretty much puts me back to Blue's method. But I like your supporting wall since I'll need one to chase wiring through anyway.
Bulldog? Tell me more! I'm looking for a good, heavy-duty hammer drill to replace the POS Makita piece of crap I bought at Canadian Tire in a fit of cheapness.
piece of crap I bought at Canadian Tire in a fit of cheapness.
We never learn...do we?
blueWarning! Be cautious when taking any advice from me. Although I have a lifetime of framing experience, some of it is viewed as boogerin and not consistent with views of those who prefer to overbuild everything...including their own egos
Additionally, don't take any political advice from me. I'm just a parrot for the Republican talking points. I get all my news from Rush Limbaugh and Fox and Friends (they are funny...try them out)!
Bosch Bulldog. It's an SDS-Plus rotary hammer that will put holes up to 1.25" in concrete, 1.0" in hard stone IIRC. If you needed anything with more bang than that (which you don't, for this job), you'd be talkin' Kango, and that's rental-type gear unless all you do all day everyday is bust up concrete.
The Bulldog makes holes for 3/16" Tapcons in less than 2 seconds (literally) and will sink holes for those Hilti-type anchors in a minute or two each. Figure 38 feet of ledger w/bolts 24" OC you got 20 bolt holes to drill, you oughta be done in an hour including layout, concrete drilling, drilling the 4x4 and bolting it up. Piece of cake....Dinosaur
'Y-a-tu de la justice dans ce maudit monde?
Dino: sweeet- gotta look up that Bulldog. Already got a good, powerful non-hammer corded 1/2" drill, so a rotary hammer might be a better choice.
And Blue- you're right, we never learn. Cheap tools are fine for occasional use, but a hammer drill? What was I thinking?! I was suckered by the brand name and the price- I have lots of (earlier generation) Makita stuff that I love and wouldn't be parted from, but this $99 (CDN) hammer drill is a total POS and I should have known better. You can smell the insulation and the case starting to melt any time you try to get it to deliver any torque...I figure it's good for about 10% duty cycle- any more than that and it'll be toast. It's the only drill I'll loan out, because I'm kinda hoping somebody'll actually fry it for me...
You shoulda bought it from a big box...then you can take it back!
I used to buy all the best tools. Now, I'm not so in love with tools and occasionally will take a stab at something cheap. I'm usually disapointed and am glad when I can take it back. Often though, I just give the stuff away to whoever I'm complaining to at the moment. Everyone is happy to get something for free...even if it is crapola.
But the best is when that cheapie works better!
blueWarning! Be cautious when taking any advice from me. Although I have a lifetime of framing experience, some of it is viewed as boogerin and not consistent with views of those who prefer to overbuild everything...including their own egos
Additionally, don't take any political advice from me. I'm just a parrot for the Republican talking points. I get all my news from Rush Limbaugh and Fox and Friends (they are funny...try them out)!
Your concern about which hanger to use is well founded Molten. There is a huge selection of hangers that will specifically cater to your needs. I'd peruse the simpson.com site and maybe send an email request to them an ask for their recomendations.
I'd probably just use hangers suitable for 2x12's depending on how picky the inspectors are. If they're real picky about stuff like that, I'd run the setup by them before I did it.
blueWarning! Be cautious when taking any advice from me. Although I have a lifetime of framing experience, some of it is viewed as boogerin and not consistent with views of those who prefer to overbuild everything...including their own egos
Additionally, don't take any political advice from me. I'm just a parrot for the Republican talking points. I get all my news from Rush Limbaugh and Fox and Friends (they are funny...try them out)!