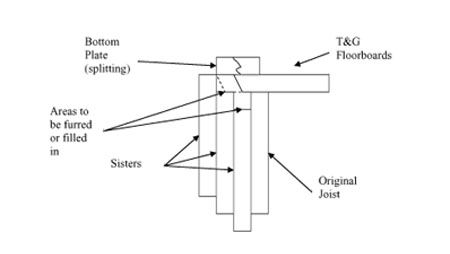
Situation: House was built with T&G floorboards over joists, then bottom plate over floorboards. During reno, carpenter carved away floor underneath bottom plate to sister joist to existing joist/beam. See pic for cross-section.
Problem: bottom plate has half of floorboards carved out from underneath it, and that piece of floor has no support underneath it (there is 1/4″ gap between it and middle sister, and in some places it is cut back from the middle sister completely). The plate is starting to tip down in front, also splitting (fixed for now with glue and mending plates). The plate cannot be taken out, it has existing plaster wall resting on it.
As you can see, access is limited (from the left). There is a space where there is no bottom plate due to an old doorway, and a 12″ strip of the right sister exposed where floorboards have been cut back all the way to the original joist.
Strategies for fixing:
(1) Try to push 1-5/8″ furring strips, 12″ at a time, along the top of the right sister, to transfer load from floorboards to sister. Expected difficulty: since floor was levelled, these furring strips will be too high in one direction and too low in the other direction.
(2) Try to fit 1/4″ furring strips (12″ at a time) between floorboards and middle sister. Besides aforesaid difficulty, there is also the issue that in many places the floorboards are cut back from the middle sister.
(3) Try to fill in space between bottom plate and middle sister, with fiberglass mat and epoxy putty. Limited access on one side of doorway, none on the other. Candidates: Structural epoxy (T-88 gel, Abatron Aboweld 55-22) or wood filler epoxy (Bondo Extra-Strength Wood Repair Epoxy, Abatron WoodEpox). Bondo I can obtain locally, others have to wait for mail order. I’m guessing fillers have low compressive strength but may be comparable to wood and only need to transfer load (?). Danger of heat of curing in confined wood space? I’m ruling out Rock Hard due to the fact that it expands when wet (also no structural strength).
(4) Try to fill in space between floorboards and right sister with epoxy, either shoveling it in from the 12″ gap or drilling and injecting. How to make sure it fills the space vertically?
Have I missed anything?


Replies
Taylor, I commend you on your tenacity in this project. I can't tell from your drawing how best to do the repair. However, I just wanted to point out to others that may be contemplating hacking out something before figuring on how to reassemble to maintain structural integrity. For remodeling and repair to be successful both in appearance and structure, planning the attack is of utmost importance. Turning someone loose with a sawzall is not always the way to go.
That being said, if the plate is not the real problem and you're looking for a way to shore up the floor for your finish, you should be able to block / scab / couple up the subfloor somehow to make it hold any finish. Take your time, think it through, don't just pile a bunch of wood in there. If the plate is indeed structural, are you sure there's no way to block that wall up from the bath side and cut nails, slide out a section of plate, repair the floor and then slip a plate back in? Best of luck.
Remodeling Contractor just outside the Glass City.
Quittin' Time
Taylor,
Floor leveling compound and a bladeless sawzall as a vibrator.
Two man/person job.
Drill 1/2" holes down thru top of Left sister and floorboards where needed 6"OC. If floor is to be finished, drill out compound after it sets up and plug the holes with matching plugs.
Fill to top of holes.
Clean excess on both sides of wall when compound is partially set.
Keep on hand some childrens modeling clay as an emergency dam, as the leveling compound will find openings you haven't. Preroll a few clay snakes and marbles.
Piece of cake. . . . . . . .That's a description not a tool.
SamT
Sam, I don't think SLC (or anything viscuous) will work. For example, the spaces between the joists are not tight and I cannot get in to caulk them. DW would be upset if SLC started dripping onto the dining room ceiling, and I probably couldn't reach the places it started coming out. Also I don't think SLC has much strength w/o the lath...Sliding furring strips in has been a bust, hitting unseen obstacles after a few inches. Either perform major surgery taking out bottom plate as calvin suggested (shades of hacking away with a sawzall...), or dollop in some kind of (epoxy) paste, or fuggedaboutit... I have extended the wall out with 2x6s, so I may be able to remove some of the load from the plate by sliding the new subfloor (on left of pic) under the extra 2" of stud. I was hoping to do better, but in case no-one has noticed I'm behind schedule....Lesson: Before anyone does anything on your house, ask them exactly what they are going to do. Then watch them as they do it.
Taylor. Please, you can ask if I already didn't tell you how I was going to make a repair that was correct and will last..........but do you have to watch? Find qualified hands and leave it in theirs to do the magic.Remodeling Contractor just outside the Glass City.
Quittin' Time
Fair enough, no offence....
None taken buddy.
How's the wife taking these alterations?Remodeling Contractor just outside the Glass City.
Quittin' Time
Cough.
Taylor,
Can you tell us more about the situation? What are these 4 joist spanning? What are they supporting?
Spaces between which joists aren't tight?
Any reason you can't slice the left joist down, fill the gaps and shim the lefty back up?
How about a joist plan, can you draw us one? any point loads? any columns under them?
That wall is open on one side, right? Is that wall a bearing wall?
Sistering 3 to 1 adds a lot of strength. What's going on?
SamT
Sam, here's the plan of the joists. Everything is going on on the far left, This is not in the picture, it would correspond to Joist #7. The original joist (I think it's a load-bearing beam, can't see it all) extends the length of the house. The sisters are only about 5-1/2', nailed glued and lag-screwed into the original. I think it was just the easiest way to add the left sister (original pic), needed to hold up a new floor.Feeling around it, I think I could seal up the gaps between joists with caulk at the bottom, and on the interior side of the sistering. At the outside wall, there's no gap between left sister and wall. OTOH I have taken down the plaster on that side of the doorway, so it is feasible I could cut out some of the bottom plate there (lots of 75-year old sunken 16d nails to dig out, can't get the sawzall in to cut them neither...). That would be a bloody mess, but perhaps better than taking apart the carpenter's work on the sisters... It would be nice if there were some kind of very low expansion material with high compressive strength that one could just squirt into some areas....A carpenter told me once to avoid as much as possible taking things out in old houses, you never know what can of worms you're going to open.... I relate this to taking out the plate. By planing I am able to make furring strips that fit in the holes, but they mostly do not make contact with the floorboards, the space does not have uniform height. If I mix epoxy with very find sand, that would make a kind of epoxy concrete that I could use to fill gaps, basically a kind of shim. If I could get this into an empty caulk bottle or syringe with wide mouth, that might make a delivery mechanism....
Taylor,
Let me see if I have a clear pictur of what is going on. I will italisize statements that are assumptions.
Naming Conventions:Picture 1, showing the sisters is named bottomplatevanityend.jpgPicture 2, showing the joist plan is named bathroom-joists.jpg"Original Joist" is the right most joist in Picture #1
In Picture 2, the sisters are to the left of the black line in the large grey area at joist number 7.
Joist #7 is supported at its' ends.CRITICAL!
There is a door in the wall over the sisters. It will remain.The floor will stepup into the bathroom by the thickness of the new flooring.The sisters replaced a joist(s).This wall is non bearing.
Of course all that is moot. You are just worried about supporting 1/2 of that cracking bottom plate. Believe it or not, Ripley, Great Stuff will do the job and your wife won't care if a little foam insulation drips down on top of her ceiling, since it won't stain or otherwise be noticable.
Take a 1/4" dowel and cut some 1 1/2" plugs. Drill 1/4" holes in the cracked bottom plate 6" OC. Squirt Great Stuff in each hole for 3 seconds, plugging each hole as you go.
To assure you that Great Stuff will support 1/2 of that plate, I'll tell you a little story from my first job as a union carpenter.
I was an apprentice helping build a 150' box beam, 4 lane, concrete bridge. We first built the end support platforms, laying a 6" thick piece of styrofoam (for expansion and shock absorbing) on the beds. Then we poured the bridge on top of the styrofoam. This bridge was built to federal standards. That meant the foam had to support an 80 ton tank moving at 80 MPH 80 times. Triple 80. Plus the bridge itself.
I think you are worried about supporting a mountain, when all you've got is a molehill.
SamT
Thanks, DW suggested foam, but I'm nervous... Used Great Stuff for Windows and Doors (the low-expansion stuff) to air-seal 1/4-1/8" space between stud and on-the-flat nailer parallel to it...some foam got behind the nailer and now it's bulging out at one end.... In this application I know I should have used caulk (we learn from our mistakes), but I also learned not to spray foam into any kind of tight corner...I can get epoxy from http://www.epoxyproducts.com for not too many $$$, mix with fine sand, inject in 6"oc holes, paste in a thicker batter where there's room for a putty knife....Yes it's worrying about the details that has me way way behind....
.
Update on fixing support for bottom plate:I tried putting mortar mix in first, where I could reach. Didn't get in far, but at least managed to get mud under one of the two studs I'm concerned about.Next epoxy with fine sand. Went well....until it started oozing out under the joist on one side, the side where I couldn't seal it up. I think in retrospect I did well on the other side and should have continued, and maybe even on the oozing side once the stuff had cured, but it had already taken so much time (research, prep, doing) that I gave up on it.Finally I went the foam route, with foam gun and plastic hose... Looks like everything is bunged up....But the low expansion foam appears to be of the flexible rather than the rigid variety (I just used what came with the gun).... It feels safer but obviously less support....I'm thinking of putting a Simpson RPS22 strap tie on the bottom plate, where I'll be notching for DWV, this is fastened with 16d nails... Would the nails strengthen or weaken the bottom plate? I'd predrill and blunt the nail heads obviously....