Hello!
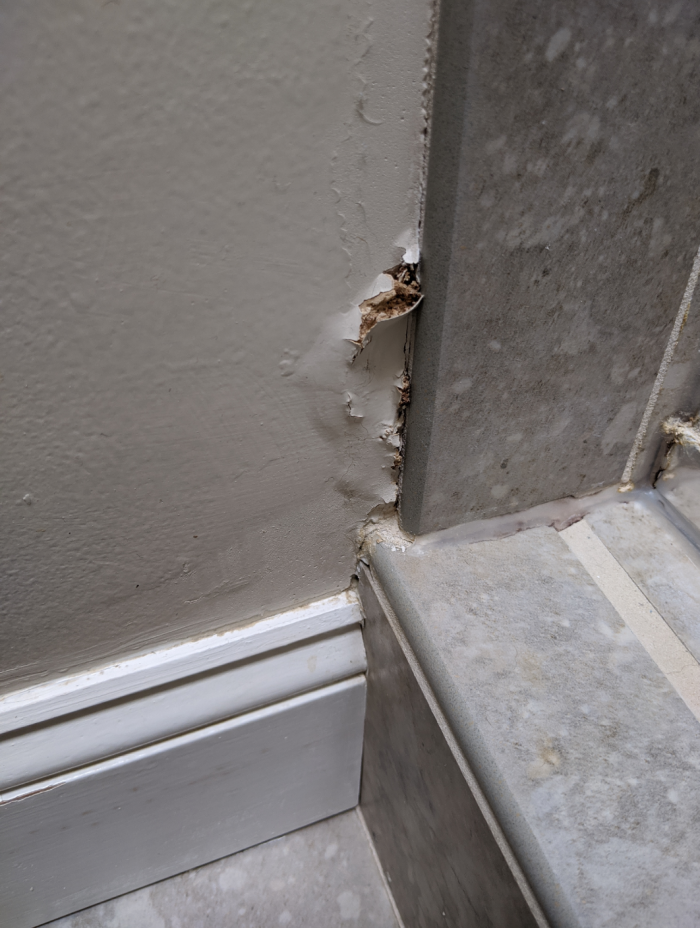
I’m hoping someone can give me advice on a tricky drywall patch. Obviously I need to figure out and address the source (I believe a caulking issue in adjacent shower) of the damage first, but once that is done I am at a lose for how to fix the drywall b/c it butts up to a raised edge of tile…….of course nothing can be simple. I’ve searched online and can’t seem to find any technique to address this specific issue, or something similar. Any ideas or tips would be greatly appreciated! Please see attached picture.


Replies
This might be a good one for the John Bridge forum. You could patch that with durabond setting compound and it looks like that's been done in the past already but you might have an underlying problem. If there isn't proper waterproofing behind the tile, it's just going to wick over to the drywall and caulking isn't going to solve it.
Obviously you have a leak there, likely right in the corner. The first thing to do is clean the old caulk out and reseal it, just don't use silicone. Once that's done clean the damaged area, paint it with white glue then patch with some 20-minute mud. Two coats should do it then follow that with some primer and semi-gloss paint.
The damage also probably goes behind the baseboard but I wouldn't mess with it any more than you have to. Those shower corners always leak.
The damage in the photo looks more like wet OSB than drywall and that makes me worry about the entire shower. If I were you, I'd remove the baseboard and cut out two-three square feet of drywall to see what's going on - even better, if this is an interior wall, go to the other side of the wall and remove a big section of drywall to see if the tile has proper backing.
Step back and take another picture. Is there a shower door right there? Bottom track?
I appreciate everyone's time and thoughts on this problem. I've attached an additional picture. Some added info.....I've been in the house for 10 years and this issue has only been apparent for the last 1-2 years. This area is in the corner where the door hinge is. Occasionally water makes its way through the crack there but I do not think it is often enough or amount enough to be causing this issue. My gut tells me it is old caulking needing to be fixed, or as several posters have suggested, a bigger underlying issue. Unfortunately this is an exterior wall. I don't suppose there are less drastic ways to test/check the waterproofing and fix that if it is the problem? Definitely do not want a demo project in the bathroom right now. Thanks again everyone!
J,
Thanks for the photo. Can you give a better description of what the brown material is at the bulge in the drywall?
And from some customers problems, I have found properly resetting of all track to be the only way to solve problems such as what you show. In addition, before finishing the drywall I leave a small gap between the drywall and any surround base (or tile backer) and caulk between them so any water or dampness is stopped before it gets wicked into the drywall.
Resetting the metals, apply caulk in all holes drilled as well as the recommended bead on the backs of the track. And of coarse a bead along the inside track to tile surface. Also caulk in the trapped inside corner where wall metaI meets bottom track. I use geocel caulk. EDIT: LEXEL CAULK
Thanks
Good suggestions by Calvin but check your grout joints on the inside of the shower too. Sometimes they can fail and let water travel behind the tile.
Geocell is a polyurethane and poly is definitely the right product for this application but it is a roofing sealant so just make sure that it's okay to use indoors. Some products will state on the tube for outdoor use only...
Steve,
Thank you, my memory fades like old curtains. I thought I had used one of their products allowed inside. Maybe not.
Lexel from Sashco is rated interior. Tenacious adhesion,clear, paintable and as anything good, a bit tough to work with. Using masking tape for a crisp edge line is highly recommended. This I have used a lot. Lasts in an opened tube quite well, with removable spout.
Thanks!
Let me add to my first reply. The damage from the leak will probably extend beyond what you see. It will have gone behind the edge of the shower, the end of the curb and if the floor is wood there will probably be some rot there. A Fine Homebuilding repair will likely mean tearing the bottom of that end of the shower out and rebuilding it all.
A pragmatic repair is to stop the leak and repair what you can see. At some point down the line it may need a shower demo and rebuild but if it was me I'd push it down the road. I'd also suggest you take a close look at the other end of the shower as when one end leaks the other one usually does as well.
Thanks so much everyone for your advice! I will probably fix the caulking as best I can and then patch the drywall (that is what it looks like is swollen) for now as I am not in a position financially to have my shower partially or fully redone and would def not attempt something like that myself. I read several different suggestions on types of caulking/sealant to use......guess I will have to do some research there! 😊 In terms of patching the drywall, I've seen techniques that use screens, tape, etc., I guess in this instance I just need to use a drywall patching compound (nomorecoffee suggests durabond) without any structure or support behind it? I'm not sure how I could use tape or a screen in this instance?
Thanks again everyone!
I suggested durabond because it's more water resistant than drying compound and sets very sturdy. Probably a good idea to clean out the rotten stuff, get some fiberglass mesh drywall tape, put it over the hole, and apply the compound over that for support. What you do might end up being temporary anyway and break up again at some point.
If you want to get fancy, you could try the following. Take off the baseboard. Cut out a few inches of the old rotten drywall along the edge of the tile. Screw a plank, maybe 2 inches wide to the back of the remaining edge (from the front with drywall screws) so that half the width is visible. Cut a strip of drywall (they sell 2'x2' pieces at HD, 1/2" or whatever matches the old stuff) that fits the hole leaving maybe 1/8" gap between it and the tile. Secure it to that plank that's attached to the old drywall with drywall screws. Get some vinyl L-bead and apply it to the edge of the filler drywall piece along the edge of the tile (adhesive+staples). Cover the joint between new and old drywall with mesh fiberglass drywall tape. Finish that joint and the L-bead with durabond or easy-sand setting compound. Durabond does not sand easily once it sets so you'll have to apply it smooth if you use it. Fill the gap between L-bead and tile with caulk (Lexel is good. I like tower tech2 that benjamin moore sells). Paint and put the baseboard back on.
Take a look in the wall while you have the hole. The L-bead and caulk should isolate the drywall if there's a leak but if there is it's all temporary because you have a bigger issue. L-bead can also come with a tear-off strip that helps you make a cleaner finish and less mess.
Disclaimer: I'm not a contractor but I did just rebuild my bathroom so I've looked into this stuff.