FHB Logo Facebook LinkedIn Email Pinterest Twitter X Instagram Tiktok YouTube Plus Icon Close Icon Navigation Search Icon Navigation Search Icon Arrow Down Icon Video Guide Icon Article Guide Icon Modal Close Icon Guide Search Icon Skip to content
Subscribe
Log In
  • How-To
  • Design
  • Tools & Materials
  • Restoration
  • Videos
  • Blogs
  • Forum
  • Magazine
  • Members
  • FHB House
  • Podcast
Log In

Discussion Forum

Discussion Forum

Trim Carpentry Work Flow

basswood | Posted in Construction Techniques on May 3, 2008 07:27am

I am taking some photos to illustrate some of the things that I think help make a trim carpentry work progress efficiently.

First, try to show up early and get a good parking place. ;o)

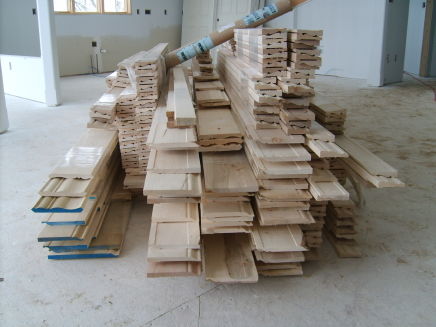
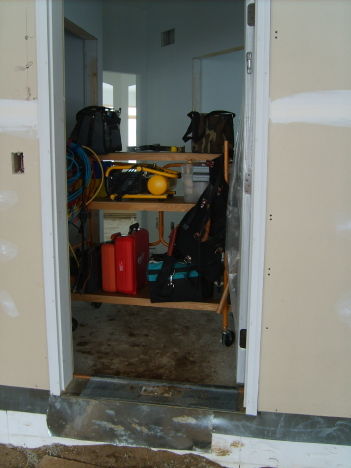
Stock the material to a central location to minimize making trips (the material should not be on the floor–as pictured–but made easy to reach with saw horses, etc).

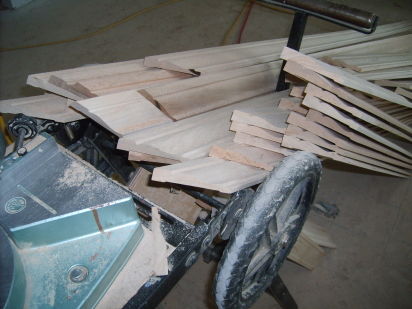
I put most tools on a wheeled cart to minimize lugging things into the work area and make it easy to move around the jobsite. Since a cart makes it easy to bring in and move around a large variety of tools it means less time wasted on running back out to the van.

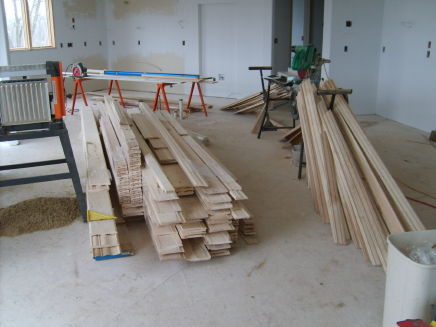
Set up the main cutting and assembly area within a a few steps of the material, and ideally close to the installing.

Get as much prep work done as possible, so installing goes smooth (without stopping to do other things. Unpackage everything. Check and fix all openings (knock stuff back plumb or square, beat the rock back, etc). Mark the size and swing and hinge side of all doorways. I like to preshim the hinge side of all doorways (as mentioned in another thread).

Measure everything and make a master cut list.

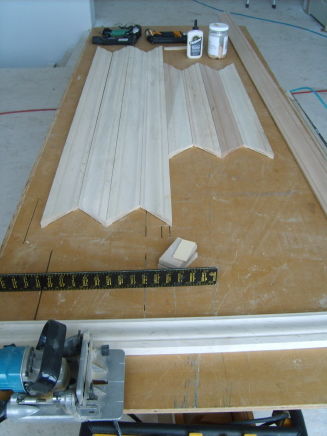
I cut all my right miters on casings, then all the left miters, then cut all the mitered legs to length.

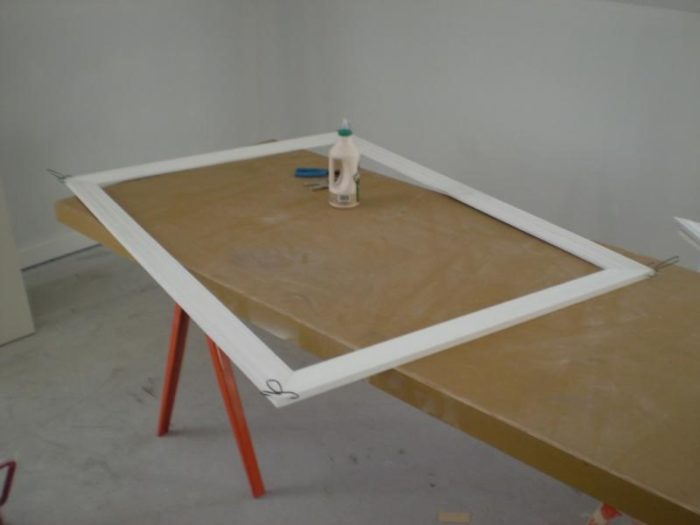
Preassemble all the trim sets possible. I glue all joints with Titebond molding glue and use Collins clamps and biscuit joiner or Kreg pocket hole jig to put trim sets together on a work table.

Install most window and door trim as a single unit. I nail the inside edges with an 18ga. pinner and leave the outside nailing for when I run base with the 16ga. finish gun.

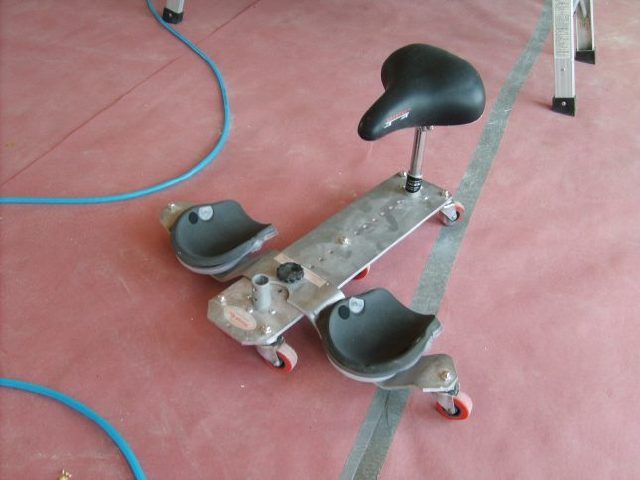
I’m gonna start running base on a Racatac.

Reply
  • X
  • facebook
  • linkedin
  • pinterest
  • email
  • add to favorites Log in or Sign up to save your favorite articles

Replies

  1. Jim_Allen | May 04, 2008 12:44am | #1

    Will you come to Austin?

    Thanks for the pics.

    Bob's next test date: 12/10/07

    1. JMadson | May 04, 2008 02:16am | #2

      Will you come to Austin?

      Isn't that a country song? 

    2. User avater
      basswood | May 04, 2008 06:11am | #4

      I worked one summer down in Bastrop...nice country. Thanks for the invite. :o)I forgot to mention this tip (applies to all trades):Finish everything! Leave nothing for the punchlist.

  2. mathewson | May 04, 2008 04:24am | #3

    Instead of beating back the sheetrock have you considered using a power plane to rabbet the casing?

    1. User avater
      basswood | May 04, 2008 06:16am | #5

      Power planing is a good option...Beating the rock back seems brutish, but it is effective and fast and can be done by unskilled help.I mark all the proud rock areas and a helper does the beating while I cut the casing at the saw.

  3. vintage1 | May 04, 2008 04:58pm | #6

    basswood,

    thanks for sharing your techniques.  With permission, I may steal a few;).

    A few questions for you:

    what is the typical width of the casing you install?  I ask due to the biscuit, most of the casing I install is between 2 1/4" and 3 1/2" it never occurred to me that a biscuit would be necessary and I would think might be a little tough to cut the slots in the 2 1/4" stuff.

    - when you precut your mitres, do you then measure for length from the short point (inside) or do you measure from the long point?  My method has always been to square up the casing on the bottom and then measure all my right and left legs to the short point.  It's easier for me to hook the tape on a square edge rather than burning an 1" and making your mark. 

    Just curious, always looking for a faster/better way.


    1. User avater
      basswood | May 04, 2008 05:48pm | #7

      I only biscuit 3-1/4" and larger casing. As you allude to, the smaller stuff would be both harder to cut the slots in and smaller width means less tendency for the insides of the miters to open up in the dry heating season. Smaller casing is also less expensive, of course, and the extra effort is not justified.The 45% miter cut on a 3-1/4" casing matches the width of my biscuit joiner so alignment is a snap and takes very little extra time. It could even be a wash timewise--it makes the assembled casing sets very stable--easier to carry and install.I'll take some photos on Monday or some casing measurement techniques. I do use inside measurements, but I typically line the inside of the miter cut with the edge of my saw stand table and hook the tape on the table, rather than the casing, and pull over to mark my cut for the bottom of the casing leg (if that makes since).I most always make the straight cuts of casing legs in matched pairs. More on that with photos later.

      1. KenHill3 | May 04, 2008 06:56pm | #8

        I also measure and mark the inside (heel) of miters, and like Brian I line up the inside miter point with the edge of my saw table, then pull my measurement by hooking the table edge. Not all miter saws have this built in- I've used a Makita CMS where this was initially frustrating not to have. If I had to buy a new CMS, the lack of this feature could be a deal breaker.

      2. Jim_Allen | May 04, 2008 08:39pm | #11

        "I do use inside measurements, but I typically line the inside of the miter cut with the edge of my saw stand table and hook the tape on the table, rather than the casing, and pull over to mark my cut for the bottom of the casing leg (if that makes since)."I've used that trick and a variation of it for years on roof pieces too. Bob's next test date: 12/10/07

        1. User avater
          basswood | May 04, 2008 11:47pm | #14

          "Nothing new under the sun."Many of these ideas are used by lotsa folks, I reckon.Much of what I do can won't apply to some of the various approaches to trim work, I suppose.On pulling a tape to measure trim, if you pull from the edge of a saw stand, you don't have to worry so much about holding the trim piece...frees a hand for marking with the pencil.

          1. Jim_Allen | May 05, 2008 12:39am | #15

            Every idea is new to someone sometimes. Please keep up the good posts! Bob's next test date: 12/10/07

      3. vintage1 | May 04, 2008 10:21pm | #12

        basswood,

        I'll wait for the pictures (and thanks for sharing).  IIRC, you have a homemade setup for your mitre saw, but I didn't see it in this thread so I was wondering how you made the measurements. 

        I have been using two different DeWalt saws, one on the DW stand and the other on a mitre stand made from the same company that makes the heavy duty saw horses (can't think of the name right now).

        Neither of the stands has any type of table  or flat surface beyond the saw table itself.  So no place to hook a tape.  I like the technique though. 

        I had looked at the Saw helper table at JLC last year but I just couldn't pull the trigger.  If you get a chance, could ypu share your saw setup?

        Thanks

        1. User avater
          basswood | May 05, 2008 03:56am | #17

          I do have one homemade saw stand that usually stays in my shop (it will go to the job I am at now though--I use it for tall base and large crown jobs).On most jobs, I still use an ancient Delta miter saw stand (when I bought it, it was about the only one on the market, that folded and had wheels), with an old Hitachi slider mounted on it. I have a couple of different aux. table/fence setups I use on both mitersaw stands to help with certain tasks.I bet you could add tables to your stands that would improve how they work for you.Someone posted a custom version of the DeWalt stand that looked great to me.I wish the Saw Helper had good wheeled set up.

  4. Hudson Valley Carpenter | May 04, 2008 07:29pm | #9

    I'm gonna start running base on a Racatac.

    Is the seat for the boss, as a place to observe and offer encouragement? ;-)

    View Image


    Edited 5/4/2008 12:38 pm by Hudson Valley Carpenter


    Edited 5/4/2008 12:40 pm by Hudson Valley Carpenter

  5. Hudson Valley Carpenter | May 04, 2008 07:33pm | #10

    What's that material that you use to pre-shim for hinges?  Do you make the shims plumb to each other as you install them?

    1. User avater
      basswood | May 04, 2008 11:38pm | #13

      I shim the hinge side plumb with flat stock of various thicknesses. I use a combination of assorted plywood rips left over from different projects. I rip the plywood into 1-1/2 strips that can be used to fir out studs, then chop some of those rips into shims (3-3/8" long) so they can easily fit between the sheetrock that often protrudes past the trimmer studs, into the door rough opening.I also use snips and cut drywall shims (dense cardboard strips) into 3-3/8" flat shims, and use a "peelashim" product to fine tune the thickness of the shim stack:http://b4its2l8.com/

      1. Hudson Valley Carpenter | May 05, 2008 03:04am | #16

        Nice system, well thought out.  Thanks for the link.  

Log in or create an account to post a comment.

Sign up Log in

Become a member and get full access to FineHomebuilding.com

Video Shorts

Categories

  • Business
  • Code Questions
  • Construction Techniques
  • Energy, Heating & Insulation
  • General Discussion
  • Help/Work Wanted
  • Photo Gallery
  • Reader Classified
  • Tools for Home Building

Discussion Forum

Recent Posts and Replies

  • |
  • |
  • |
  • |
  • |
  • |
View More Create Post

Up Next

Video Shorts

Featured Story

FHB Podcast Segment: Finding the Right Fixer-Upper

Get expert guidance on finding a fixer-upper that's worth the effort.

Featured Video

How to Install Exterior Window Trim

Learn how to measure, cut, and build window casing made of cellular PVC, solid wood, poly-ash boards, or any common molding material. Plus, get tips for a clean and solid installation.

Related Stories

  • Guest Suite With a Garden House
  • Podcast Episode 688: Obstructed Ridge Vent, Buying Fixer-Uppers, and Flashing Ledgers
  • FHB Podcast Segment: Finding the Right Fixer-Upper
  • Keeping It Cottage-Sized

Highlights

Fine Homebuilding All Access
Fine Homebuilding Podcast
Tool Tech
Plus, get an extra 20% off with code GIFT20

"I have learned so much thanks to the searchable articles on the FHB website. I can confidently say that I expect to be a life-long subscriber." - M.K.

Get home building tips, offers, and expert advice in your inbox

Signing you up...

This site is protected by reCAPTCHA and the Google Privacy Policy and Terms of Service apply.
See all newsletters
See all newsletters

Fine Homebuilding Magazine

  • Issue 332 - July 2025
    • Custom Built-ins With Job-Site Tools
    • Fight House Fires Through Design
    • Making the Move to Multifamily
  • Issue 331 - June 2025
    • A More Resilient Roof
    • Tool Test: You Need a Drywall Sander
    • Ducted vs. Ductless Heat Pumps
  • Issue 330 - April/May 2025
    • Deck Details for Durability
    • FAQs on HPWHs
    • 10 Tips for a Long-Lasting Paint Job
  • Issue 329 - Feb/Mar 2025
    • Smart Foundation for a Small Addition
    • A Kominka Comes West
    • Making Small Kitchens Work
  • Issue 328 - Dec/Jan 2024
    • How a Pro Replaces Columns
    • Passive House 3.0
    • Tool Test: Compact Line Lasers

Fine Home Building

Newsletter Sign-up

  • Fine Homebuilding

    Home building tips, offers, and expert advice in your inbox.

  • Green Building Advisor

    Building science and energy efficiency advice, plus special offers, in your inbox.

  • Old House Journal

    Repair, renovation, and restoration tips, plus special offers, in your inbox.

Signing you up...

This site is protected by reCAPTCHA and the Google Privacy Policy and Terms of Service apply.
See all newsletters

Follow

  • Fine Homebuilding

    Dig into cutting-edge approaches and decades of proven solutions with total access to our experts and tradespeople.

    Start Free Trial Now
    • Facebook
    • Instagram
    • X
    • LinkedIn
  • GBA Prime

    Get instant access to the latest developments in green building, research, and reports from the field.

    Start Free Trial Now
    • Facebook
    • YouTube
  • Old House Journal

    Learn how to restore, repair, update, and decorate your home.

    Subscribe Now
    • Facebook
    • Instagram
    • X

Membership & Magazine

  • Online Archive
  • Start Free Trial
  • Magazine Subscription
  • Magazine Renewal
  • Gift a Subscription
  • Customer Support
  • Privacy Preferences
  • About
  • Contact
  • Advertise
  • Careers
  • Terms of Use
  • Site Map
  • Do not sell or share my information
  • Privacy Policy
  • Accessibility
  • California Privacy Rights

© 2025 Active Interest Media. All rights reserved.

Fine Homebuilding receives a commission for items purchased through links on this site, including Amazon Associates and other affiliate advertising programs.

  • Home Group
  • Antique Trader
  • Arts & Crafts Homes
  • Bank Note Reporter
  • Cabin Life
  • Cuisine at Home
  • Fine Gardening
  • Fine Woodworking
  • Green Building Advisor
  • Garden Gate
  • Horticulture
  • Keep Craft Alive
  • Log Home Living
  • Military Trader/Vehicles
  • Numismatic News
  • Numismaster
  • Old Cars Weekly
  • Old House Journal
  • Period Homes
  • Popular Woodworking
  • Script
  • ShopNotes
  • Sports Collectors Digest
  • Threads
  • Timber Home Living
  • Traditional Building
  • Woodsmith
  • World Coin News
  • Writer's Digest
Active Interest Media logo
X
X
This is a dialog window which overlays the main content of the page. The modal window is a 'site map' of the most critical areas of the site. Pressing the Escape (ESC) button will close the modal and bring you back to where you were on the page.

Main Menu

  • How-To
  • Design
  • Tools & Materials
  • Video
  • Blogs
  • Forum
  • Project Guides
  • Reader Projects
  • Magazine
  • Members
  • FHB House

Podcasts

  • FHB Podcast
  • ProTalk

Webinars

  • Upcoming and On-Demand

Podcasts

  • FHB Podcast
  • ProTalk

Webinars

  • Upcoming and On-Demand

Popular Topics

  • Kitchens
  • Business
  • Bedrooms
  • Roofs
  • Architecture and Design
  • Green Building
  • Decks
  • Framing
  • Safety
  • Remodeling
  • Bathrooms
  • Windows
  • Tilework
  • Ceilings
  • HVAC

Magazine

  • Current Issue
  • Past Issues
  • Magazine Index
  • Subscribe
  • Online Archive
  • Author Guidelines

All Access

  • Member Home
  • Start Free Trial
  • Gift Membership

Online Learning

  • Courses
  • Project Guides
  • Reader Projects
  • Podcast

More

  • FHB Ambassadors
  • FHB House
  • Customer Support

Account

  • Log In
  • Join

Newsletter

Get home building tips, offers, and expert advice in your inbox

Signing you up...

This site is protected by reCAPTCHA and the Google Privacy Policy and Terms of Service apply.
See all newsletters
See all newsletters

Follow

  • X
  • YouTube
  • instagram
  • facebook
  • pinterest
  • Tiktok

Join All Access

Become a member and get instant access to thousands of videos, how-tos, tool reviews, and design features.

Start Your Free Trial

Subscribe

FHB Magazine

Start your subscription today and save up to 70%

Subscribe

Enjoy unlimited access to Fine Homebuilding. Join Now

Already a member? Log in

We hope you’ve enjoyed your free articles. To keep reading, become a member today.

Get complete site access to expert advice, how-to videos, Code Check, and more, plus the print magazine.

Start your FREE trial

Already a member? Log in

Privacy Policy Update

We use cookies, pixels, script and other tracking technologies to analyze and improve our service, to improve and personalize content, and for advertising to you. We also share information about your use of our site with third-party social media, advertising and analytics partners. You can view our Privacy Policy here and our Terms of Use here.

Cookies

Analytics

These cookies help us track site metrics to improve our sites and provide a better user experience.

Advertising/Social Media

These cookies are used to serve advertisements aligned with your interests.

Essential

These cookies are required to provide basic functions like page navigation and access to secure areas of the website.

Delete My Data

Delete all cookies and associated data