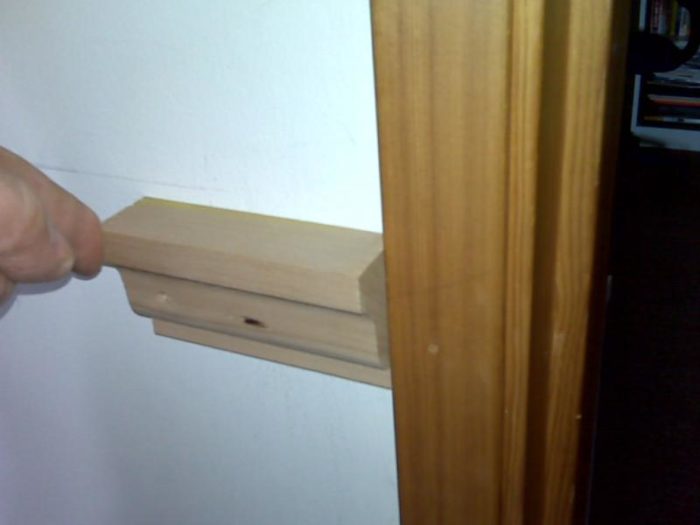
The client wants a beadboard wainscotting, and this is the trim they’d like for the top cap. It’s nice because it matches the wings on the windowsills, so it’ll be a great fit with the windows. However, where it butts up to the old casing, it overhangs quite a bit.
I was considering bevelling it back 22 1/2 degrees from where it protrudes past the casing. If one of y’all has a better idea, I’d love to hear it.
The trim will sit right on the top edge of the beadboard.
Edited 3/8/2009 10:58 pm ET by geoffhazel


Replies
I would do this two-part "bell return", but would lap part of the bell over the casing (scribed to fit with sanding disks on a grinder).
thanks man ... now I have a fancy name for the cut that I've made a hundred times!
"Bell Return" ... U make that up or is official?
either way ... I'm using it.
anyways ... I'd cut the bell return and run the bell over the casing.
have the bottom "flat" meet the casing and cope the rest to overlay.
actually ... I'd cut/fit a scrap of that ... and cut a scrap of a standard back 22.5
hold each up and let the customer decide.
Jeff Buck Construction
Artistry In Carpentry
Pittsburgh Pa
Hi Jeff,I made the "bell return" label up... it does remind me of a bell, so there you have it. If you can't dazzle them with brilliance, baffle them...Always good to mock up a couple of options and let the customer choose.Later,Brian
I was trying to think of some kind of return miter you might do, and I can't come up with anything that will work.
Instead of the bevel you mention, you might try rounding the top cap back. With a hard sanding block for the top vertical profile and a large dowel wrapped in sandpaper for the curved part, I bet you could get a nice smooth arc that stops at the thickness of the casing.
Put (what it looks like will be) a BIG backband on the casing.
Consider rounding over the bevel instead of a sharp miter. Other than that, I can't think of anything better than your original plan, but here are some other considerations for you...
If the cap molding gets painted, it's the paint/stain transition that's going to be the most noticeable anyway so a bevel is as good as anything.
If you stain the cap molding to match the casing (a challenge), take extra care with the exposed end grain since it will stain much darker.
If everything gets painted, then it will all blend reasonably well regardless of how the two moldings meet.
I've done a return similar to Basswood's, but I notched it onto the door casing. It looked quite nice.
I don't have any pics, so I hope you can visualize it.
you could also swap out the casing to a profile that is flat and return it on top of the casing
Noah
I'd do a standard mitered return (45º cuts), and scribe the back to fit the existing casing. The return would be impossible to cut once it's scribed, so you'll have to glue and nail it first, then scribe it.
PITA, but doable.
AitchKay
I might try something like the attached pic.
I like this idea. I always had a problem extending the lower paint up into that small area, but the paint idea will solve that. I'll try that for the next one.
I could do that. I wonder if I would want to extend the wainscotting up a bit to cover that tiny area, if possible? and cope it to meet the curve? By the way, that's an awesome picture. Hope you didn't take too long on that just for lil' ol' me. What drafting/cad program did you use?
It didn't take much time at all to build that model up in Sketchup (free) since I already had the pieces made, just had to bring them together in a model. I was guessing the casing was a 366 but pretty sure of the rake mould they're suggesting for the cap.
Extending the wainscoting would work but I think making a filler to match the lower flat and formed to fit the curve or better yet, build up the end section withthe 22.5° miters with glue and then notch out the back take a straight sided filler (a lot easier to make).
Anyone else think that the heavy top cap looks funny against the relatively weak door casing?
I second the idea of using a beefy backband around the door casing first. I've been going around all of the door and window casings in my house with BB and I'm very impressed with the visual improvements.
2 more centsand it would be much easier to present if I wasn't such a luddite / computer illiteratefirst i think you have a bit of an inelegant piece of crown there / easy to find one very similar but might bit more elegant
that looks like a sophisticated modern brickmold
but whatever you choose most of your dilemma is how proud it is of casingcut a rabbit out of the bottom back of your piece the thickness of the wainscoting ( if that gets you into the curve you may have to adjust accordingly ) then you lap all wain & can cut it a little "wild" and it will recess back a bit and better match the simple elegant trim you already have
It may look funny to us, but if that's what the client wants... what do you do? Try to talk them into something else and fill their head with enough doubt that they drop the job completely?
rasher, what kind or size of backband would you recommend? These are just puny 1 5/8" bevelled casing that was so popular back in the 70's.If you have any pics of your place I'd like to see them.The clients in this case are pretty ignorant of how things SHOULD look or COULD look, and are willing to listen to recommendations, but she's a very visual person, and a picture is worth talking for an hour.and, unfortunately, like most clients haven't written me a blank check for installing new casings or backbanding the door trim (yet).
My casings are 3-1/2" X 3/4". I used a ~1-1/4" X 1" backband. If you're handy with a tablesaw, you can easily make your own. Me, well, I just bought what my yard has.
Yeah, that looks good. I don't know how you'd make 1 5/8" casing look like anything decent even with a backband.I don't particularly want to talk them out of this trim, and I think the idea of doing a return into the wall and painting or filling in the tiny gap is the best approach for this project.Replacing the casing or making it bigger is going to exceed the scope of the original job.
well, your advice helped us out quite a bit. I persuaded them that the fat trim just would NOT work well, and we found a little guy that fit over the top of the 3/16" beadboard "panels". We also upgraded the two door moldings to something a bit thicker, and it all worked out nicely, much more so than it would have with the heavier trim.And as a bonus, because the trim we have overlaps the top edge of the beadboard by 3/4", I was able to use my nailer on the top edge as well as not sweat the top edges lining up perfectly.
View Image
Edited 3/31/2009 10:44 pm ET by geoffhazel
Edited 3/31/2009 10:46 pm ET by geoffhazel
Rasher thats quite the work lite you have in the 1st picture.ML
I've had a couple ways of making that up, but I don't think anything is going to look good untimately. That char rail is way too heavy proportionate to the simple thin casing it abutts.
If you put Dolly Parton Boobs on a Twiggy, you don't have Dolly or Twiggy, you have FrankenMamma
Welcome to the
Taunton University of Knowledge FHB Campus at Breaktime.
where ...
Excellence is its own reward!
I shy away from back beveling. Seems to me the "easy way out"....and often looks that way.
In the circumstance you are describing, I always try to "marry" the different mouldings at the intersection.
I'm attaching some pics of what I did with my own bathroom wainscotting.
J. D. Reynolds
Home Improvements
Proud recipient of the BT 'Truth In Print' award.
I agree with JD - overlapping and integrating looks best to my eye, and is what I usually try to do.Justin Fink - FHB Editorial
Nice
Thumbs up for your solution, JD. I've done similar several times, but have no pix to show. Would not work very well in this instance unless the casings were changed out to something wider and flatter, which is what I probably would have tried to persuade the client to do if it worked in the larger context of the house.Steve
Not sure if that's going to be painted, but here's what I'd do. I think chair rail looks nicer when it "bites" onto the casing.
Maybe you could talk them out of keeping the clamshell casing? Looks kinda' cheesy against a nice wainscot.
Nice job with the sketch up Mike.....infinetly clearer than the pics I posted from my Palm Pilot....Only issue I would have with your example is the baseboard.
I would likely add plynth blocks large enough to accomodate the base mouldings and avoid the returns.
J. D. Reynolds
Home Improvements
Yeah, I'd probably add plinths as well. Once you do that though, might as well re-do the casing. Clamshell doesn't fit with a nice wainscot.
Ahhh, too late to the party, I see. But...sometimes, when we run into that situation, where the chair rail sticks substantially past the casing, we'll run a flat backer (3/8-1/2" thick) to the casing, then return the chair a pleasing distance away from the casing. Eliminates paint triangles and notching.http://www.tvwsolar.com
I went down to the lobby
To make a small call out.
A pretty dancing girl was there,
And she began to shout,
"Go on back to see the gypsy.
He can move you from the rear,
Drive you from your fear,
Bring you through the mirror.
He did it in Las Vegas,
And he can do it here."
I agree....even a basic colonial would work better.
J. D. Reynolds
Home Improvements