I am planning a small repair project which involves replacing a missing piece of crown molding from a third floor dormer. I will need to install roof brackets in the area where I’ll be working, as it’s too high to do it from the ladder. I’ve never used these on an already-shingled roof before- do you guys have any suggestions? The roof is fairly new so I’d like to avoid damaging the shingles as much as possible. That awning in the picture will be coming down before this all starts.
Also, what other safety measures do you guys take in this situation (see attached picture)? I don’t take risks when it comes to heights. Do you go for the fall kits? A rope around your waist tied to the chimney? The terrain below is a driveway, not that it matters too much when you’re falling 25′
Thanks
Andy


Replies
Small job like this you can spend more time on staging and fall protection than on the work. My first thopught was to see if you can get someone with a cherrypicker bucket or work lift. The photo looks like maybe wires could interfere. Have you thought about staging, either pump jacks or steel?
If you absolutely have to do it from roof jacks, I just use srtuctural screws like deck screws (don't trust your life to sheetrock screws) to fasten the jacks, trying to hit a rafter, right through the surface. Then to patch, I cut a slip of metal sized to slide up under the shingle where the holes are and use a good caulk to both glue it in place and to seal it against water. Screws will back out easily without damaging shingles. If you try to lift the shingle to nail up under the tab, you could break it and end up with a major roof repair.
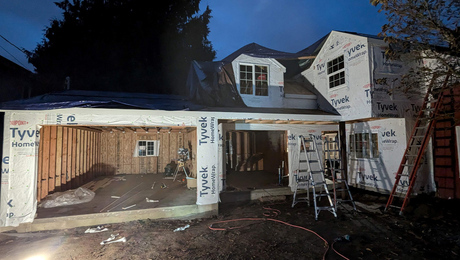
Thankfully, the wires in that first pic I posted aren't actually in the way- here's another shot from the other side that better shows what I'm dealing with. I got rid of that awning yesterday, after first realizing there was a hornet's nest in there. Fortunately, it wasn't occupied!
About the pump jacks... how do you stabilize them? The other thing is I have to be able to set up and take down the rig by myself. I had thought about renting scaffolding also. Eventually I will be painting the whole house, so an investment in pump jacks or similar might make sense. It sure would make painting the soffits faster.
So far I'm most intrigued with the idea of renting a lift. I hadn't thought of that. As always, thank you all for the ideas!!
Andy
I'd be willing to bet that if you did a Google search you could find pictures and drawings of how to use Pump jacks with the standoffs or mounting brackets as they are also called.
It is a metal brace that clamps to the pole and can be screwed or nailed (screws are easier to remove without damage to the surface) to facia, frieze boards, window casings, or any solid wood.
I have erected pump poles as high as three stories alone but it is way hard and I don't recommend it for the uninitiated. You'd need help of one or two others. Same with steel staging.
check the rental yards for that lift. In my neighborhood, a painting contractor owns one and leases it with a man for $75/hr.Excellence is its own reward!
My old wood (two 2-by-4s cobbled together) pumps are 32' high and they're not too hard to walk up or down solo. Put the base against the foundation, then start walking it up...once you start, don't stop!<g> Let it rest agianst the gutter, then climb up your ladder to secure the standoff arm.
As piffin wrote, definitely use an arm at the top, and definitely use screws instead of nails to fasten it. Don't use drywall screws.
When running pumps up real high, I've sometimes used additional arm halfway or so up the pump. I doubt you'll need that. I also cross-brace the poles. As you pump, you'll have to remove the cross bracing, pump past it, then reattach it to the pole. Simple cross-bracing does wonders to add stability.
Yuo don't need to get too fancy with your planking. I'd recommend a 2x10 and a 2x8 side-by-side, connected by 16" pieces of 2x4 nailed from below. I'd recommend about a 2" overhang on each end. So, if you set your pumps 12' apart, use 16' planking. You pump one side up a few feet, then the next a few feet past the first side you pumped up. You'll see why the 2' overhang on the plank comes in handy when you pump up.
Pump jacks are not for the faint of heart. They can be a little disconcerting for the first-time user...but you'll get comfortable on them in no time. Just don't get too comfortable.<g>
If you are getting started in business, a pair of pump jacks is a great way to start buying scaffolding. You can buy them mail order from Tool Crib for about 150.00 each, including the safety rail and tool platform holder, post base with a spike, and a couple steel standoffs. Then, as the need for more arises through the years, you can add one, or two sets at a time. Those things are real versitile, great for lower work too, like siding a one storey building.
If you're going three stories with wood posts though, I'd still wear a fall arrest harness. You never can be too safe.
Brinkmann for president in '04
Edited 8/11/2002 9:16:11 PM ET by jim blodgett
The safety book on pumps says that you should place the posts every seven feet, horizontal, and attach to the building every seven or eight feet vetical. That will make it rock solid but is way too overkill, in my book. I spread them about twelve feet with no problem and vary the heights between brackets according to where I can find good atachments. I've come to prefer the metal standoffs over the diagonal cross ties too. In addition to being more stable both ways, they are easier to temporarily release to pump past or to leapfrog two of them.
WD-40 on all moving parts every time I put up or take down.Excellence is its own reward!
I visited my brother yesterday. The house next door had a pair of pump jacks set up. The tops of the poles were secured in an interesting way. There was a sheet of plywood, maybe 4 x 2, nailed to the roof so part of it stuck out past the rake, maybe 1 x 2. A hole was cut in that portion just big enough to stick the post through.
Looked like a brand new roof, too.
Rich Beckman
On a job like that, I'd sid with piffin and work off of pump jacks. A couple of jacks and arms will set you back about $120, the cobbled 2-by-4s and planking another $40 or so.
You could buy the setup and have it forever, or rent the pumpjacks and arms.
If you go with pumpjacks, post again for some safety tips.
You could always resort to the tried and true method of a rope around your waist, rope slung over the ridge, other end of the rope tied to the bumper of your truck. The nice thing about this set up is the missus can move the truck a few feet closer to, or away from, the house to adjust your working height. <BFG>
Brinkmann for president in '04
i assume this is the dormer you want to work on...with my equipment i'd put up two alum-a-poles right in front of the face ( we can go to 48') as piffen described
failing that.. i'd think pipe staging.. or
looks like you are about 10 below the main ridge.. maybe two ladder jacks hanging on ridge hooks off the main ridge .. one on each side of the dormer ....and tie in with a fall protection system ....
Mike Smith Rhode Island : Design / Build / Repair / Restore
As piffin stated a personnel lift or cherry picker would be my first choice. Go to your local rental places and see what else they have like a scissor lift or Genie lift which goes straight up with no boom swing. I can use one in my area for $145. a day. Can't beat that for safety at a relatively low cost.
Please be very careful of those wires. A very good friend was killed on a job site when his ladder got away from him and he got electrocuted. He was a trade professional and a very careful person but accidents can happen to anyone.
Mike