Looking for some ideas/options on capping some wainscoting I installed. I suppose I could just go to the yard and pick some factory stuff out, but I thought there might be some more creative approaches. Please share your ideas, usual (or unusual) practices, etc.
This is a bathroom–wainscoting is on two walls, runs about four feet up the wall. Used 1 x 6-inch white pine beadboard milled locally. Finished clear–house has natural, somewhat rustic look.
Sheetrock above is half inch, wainscoting is fastened directly to studs and blocking, so wainscoting stands 1/4″ proud of the rock. 1/2″ gap between top of wainscoting and the bottom of the rock.
Wife wanted wide cap to place things on, but I think that’ll look silly and stuff will just get knocked on the floor. What’s a traditional width? I was thinking 1 1/2″ or 2″ at the most.
Also, there’s one window, casing is 1×4 white pine flush with sheetrock, which means casing is 1/2″ proud of wainscoting. What’s a good detail for where the cap meets the leg casing? Seems like it should extend a tad over the casing with a mitered return to hide the end grain?
Thanks for the ideas.


Replies
A simple approach would be to make a 1x bullnose with a router and round-over bit. Make any width you like, but about 1 1/2" to 2" projection from the drywall seems right. Then put a standard molding under the bullnose to cover the joint with the wainscotting. You could use a stop molding or upside-down base.
Al Mollitor, Sharon MA
You could use 1X2 stock, route an ogee on the top side and rabbet a 1/4 inch off the back to cover the gap and top of the wainscot. You could also use stop molding, which already has the ogee, and rabbet the back, but it may be too thin to look right.
Aaron, pretty tough to attach that 1x2 to a 1/4" beadboard and or to the stubs. A bullnose under that 1x2 would help ALOT!
I was thinking that the wide side would be on the wall, with the ogee edge on top, and simply butt the 1X2 into the window trim. I agree that it would be difficult to do it short side on the wall---LOL!
Georgia Pacific has an ad showing a simple trim detail, natural beadboard with a white cap. Check some of the recent FHBs.
I wish I could post pics here...
I would:
(and this concept could/should be extended to a baseboard too)
-put a 5/4 x 4 vertically on top of the bead. This hides the ugly gaps that form when stock is placed on top of bead, and will stand 1/4" proud of the bead surface. More would be fine, or even better, but 1/4 will do. An alternative is to rabbet a 'groove' for the bead to nose into if the bead has variations on it's top edge.
-trim the SR 1" up from the top edge of the vertical 5/4 x 4, and put a 5/4 "shelf" on top of the 5/4, nosing under the SR. ((Easier to clean up the joint this way. If your wall is flat, no need, or if the wall is curved, you could scribe the "shelf".)
-Attach 1" bullnose to the outer edge of the shelf, and some trim at the intersection of the "shelf" and the vertiacal 5/4 x 4 bead 'cap'. Maybe a cove or a bed rail upside down.
I agree with your wife, to a degree. The projection should be enough to be useful, but not too large to be visually top heavy. I am amazed by how "accesorizing" makes my work look better, when done right. If however, the shelf will end up holding bottles of "Nair" and "Acme Shaving Cream", then by all means make it tiny and tilt it too!
And your thoughts on the window casing interface are spot on. overhang the "shelf" a bit and miter return the bead into the casing.
Sorry I can't figure how to post pics. I'll research and see if I can.
Jake Gulick
[email protected]
CarriageHouse Design
Black Rock, CT
Duh- I get the dummy award for the day!
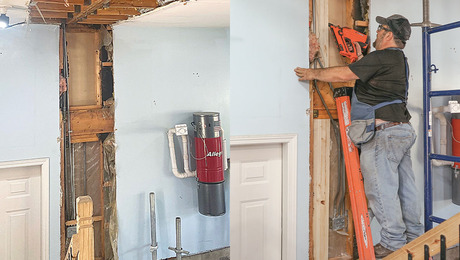
Here are some pics. The applications aren't identical, but the concept is the same, and maybe you can see something useful.
The green bathroom is closest to your needs and description. The second is actuallly a kids room where the shelf was to be useful.
Jake Gulick
[email protected]
CarriageHouse Design
Black Rock, CT
Edited 10/29/2003 2:45:57 PM ET by LATEAPEX911
Edited 10/29/2003 2:50:49 PM ET by LATEAPEX911
Nice! Pretty fancy!
A second try at getting something in a useful size. This is another bathroom I did, but the detail is larger and heavier due to the room's larger scale.
Jake Gulick
[email protected]
CarriageHouse Design
Black Rock, CT
compliments to Carriage House Bldrs photos / previous post handsome work
I'm usually more involved w/ the more formal homes as portrayed in Carriage's pics - built up processes using crown & bed mouldings w/ rails etc But one I've used and always liked is the smaller of the shake or brick mouldings maybe the 1 1/2" rather than the more squared 1 3/4" moulding has some nice ogeed lines w/ enough bulk to rabbet where you like etc hope these are mouldings still available country worldwide it is a shame how homogenized the moulding situation is today
I think what you are describing is the ogeed Band moldings. Agree - I use them lots for exterior detailing.
Excellence is its own reward!
Wow! Thanks for all the ideas, photos, recommendations, and warnings. Some really fine craftsmanship there. I guess the bottom line is "use your imagination" and create something practical and beautiful that suits the room.
I like the idea of a simple bullnose cap, since the window stool is 1x bullnose (by the way--when I did my stair tread nosings I used a bullnose router bit--but a lot of pros seem to like using a roundover first on one side then the other--is there a reason for that--aside from not having to buy an expensive bn bit!?).
Piffin, I'll be sure not to mention to my wife that you agree with her. No seriously, maybe I need to rethink my objection to the wside cap. One concern is that the door opens in toward a wainscoted wall, and the hinge jamb is only about 3 inches from the wall (I had to rip both leg casings)--I want the door to be able to open wide without slamming into a wide "shelf" cap. Maybe just one wall would have the wide stuff, like what you did over the "throne" in that photo.
By the way, I've got one outside and two inside corners to deal with. Do you guys like to biscuit/glue those miters on the cap?
Well, my Arts & Crafts reflex for beadboard at the window is to match the top rail o nthe bead board to the window apron, and the cap "ledge/shelf' to the window stool. Ok, this could be a problem with a 54" high sill (unless the bead boards is up that high).
If the window is lower than the wainscot, use the same detail as the apron & stool. That is, the top rail is as wide as the apron, and the cap "ledge/shelf" projects the same as the window stool, and you can match the "legs" onto the jamb casing, too.
If you are looking at a strip of lumber 5/4 x 5/16, then, I'd cut the SR so the cap would be 5/4 x 13/16. This also lets you toenail the cap on from underneath nice and solid. The top rail will snug up under the cap, especially with a nice deep rabbet for the brad board.
Are you SURE you're only twenty years old? You must have gone to a good school, kid..
Excellence is its own reward!
Are you SURE you're only twenty years old?
Yes, I am quite usre that I am not younger than CAG <g>
Ought not to be, having been born in 1960 (before the 50th star went on the Flag, 4 July 1960, too).
Know the difference between a bit and a crupper (and which end of a horse they go on, too . . . ) Used a brace-and-bit, and a CNC router, too. Technology is my friend, and the better a house I can build, the better everyone lives.
And that's (almost) all I have to say about that.Occupational hazard of my occupation not being around (sorry Bubba)
"Know the difference between a bit and a crupper "
LOL, Me too, but I'm not sure I'd want to lick either one.
I've got other tools that I'd kiss though..
Excellence is its own reward!
I think you have CapnMac and Captain Strap (?) confused.Kevin Halliburton
"I believe that architecture is a pragmatic art. To become art it must be built on a foundation of necessity." - I.M. Pei -
Ed,
I typically use a bullnosed cap about 1-3/4" over a waist of anywhere from 2-1/2" to 4-3/4" depending on size of room and style of trim.
It makes sense in a bathroom to have that shelf for things.
In Disc 15 below, you can see one. The cap is minimal over the vanity but on the left, it is about 10" deep in the alcove where the stool sits, for a "library" shelf. out of the phot to the right along another right angled wall, it widens to more like 2-1/2" for placement of bath goodies over the clawfoot tub. Lav&tub shows same before all finished out. The waist on this was wide enough for mounting towel bars to avoid penetrating tender sheet rock or plaster, providing secure mounting so it was a flat surface with a bead at bottom, The cap was a piece from Princeton products. They have several different styles preprimered to select from their catalouge at Vikings.
For casings, I return onto it slightly when I can. Let's see if I have a photo showing such...
Nope, none that show that detail but disc 06 shows another example of what your wife is wanting...
Excellence is its own reward!
Be sure to back prime the wainscotting with an oil or similar primer. Its really important!
I made my own cap molding using 1x over the top of the wainscotting to the depth I liked then added the molding I made onto the front of it.
Be well
andy
My life is my practice!
http://CLIFFORDRENOVATIONS.COM
Hey Andy, Is that window elevation to make it handy for emptying the sink the old fashioned way? LOL
I like the dry sink stand.
Oh, Is this the scene of the infamous toilet model foto?. The one displaying use of FHB mag?
Excellence is its own reward!
Edited 10/29/2003 4:16:48 PM ET by piffin
Was a dbl window that I had to separate..funny thing...there was an old sticker on the inside jamb..ANDERSON!My life is my practice!
http://CLIFFORDRENOVATIONS.COM
I remember that picture.
Excellence is its own reward!
what you doing up so early....I thought it was just CAG, IMERC and me that woke before the rootsers?
Wanna know what sucks?
Wake up at 2 AM and your mind reels about stuff that wasn't in the plans yer sucky archy drew. Thinking about how to make her lame measurements work with no details....
Its instant.the second I woke up......grrrrrrr. I better go meditate.
On a happy note......the weather is so awesome..spose to be almost 80 this weekend......on a counter productive note....does that mean I'm working all weekend.....gulp. Yep!
Be exhausted
andy
PS.....a new tool I just discovered after all deez years....deer skin gloves.WOW!
PSS..and thanks for the suspenders tip.....another FANTASTIC tool! $6 at HDMy life is my practice!
http://CLIFFORDRENOVATIONS.COM
I worked a hard one yesterday, slogging in mud from the storm and running pumps to set footing forms so I was beat when IO got in and wife was on the PC, so I hit the sack at 6:30PM - all slept out now and enjopying solitary coffee..
Excellence is its own reward!
solitary coffe.......hmmmm. Just when I was gonna hit the sack for an hour you and Howard (S) got me thinkin'. A new pack O organic Paul Newman coffee whole beans with vanilla soy creamer...Howard was jawin about a new cell phone with all kinda cool stuff....now I need to google it being I havent had a cell in over 5 years......ugh
Be tired today
andyMy life is my practice!
http://CLIFFORDRENOVATIONS.COM
MONSIEUR ED-- I've used a 5/4 or 1x window stool with the ogee edge for the cap several times. I rip it to width, rip the underside bevel to square, and install. Sometimes I'll put a small moulding beneath to add more detail. Sorry I don't have pictures; a digital camera is on my wish list.