Water leaking through former basement door
In 2013 we bought a house that was built in 1939. An addition was built in 1950, including a finished basement that was used as a bedroom. A few weeks ago I embarked on what I thought would be a simple project: replace the basment bedroom carpet with laminate flooring. When I ripped up the carpet, I immediately discovered must smells and spongy subfloors. My list of problems include:
- The basement floods every time it rains. We couldn’t know this before buying the house, because the water remains beneath the subfloor.
- This flooding totally rotted the sleepers under the subfloor (see photo below).
- The nail studs used to attach drywall had rotted everywhere they contacted the concrete floor.
- Fiberglass and mineral wool insulation had been applied to the bare concrete foundation with no vapor barriers anywhere. Mold city.
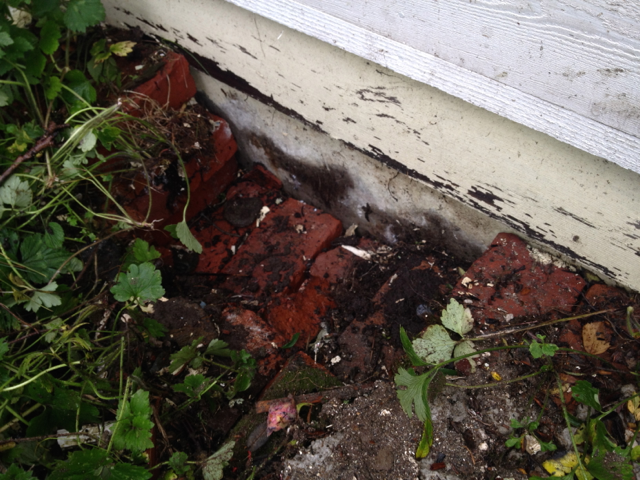
- Wind-driven rain has soaked the exterior siding. Without a rainscreen or any building fabric, this caused the (plank) sheathing to rot 2′ above the concrete sill.
- The wet sheathing caused the 2×4 sill plate to rot.

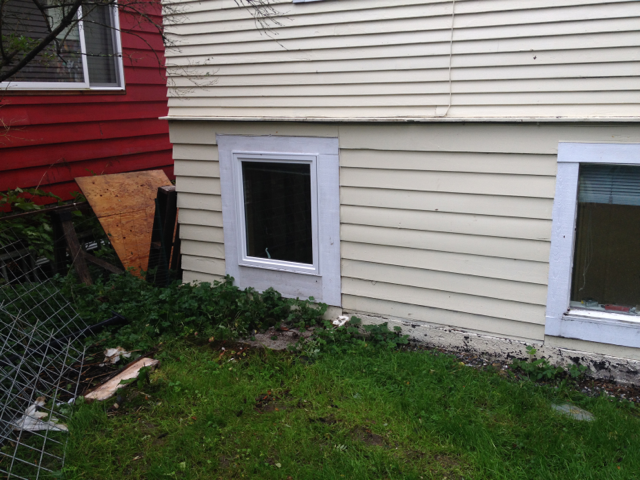
The flooding is caused by water that is leaking through an old, below grade exterior door. This door was removed and closed off at some point. We required the seller to replace the crank window with an egress window as a condition of the sale.
Only after I pulled the drywall off did I realize how they’d closed off this doorway: Basically they slid in a sheet of plywood and framed it in with untreated lumber. This lumber has rotted. Water is cascading into the basement between the top of the old concrete door sill and the bottom of the new wood framing.
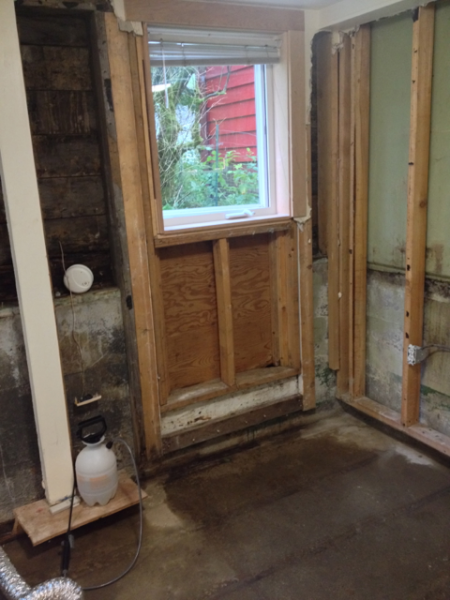
Outside the house, they faced the plywood with some kind of hardboard. Then they backfilled the stairwell with bricks (!).
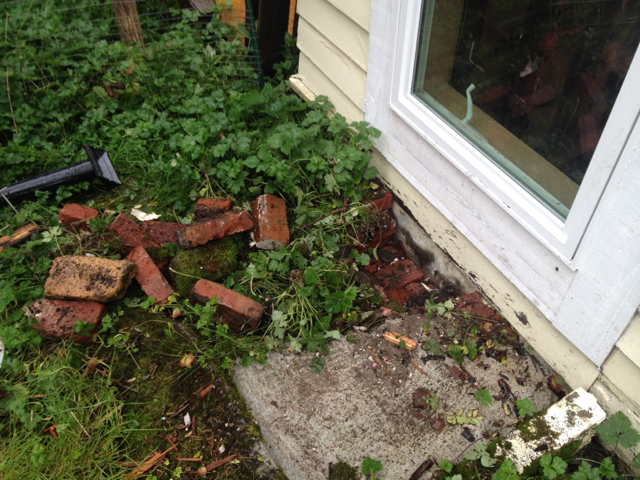
I wouldn’t believe it if I didn’t own it.


I’ve come up with a few options on how to address the water problem, and would love to hear your thoughts and advice:
- Excavate the old stairwell. Replace the rotten plywood and framing in the doorway with exterior grade, pressure treated stuff. Install a french drain below the concrete door sill, and discharge water well away from the house. Apply Grace Bituthene system to the new plywood (primer, membrane, Hydroduct, mastic). Backfill with washed gravel.
- Excavate the old stairwell. Rip out the rotten wood and build a proper exterior wall system where the door used to be. Then install an egress window well.
- Remove the wood structure and pour a new concrete wall to match the existing foundation. Tie it to the existing foundation with rebar, and apply Grace Bituthene system to the exterior. Backfill with washed gravel.
That last one sounds expensive, and is pushing the limits of my DIY abilities. Any better ideas?
Thanks!


Replies
consult onsite with a G.C.
IMO, your list of options are not comprehesive enough to address and/or resolve all your possible moisture related issues. I recommend that you consult onsite with reputable G.C. If you can afford their solution(s), then hire them.
You have my sympathy.
It would be possible to seal the door opening by doing a proper job of the FUed job they did, using foundation grade plywood, treated lumber, and some sort of waterproof membrane on the outside. But probably just as easy/cheap to install CMU or pour concrete.
here's my thought...
if you laid this out so nicely, why is #3 beyond your ability? This ain't rocket science.
Doesn't have to be rocket science to limit somebody's ability
DIY abilities include physical as well as mental capablities. Maybe the O.P. is referring to the former in limiting him or herself in this case.
of course, but...
the self-professed stretch was about #3 specifically. #1 and #2 are pretty strenuous. I read it as the concrete work was the stretch. Just struck me that the poster had a pretty good handle on the problems and options, and if they felt they could tackle #1 and #2, #3 wasn't a stretch.
I dunno -- I've done a lot of #1 and #2 in my life but I don't ever recall doing any #3.
you might want to look at it this way....
Have you even formed and poured a concrete wall? I have. Many times.
It usually involves a fairly advanced framing layout (building form walls with whalers on layout) knowledge, snap tie and steel tying familiarity, and a fair amount brute strength to work the material. Also, most folks have no idea of the force involved with wet concrete; particualary when it's vibrated. IMO it is not a DIY job and almost always involves more than one person. Blowouts can be disasterous. Also, concrete placement work is not a slow paced affair; particulary when ready mix overtime charges can easily double the cost of your concrete materal costs.
#1 & #2 can easily be done by one person at their own pace and schedule.
of course, but...
yes, I have. Many times. I don't find those skills that difficult, nor difficult to design this well for this small of a scale (he/she is not replacing the whole wall, just filling in a 3-5 foot tall portion of a 32-36" wide doorway opening), nor to do all the tie in work, and the original poster in options 1 and 2 indicated they had access to the brute strength. Anyway, we can all keep going back and forth like this, but they can figure out what is within or beyond their skill level. I was just offering the suggestion that maybe they shouldn't necessarily assume that #3 was beyond their skills. Anyway, good luck.
I stand corrected
@user-969819
I now understand your point about having to fill in just the doorway. I misread part of the original post and photo(s). I assumed the yellow sided addition was CMU. I just couldn't make out the mildewed details in the photos provided. I also inferred that when the O.P. said they wanted to match existing concrete foundation that they were referring to the original (red sided) structure's concrete foundation and that this would mean replacing the entire CMU knee wall foundation of the addition. This concrete work would have been the bigger job I was referring to as being out of the capacity of most DIY's.
I apologize for making the wrong assumption and stand corrected.
no worries!
What's wrong with putting a door into the opening?
Replace the mess with a new door & stairs, and regrade the yard is what I would do, if there is a way to control water drainage.
Is all that water coming in from the old doorway? now that you have gutted the basement I would look the next time you get a good downpour and make sure the door way is your only culprit.
My concern would be making sure that this is the only issue. Being an older home, if the basement was not originally intended to be a dry space, you may have more problems than just the doorway. i would want to be absolutly sure this is your only moisture issue before you start rebuilding.
that said, i would more then likely opt for #3 but as it has been pointed out, it is not a simple task...
Putting your construction skill aside for now, I think you are on the right track with your proposed solution. Obviously you have to excavate and replace with proper backfill. Obviously you have to rebuild the wall... Either concrete or all weather wood is OK. I'd do concrete cuz we all know it won't ever rot. You don't need the concrete for its supportive strength.
The crux here will be the waterproofing of the exterior and the installation of a french drain. This is where the money is. A proper job will entail excavating the entire foundation. This is something a DIYer can do but do you want to? Not difficult but the physical part puts concrete placement into the easy catagory. I tackle most jobs myself. But digging... not so much.
Don't be fooled by anyone that installing a sump pump will bring happiness.
A thought regarding doing the wall in concrete: One could use ICF's. They are easy to use. They could serve as a the form material without having to employ plywood and snap ties. If the resulting foam is in the way after the concrete sets, simply cut it off and discard it. Drilling holes into your existing foundation is easy. Rent a proper drill or buy one from Harbor Fright for about the same amount.
Good luck.
Update from OP!
Thanks, everyone, for all of the help and advice. I apologize for not following up here, but I've run into some challenges logging onto the forum (resolved!).
So as it turns out, the water is not coming through the old door, but rather through a hole in the foundation -- the intended purpose of which, I have no idea. I'm attaching a photo of the evil hole, which I discovered by setting my laptop in the basement during an overnight rainstorm, and recording a time-lapse video:
http://youtu.be/ZFvoZjPXY4E
The old door is to the left in this movie. The hole is, well, where the water is coming in. I've since filled the hole with hydraulic cement and the basement is dry as a bone.
The door is still an issue, however. Money is an issue, so I can't hire a contractor. Pouring concrete is something I've never attempted. I removed all the brick in the old exterior stairwell, and I think I'm going to jackhammer the old concrete landing out of the way, install a french drain, replace the wood framing, install a proper waterproof membrane, and fill the hole with washed rock.
Thanks again for all the help! I'll post results soon (I hope).
George
That was clever to use the video to find the leak!
That is an odd hole. Looks like it may have been formed with a piece of wood that subsequently rotted out, though it's not clear why a piece that shape and size would have been left in the concrete. About all I can guess is that someone jammed a piece of wood in there to hold the forms apart, perhaps not realizing that it was not low enough to be below the floor, or simply forgetting to yank it out before pouring. (Though likely the others here have some other ideas.)
BTW, I don't know that there's anything wrong with reusing the brick for fill, after you redo the door stuff.