What layer of materials should I use to insulate vertically between finished living area and an unfinished attic.
This is a specific question that came up from my first posting about attics in general.
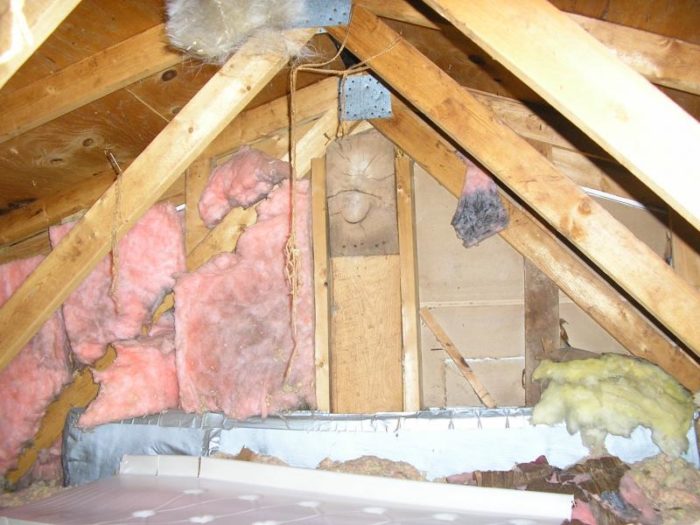
I want to close off the cold attic side.
Here is what exists now (starting with the inside of the house):
A. Painted drywall (standard thickness, not sure exactly
B. ..which is hanging on/against a truss which is open on the opposite side to the unfinished attic
C. The gaps in the truss were filled with faced FG batts, many of which had gotten wet in the past, presumably because the attic was ungodly hot in the summer.
That’s all that’s now there. I want to add more as its not doing much insulating as it stands.
I could just ask you all what to add to the cold side of the truss/gable, but I might as well let you know what I was thinking.
D. Ripping out the bad pink FG that was there and installing new FG (the gap is only as wide as the truss)
E. Hanging a layer of Rigid Foam Panel on/against the truss…then sealing it well.
F. Will just have to come later. I’m open for ideas. I’m thinking some sort of unfaced FG.
I’d like to at least get to stage E asap as it’s starting to get cold outside and I want some protection up there before it gets really cold. I live is the northernmost county of zone 4, just douth of the line between zones 4 and 5.
I’m wondering if the Rigid Foam would help or hinder moisture issues.
(Dow 3/4″ x 8′ x 4′ R-5 Polyisocyanurate Rigid Foam Insulation, with moisture resistant facers)
Thanks
Tom
(reposted photo of the center portion of the truss/gable. It’s easier to see what I’m talking about)


Replies
Need to figure out
where the moisture came from. Is there condensation forming there for some reason? Is there a leak?
For insulating that, I would cut precision pieces of fiberglass batts and fill all the spaces in the truss, then cover with foam board. If you have an insulator up there, they can insulate that wall with dense-packed cellulose. Since there isn't much thickness, the foam is mo' betta.
There is no more condensation, not sure how the FG got wet before, but the problem hasn't occured since a new roof was put on ('94) including a ridge vent which wasn't there before. The pink stuff you see in the photo was there from the time the house was built in the mid 1970's.
I can't honestly say where the moisture came from.
I know that the unconditioned attic got incredibly hot in the summers. It catches a lot of afternoon sun and like I said, had no roof vent or soffit vents at all. I think this might have also led to moisture up there from high humidity.
On the other hand, there really wasn't much insulation between the heated cathedral ceiling on the other side of the drywall you see in the photo and the unheated attic. So there was heat running through into cold attic air.
Hard to pinpoint the exact cause but it seems to be drier since the ridge vent was cut (across the entire length of the attic nearly entire, it covers both the cathedral side and the attic side).
You think the insulation between the truss spaces needs to be faced or will unfaced work ok? There isn't much width to put much in, thickness wise. The previous batts were faced, with the facing on the warmer side (living area).
I was thinking that the Rigid Foam might suffice as the moisture retardent layer.
I bought some of the Dow Super Tuff-R (i think). It has a blue side and a foiled side. I was thinking of putting the foiled side facing the attic to help repel its summer hear.
I'll worry about the next layer later, for now I want to get that truss covered and sealed.
Thanks
It may actually be
that the foil should face the living space. In theory that would reduce heat flow from the attic to the living space, as the foil has low emissivity and won't radiate as much heat as an un-foiled surface. Question is, maybe it's more important to retain heat in the house during winter, in which case the foil would face the attic.
A radiant barrier always needs an airspace in front of it, at least one inch. If you put fiberglass into the truss, don't put the foil against the fiberglass, it will nullify it...point the foil towards open air always.
Thanks for the info.
I think now I will just attach the Rigid Foam with the foil side facing the heated living area. And leave the voids in the truss vacant with no FG filling. And remove the old FG that is in there now, what's left of it. Seems a shame to leave that void area without anything but I suppose when the foam boards get sealed it should do ok.
Since I will be putting additional insulation over the boarding in the future (on the cold side) it sounds like it would be easier to attach it directly and not have to worry about providing a 1"+ air gap for the foil to work best.
fass
If I see this picture correctly (2x's on the flat with the drywall attached)-leaving a space and inch and a half deep.
I would get some 1-1/2" foamboard, cut it to fit in between the framing, foam the gaps. Then I'd install the other foam over the 2x's to seal this side.
Leaving that gap open would allow leaking warm air to condense on the covering foam board.
calvin, you're correct. The void is the thickness of the truss.
I was thinking the same thing. It would eliminate the 1 inch of space against the foil side of the 'outer' foam board though.
I've already bought some 3/4 inch panels. I guess I could use them single or double them up.
Which direction should the foil side face if I use them to fill the voids?
Now I'm also wondering how to attach them, it's not going to be fun cutting a bunch of perfectly fitting pieces up there.
I don't know if glueing anything against the back of the living room drywall would be a good idea. Maybe just putting them in and taping them from falling out would be enough. It's not like they will have anyplace to shift to after the outer board is nailed over it.
.........................................................................................................
I remember MANY years ago as a kid, I saw some TV episode where a POW occupied his confinement by mentally constructing the house he was going to build when he got home, stick by stick.
I can relate. In a way it's a good thing this project is so hard to get access to. It's making me think things through first.
fass
not sure about the silver lining...............
In this situation, the air space is something I wouldn't even concern myself with-because I'd be more inclined to be providing a vapor barrier right up against the warm drywall.
I'd cut the pcs as close as possible to perfect-then take a can of spray foam up with me and proceed to make a mess.
I'd use friction to hold them in, then fill voids with the foam. And not much foam at that-it increases in size and might push off the final foamboard.
Others have a much better understanding of the different kinds of foam and their vapor barrier stats, except for the popcorn type white foams, I think most foamboards would repel/contain vapor.
As to the foil, early on in a homebuilding career, a friend in the mountains lined the inside of his place with silver covered foamboard. For a number of years it was like living inside a restaurant baked potato. Later he became more wealthy and covered it in sheetrock. Now it looks like a real house.
but I digress.
VB
I would not be so concerned about the vapor barrier against the drywall. In this case, the foam over the outside of the truss is a very good way to do it... eliminate thermal bridging of the framing, provide a solid air barrier, etc. If he uses 3-1/2" polyiso foam, he will have great R-value for the application and the dewpoint will be somewhere within the foam... there will never be a condensing surface on the drywall side of the insulation. It will be a more competent application than the typical fiberglass-in-framed-cavity construction of the rest of the walls of the house.
That said, the foil is not a good enough reason to leave the truss spaces unfilled, if he's inclined to fill them. Even if he does, I think he wants 3" or more of polyiso foam over the outside of the truss.
david
I was thinking of using fiberglass batts of some sort on the cold side of the 3/4 foamboard, putting it on later, after I got the foam board complely installed and sealed.
Are you saying to use 3.5" foamboard now? I'm not sure of it's r value. It might be overkill if I use the 3.5 against the truss and fiberglass over that.
Like I mentioned on the original post, it's the vapor barrier that I'm trying to satisfy.
Also, how do you attach the 3.5"?
Edit......I found a chart of rigid r values...
Rigid Board Insulation
Common Name(s): Polyisocyanurate, polyiso board
R-value per Inch: 6 - 7
Strengths or Best Use: high R-value, readily available at local stores, easy DIY installation, can be airtight if sealed/taped at the seams, good for narrow spaces that still need high R-value, air can go around but not through this insulation
Weaknesses: Expensive, R-value diminishes slightly over time especially if the foil face is removed, will absorb moisture if wet, degrades in sunlight
Common Name(s): Polystyrene bead board, Styrofoam
R-value per Inch: about 3.5
Strengths or Best Use: readily available at local stores, easy DIY installation, can be airtight if sealed/taped at the seams, air can go around but not through this insulation, used for foundation insulation and under concrete slabs
Weaknesses: Will absorb moisture if wet, degrades in sunlight, not very fire resistant
Common Name(s): Expanded polystyrene, EPS
R-value per Inch: 4
Strengths or Best Use: readily available at local stores, easy DIY installation, can be airtight if sealed/taped at the seams, air can go around but not through this insulation, used for foundation insulation and under concrete slabs
Weaknesses: Will absorb moisture if wet, degrades in sunlight, not very fire resistant
Common Name(s): Extruded polystyrene, XPS, blue board, pink board
R-value per Inch: 5
Strengths or Best Use: readily available at local stores, easy DIY installation, can be airtight if sealed/taped at the seams, air can go around but not through this insulation, used for foundation insulation and under concrete slabs
Weaknesses: degrades in sunlight, some ants will burrow and nest in XPS, not very fire resistant
Common Name(s): Rigid fiberglass
R-value per Inch: 4.4
Strengths or Best Use: easy DIY installation, air can go around but not through this insulation, used for roof insulation (commercial) and foundation insulation, used in narrow cavities, not susceptible to moisture damage, naturally fire resistant (needs no additional chemicals)
Weaknesses: expensive, not available everywhere
Common Name(s): Phenolic foam boards
R-value per Inch: 4.8
Strengths or Best Use: used for roof insulation (commercial) in the 1980's because it was reasonably priced for a high R-value
Weaknesses: when wet it leached an acid that was corrosive to metal roof decking, no longer distributed
Foam board
I would use 3" - 4" polyiso in your case.
1-1/2" of fiberglass in the truss space, plus 3/4 foam outside the truss... low R value and probably not adequate to keep the dewpoint within the foam or entirely outside the assembly. You need more foam.
I understand your point but I don't see where I can get that thickness of foam.
I checked lowes website and didn't see anything over 3/4".
When I was buying my sheet of 3/4" I did notice some 3-4" white unfaced foam of some sort.
Is that what your talking about?
Do you have ...........
a good masonry supply?
a distributor of the foam (online search off the foam maker's site). Ask who in the area you can give the money to and pick up what you need at the distributor's.
Perhaps a good sized concrete operation?
Commercial drywall supply?
These are all places where I can find thicker, bigger sheets of foam and that's in Toledo,Oh.
Of course, you may be further out in the boonies than that.
A question,
In the middle of that gable, up top-what is that bulging paper bag / swollen celotex backer looking area?
calvin
Thanks. Yeah. I'm going to have to call around. Too bad it's so late.
It seems like the 3" is the way to go. Then I hopefully won't have to add anything more to it.
3" will get me up to between R-18 and R-21.
It's going to be tough getting it into the attic. I had them cut the 3/4" piece in 32" lenghts (thirds) just so I coulg get it through the scuttle. 3" pieces will probably have to be even smaller.
fass
Now is the time to..................
Figure the best way and size to do it with the least amount of seams (if at all possible).
Then decide if it isn't time to make that scuttle the size it should have been in the first place.
They are usually located in the worst area but within many walls that are there to carry load. Figure which ones, and see if you can easily (sort of) make that thing bigger without bringing down the house.
I realize you can't be getting a hole that would acommodate a 4x8, but here I can find full sheets AND long halves-2'x8'.
See if long would work with a bigger hole or live with shorts.
The framing of that gable would have breaks on those studs, where? Have the pcs sized accordingly if it's at all possible.
If you mean the grey stuff near the center of the very top of the photo, it's a portion of the insect shield for the ridge vent. I need to replace or reattach quite a bit of it.
All the other colors and shapes are probably pieces of the old FG which fell out from between the voids in that end truss.
Lumberyard
Locally I can buy XPS and polyiso foam in a variety of thicknesses at the lumberyard. Lowes is a distant second in terms of selection of professional building materials, especially anything other than 2x4s and half-inch plywood.
3-1/2" is a common polyiso thickness, at least around here. It's convenient for insulating old 2x4 walls and getting close to R-21.
You could also use 2 layers of 1-1/2" or 2", butted tightly and taped.
If you use a single layer of 3/4" foam, you could have a fairly cold surface on the inside of it, inviting condensation. At 68 degrees AND 50% RH, the dewpoint is 49 degrees.
any ideas how I would attach the 3+" to the truss?
No single piece would be that big, just not sure how I would do it. At least I could easily nail the 3/4".
Long
screws
I wish I would have bought some spray foam last time I was at the store. I was thinking that I'd probably pick the wrong kind.
Maybe someone will point me in the right direction.
I was thinking I wouldn't have enough voids to spray the entire contents of the can with, at one time. Last time I used it I think there was no way to save any for another day and it all had to be used at once. It also expanded so much I didn't think it could be used managebly as an adhesive.
I need to design the fix around the least permiable layer.
According to this article (which seems to make sense to me) the main concern about vapor is where is can go once it's there.
http://www.greenbuildingadvisor.com/blogs/dept/building-science/vapor-profiles-help-predict-whether-wall-can-dry
In my case, that would be the 3/4" Rigid Foam Board with its blue plastic on one side and the foil on the other (R-5). (I don't see where I can buy any thicker panels of it.)
Which is making me think I will fill the 1.5" voids of the truss with unfaced FG then cover that with the 3/4" Rigid Foam, then add unfaced FG rolls/batts to the outside of the 3/4" Rigid Foam Board.
Filling in the 1.5" void with the foam boarding would seem to be placing two layers of not so permeable materials against each other which sems to invite trapped moisture.
It might not be the most efficient design but I think it would avoid trapping moisture as it would be able to dissipate towards the interior (when it has to) and towards the open unconditioned attic (when it has to).
I'm still not 100% comitted to this particular method so any additional input is welcome.
That's an easy call - for a client or myself I'd take out the fiberglass directly against the wall and cut pink foam board to fit directly against the wall and to fill any gaps so you have 4" of total thickness. Insulation is cheap and 4" isn't overkill - as you know there is a huge amount of heat in an attic. The foil faced foams are more expensive and in the end nothing you do messing with them will make much of a difference compared to the 4" of pink foam.
Cheers!
Don
Don, good to see you back
And I agree, fill the space-but methinks, it's 2x4's on the flat, so only an inch and half in the gap, then go over the studs.