Quick question: if reframing window opening for different sized window, how to seal up the outside opening until the new window arrives? Don’t want to touch siding until window is in hand, but need to take existing window out for interior work. This is a house with no wrap of any kind, looks like no paper around the rough opening, but I do plan to at least add the splines.
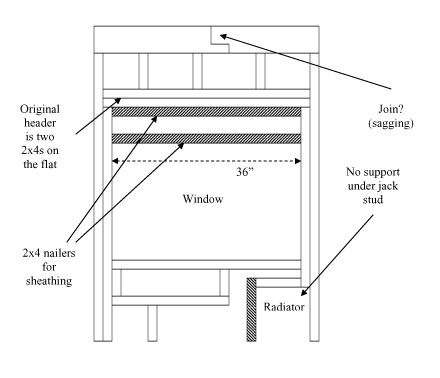
Longer question, if anyone has patience to read: Looking closely at the current window, which was remodelled at some point, there are a couple of things that make me go “Yikes”. The top plate is a 4×4, near as I can tell there is a S-shaped connection right over the window. The bottom part has sagged down 1/4″, I plan to add another cripple stud right underneath it. It does seem to me that this makes whatever is under this join particularly important for structural support. Here I’m dismayed to see two 2x4s for the header (bowed about 1/8″ near as I can tell). Even worse, the jack stud on the right terminates about 2′ above the floor because there’s a steam radiator there!
Attached is picture of what’s there now, and what I’m planning. Should I replace the header with a 2×10-ply sandwich? That’s much more renovation than I was intending. I’m not sure what to do about that unsupported jack stud, moving the radiator is not an option, 75-year old pipes. Oh I’m planning to fur out 3/4″ to level the walls and install thermal break, the radiator will be completely recessed at that point. One last thing about that radiator: the original builders cut a 2″ notch in the bottom plate to bring the steam pipe up, and there’s a split developing there; planning to put a customized tie plate in there…
In case you’re wondering what’s going on on the left below the window…. Near as I can tell, it must have been framing for a sink that was there once and is now long gone…. Some of it may have been cut away by remodelers….
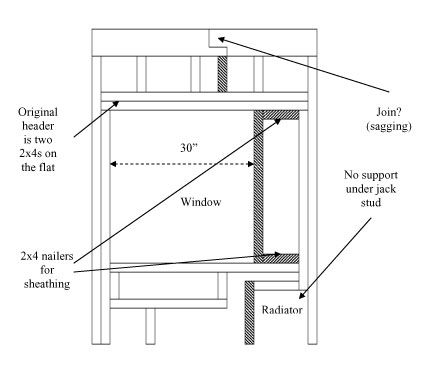
Edit: Actually I think a 2×8 header is more doable than 2×10, the latter could be a nightmare squeezing in under that sagging top plate…
Edited 12/8/2004 10:45 am ET by Taylor


Replies
I'm not sure I understand the radiator problem. Does it extend into the wall cavity where the jack stud should be? I'd like to see a proper full length one piece jack stud and king stud for the new narrower rough opening.
Transferring the potential plate splice problems to the window header might be a bad idea. I'd suggest leaving the header alone, and putting a horizontal member under the splice.
As for a temporary window, there isn't such a lot of framing to do here that it would be worth the bother. I'd hold off and not pull the trigger on any of this until the new window is in hand, and you can check that they got it right. Get all your tools and materials ready, then start early on a Saturday morning, and you should be able to have it buttoned up again before dark.
-- J.S.
Yes the radiator is recessed. There's about 1/8" clearance on one side, 3/4" on the other. I thought of a way to fix the jack stud, but it involves modifying the header: add a new king stud on the right and extend the header so the existing right king stud becomes a jack stud. A variation on this doesn't replace the existing header but puts a new header on top of it.Not sure how to install a framing member under the top plate. I thought of putting some kind of tie plate there, but there's a 1/4" difference in height between one side of the splice and the other, and not enough space to get any kind of jack in there to jack it up. I was planning to prop up what's there with a trimmer stud. My (layman's) understanding is that the header is basically there to act as an elevated bottom plate as far as the top plate is concerned, spreading the load around the window underneath.I haven't ordered the window yet.... I was figuring on cutting the RO before ordering the window, to avoid any nasty surprises. Now tell me what an idiot I've been (it's okay, I can take it...). But I was hoping to at least get the interior work done.
I'd suggest taking what you have in the picture on the left, the one with the doubled 2x8's for a header, eliminate the small cripple studs above the header, and just push it all the way up to directly support the splice. If one side of the splice is 1/4" higher than the other, fill that in with a rip of plywood. Put it all together with lots of construction adhesive and proper jacks and kings on both ends as you've shown in the drawing. That does as much as you can for the structural problem, and leaves you lots of freedom to fill in the R.O. to whatever you need for the window you're going to use.
Since you're filling in the R.O., you have lots of room to adjust to make a window work. So, you can probably save a bunch on the window by looking around. More often than you might think, yards get stuck with mis-ordered new windows, and sell them off cheap. One place out here had a whole section called the "bone yard" full of effed-up windows. They even called it that on their web site. They've changed hands recently, and are under new management.... I wonder why? ;-)
-- J.S.
why not just extend the header another inch an a half and use your new kingstud as the jack because it extends to the lower plate and then add another king stud at the end of the header
Thanks for your very helpful comments. It's not that the left side of the splice is a nice even 1/4" lower, it's more like it slopes down (on one side of the beam at that) to that gap at the connection. I figure that otherwise there would be almost exactly 9-1/2" of space there, probably less 1/16" just to be a PITA. With a 2x8 I have 2" to play with, with the 2x6 I'd have 1/2". The 2x6 option is a lot easier I think (leave existing header), but 2x6 header in this situation sounds skimpy. Why am I set on window position? When PO remodeled, they just opened up the 3" weight pockets either side when they put in a new window, but for some reason I can't figure out they reduced its height. It's destroyed the harmony of that side of the house. So I'm resizing the window to be same size and position as the other window on that wall and storey. Hence bringing the top back up to the old header. Re make of window: we've picked out the window we want, I'm happy (or resigned) to say it's nice and expensive....Edit: Looking again, there is a cripple right under the left end of that splice, perhaps adding another cripple under the right end won't do that much.... Or perhaps the fact that it lowered by 1/4" despite that support is a measure of the forces there....
Edited 12/8/2004 8:47 pm ET by Taylor
> It's not that the left side of the splice is a nice even 1/4" lower, it's more like it slopes down
Ah. I thought the problem was just that, as is common for old rough sawn lumber, the dimensions differed across the splice. Two by in my house can be anything from 1 3/4" to 2 1/8". If this is deflecting under the load from above, and the upstairs floor dips down there as a result, we have bigger problems to consider.
My concern had been with the short overlap of the splice. Code now requires a four foot minimum for doubled two by plates. Snugging the header up under the splice, well glued for its full width, would have been a nice step in the right direction for strengthening the top of the wall against forces perpendicular to the wall, and really no extra work.
Both for appearance and thermal efficiency, it's very unfortunate to have a radiator extending into an exterior wall cavity. I'm not sure how afraid you have to be of working on the old pipes. And if they're not sound enough to work on, the other consideration is how much longer will they go before you have to replace them anyhow? Putting the radiator situation right would eliminate the need to do goofy framing around it.
Can you get digital photos of this to post here? It helps a lot to be able to see what we're talking about.
-- J.S.
Pix will have to follow tomorrow....Arguments for and against bringing radiator out:
+ Structural, both the jack stud issue, and I could put a stronger tie plate in the bottom plate where the notch for the steam pipe is causing a split.
- Space: It is a narrow (5') bathroom, and the radiator is flanked on the other side of the room by the toilet. Energy efficiency is debatable: The radiator would have to be covered with a radiator cover to avoid burn risk, increasing its volume and lowering its efficiency. On the other side of the wall to the radiator is actually a subroof ("eyebrow roof"?) that extends over the kitchen. That roof AFAIK is uninsulated now, insulating it is on my list of things to do.Eventually I'd like to replace steam pipes with hot water, but the boiler is relatively new....
We got pitchers....First is the radiator. Those mason lath strips will go.Second is the header. Cripple on the left is holding up the splice.Third is a close-up of the splice and the cripple below it.Fourth is a close-up of the steam pipe and where they notched the bottom plate (actually a couple of 2x10s by the look of things) to bring it in under the radiator. I'm planning to put a custom-made C-shaped tie plate around that (BX cable will have to go).Right now, I'm planning the 2x8 replacement header as discussed, but at top of window and with 2" cripples. DW agrees radiator should stay recessed or people will be climbing over toilet to take a shower.
Have you considered actually WIDENING the opening towards the right, so you can insert a doubled jack stud to the right of the radiator (using the existing stud as one of the pair)? Add another jack on the left as well, if you can tolerate moving the window over 1.5". Then rip out and redo the header with something like a doubled 2x10 resting on the new jacks.
What is the purpose? Is the end goal to double up the jack studs? Is that necessary? There's nothing in the attic above, there's an air handler on that side of the house but over the adjoining room. FWIW there is a stairwell up to the attic across the hall. Also people seem to really want a 2x10 header, the space for the header is about 9-1/4" to 9-7/16" depending on where you measure it (just to give an idea of the PITA factor of squeezing it in there...).The stress-testing of this room will be in the floor (CI tub, SLC).I need to commit soon, I need to give a 2x10 or 2x8 a chance to dry out in the boiler room. No KD available.
I assumed you were concerned about the sag in the spliced top plate. 2x10 was a number I pulled out of the air, just because it looked like there was that much room. I'm sure 2x8 would be sufficient (and single jacks, if there's no floor above).
The main point is that you could redo it to use the existing stud as a jack and have proper support of the header.
BTW, is this balloon framed? I guess I didn't stop to look that closely at the pictures.
Thanks. I'll try planing and sanding down a 2x10 header to fit in there. It could be a worse PITA trying to toenail 2" cripples without splitting them. Will it be necessary to prop up this area with jack posts while I'm working on it? I'm guessing so if it's over 30" and especially with that splice in the top plate.... The house is platform framed, that's the one break I get...
If you're in a situation where you need 2" cripples, cut wedges instead. Easy to cut, easy to install, a tight fit assured.
Probably not necessary to temporarily prop the area, though a simple 2x wedged at an angle between floor and the top plate would provide some insurance while the stud is cut, if it makes you nervous. Try to end the bottom over a joist, or put a chunk of wide 2x at the foot.
You'll have to pull it to install the header, of course.
Thanks much for the advice. I think I'll use a 2x10 ripped down to 9", then wedge in shims once it's in place.A couple of general questions that have come up while researching the window install:(1) Anyone hear of using 1/2" foam instead of ply in the header? On the face of it this sounds like giving up too much structural integrity for too little insulation value, but at least one window book recommends it.(2) AAMA says wood shims are only good for jambs, use plastic or metal shims to support the sill. Presumably the same would be true for any structural use of shims. Where do you get such shims? As usual no-one around here knows what I'm talking about.
If you have a double 2x for a header, 1/2" ply isn't going to add much strength. The foam is a good idea, generally. It's also something I'm seeing done around here (with the foam on the outside).Wood shims have held up parts of buildings for hundreds of years. Not clear why they're all of a sudden no good. The place where plain wood isn't especially good is under a mud sill and other rot-prone areas, but you can use cedar or soak some regular shims in treatment for a couple of hours.
I think I owe BT a report on how this turned out.Window11 and Window12 show the state after removing the window and the header. The right king stud has been shortened to a jack stud and the new king stud is clamped for nailing.Window19 shows the RO after installation of the new header. I ended up having room for 2x10s (once they had shrunk) with 1/2" styrofoam between them. Not real happy about those knots on the right, but this is all I had that was dry. Thinking about epoxy to glue in the knot. I had 1/16-3/8" gap between header and beam above, I glued various kinds of shims in there (hardwood, plywood, metal strips) and toe-nailed some 16d nails into the top plate. The RO is furred out on the right to accomodate the new window size.Window16 shows a pic of framing below the sill after I had "filled in" some of the missing pieces (lower left, lower right, upper middle). There were some howlers here too. I think the ledge halfway down was the original sill, before an extension on the lower floor, so they originally had the jack stud resting on the sill. The predictable result was that original sill was acting like a seesaw and causing the present sill to bow up in the middle.Thanks to everyone for their help on this!
Thanks for the update. All too often we never find out what became of a problem.
-- J.S.
The rad in photo is a "SunRad" and meant to be in the wall. If you change heating later, remember to keep all rads cast iron or change all. Cast iron retains heat and drawers heat differently than fin clad copper and can't be inter mixed.
Since you're putting in the vertical nailer to narrow the window, run a cripple directly below it down to the bottom plate to take the load off the crippled jack.
As to how to seal the opening, for short-term use a piece of plywood or flakeboard to fill the opening, then staple plastic over it, taped to the siding on all sides. For longer term flash the top and bottom of the ply and seal the sides whichever way seems right.
"Since you're putting in the vertical nailer to narrow the window, run a cripple directly below it down to the bottom plate to take the load off the crippled jack."Unfortunately the radiator is right below the nailer, extends a good 6" beyond it.... Hey, it's not me making this difficult.... Oh the rough sill is a single 2x4, but that's the least of my worries...