FHB Logo Facebook LinkedIn Email Pinterest Twitter X Instagram Tiktok YouTube Plus Icon Close Icon Navigation Search Icon Navigation Search Icon Arrow Down Icon Video Guide Icon Article Guide Icon Modal Close Icon Guide Search Icon Skip to content
Subscribe
Log In
  • How-To
  • Design
  • Tools & Materials
  • Restoration
  • Videos
  • Blogs
  • Forum
  • Magazine
  • Members
  • FHB House
  • Podcast
Log In

Discussion Forum

Discussion Forum

window trim on brick sided house

goalieump | Posted in Construction Techniques on September 10, 2014 03:38am

My brother has asked me for some advice on trimming out this daylight basement window. The units were installed a few months ago, but never finished. They’ve been under visqueen for a long time, and now that the rain is about to begin falling again in the Pacific NW, he’s trying to finish the job before the leaks start.

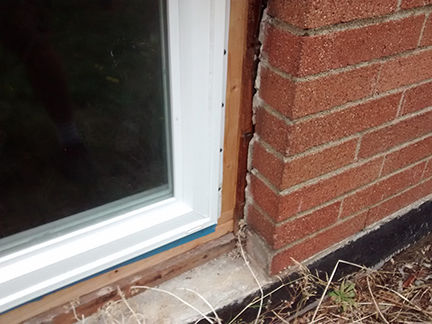
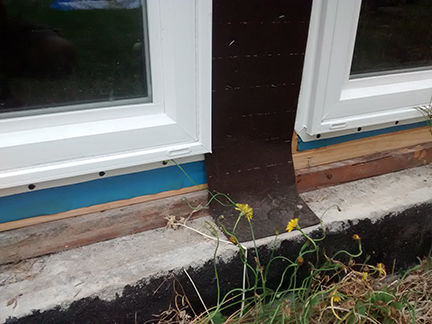
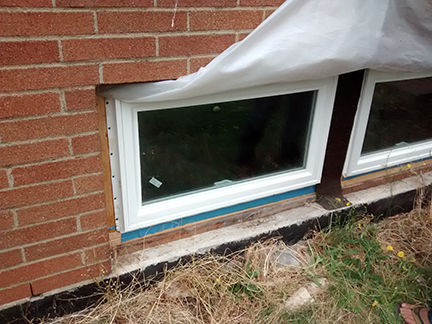
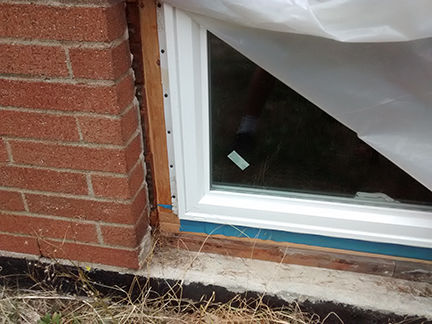
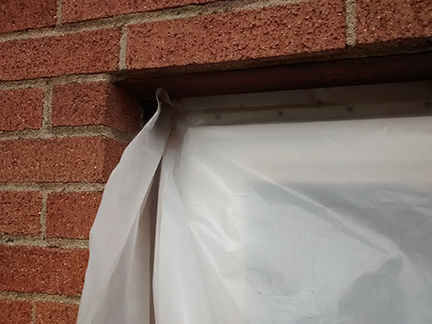
I’ve advised him that sealing with silicone along all the joints first is a good idea to stop air leaks and wind driven rain, but his main concern is the window sill below the units. Originally, there were cast concrete blocks that were installed at an angle to shed rain, but those blocks no longer exist. The top of the foundation is exposed. The lap siding behind the brickwork is also exposed with no real flashing or house wrap. Above the window is a piece of steel angle that supports the weight of the brickwork, and spans the width of the brickwork opening. This window is near ground level, and is on the west side (wet, windy) side of the house.

The attached pictures help tell the story.

Advice needed:

  1. What’s the best way to seal around the units, and seal the sheathing behind the brickwork?
  2. What material(s) should be used to build up a sill that sheds water?
  3. Are there any concerns about adhesive flashing (Grace) that could be incompatible with the brickwork?
  4. What’s the best method to cover the angle iron to give the window a finished look without causing undue water leakage concerns, as the angle iron, which has been continuously exposed can dry now, but may not dry if covered?

Our initial idea for the sill was to drill for anchor bolts in the foundation, tie a pc of rebar to the bolts, and build up a concrete sill at an angle that a non-incised pc of pressure treated lumber could then be placed, and after that, build up the finish work from there. Good idea or not?

Thanks for your help,

Jesse

Reply

Replies

  1. User avater
    MarkH | Sep 10, 2014 07:02pm | #1

    The usual trim is "BRICK

    The usual trim is "BRICK MOULD".  I'd use PVC brick mould.  I would paint the angle iron with a paint that is known to retard rust after cleaning and treating the metal properly.  As for the sill, use a mortar mix, or one of the acrylic modified patching compounds that can be built up to the thickness you need.  Some are for thin use only.  I'm not a big fan of silicone, I'd use a polyurethane caulk for sealing.

  2. DanH | Sep 10, 2014 08:30pm | #2

    Well, most of all you need a sill.  It's hard to guess what the best way to do the sill would be since really the sill should run under the window.  I guess you'll just have to butt something (probably PVC lumber) up against the bottom of the windows,caulk it, and hope for the best.  To support the sill you need to build up with masonry, I suppose.  I'd probably be inclined to use matching bricks or concrete bricks.  But be sure to flash behind and install wicks at the bottom to let moisture out.  (It's unfortunate that the whole mess is so close to ground level, but not much that can be done about that at this point.)

    On the sides and top you want brick mold.  Standard 2" brick mold might fit, or you might need to widen it by attaching a ripped piece of PVC lumber on the outside edge -- hard to tell from the pictures.  In the middle between the windows probably another piece of PVC lumber (with brick mold on each side).

    For sealing, you should first make sure the windows are thoroughly foamed in on the inside, for air sealing.  Caulking on the outside should be done as the sill and brick mold are installed -- you want the caulk to be at the outermost layer.  Apply caulk between brick and brick mold, and between brick mold and the nailing flange.  I favor a silconized acrylic latex such as DAP Alex Plus -- properly applied it will last 20 years or more.

  3. User avater
    deadnuts | Sep 10, 2014 09:35pm | #3

    zip tape flashing, stone sill, and pvc

    The pvc brick mould suggested is a good idea.

    Further, I would flash with zip tape (there are obviously other options) around entire perimeter of framing making sure to slope the sill section in a manner to shed bulk water (as normal frame sill would be done). I woud pre-slope sill with a piece of fat mudded hardi backer before the sill flashing is installed so that it sheds. You could also mortar the angle, but you'd have let it cure before taping; hardi avoids this time delay. I would also use a chisled edge slab of limestone for the sill. To me that would be a classy way to go and look professional; particulary with the windows close to grade.

    Attached is a sketch. It's quick and not to scale. Note:  I don't know your existing dimensions, so brickmould pad out as shown may not be necessary.

  4. oops | Sep 10, 2014 10:39pm | #4

    window trim out

    I don't want to seem rude, but your questions seem  indicate that you are in the trades. I think you would be wise to get someone whose trade this is.  There is not a lot to do and should not be all that expensive. 

    Not done correctly, it will cost even more to repair.  Done right, sleep tight.  :)  Good luck.

  5. goalieump | Sep 10, 2014 11:15pm | #5

    A big thank you to everyone who responded. Very helpful information. I've installed windows before professionally, but not for very long. I've installed them in my home, but not in a brick sided house, so any extra information regarding the unique techniques is a great help.

    I'll keep updating this thread as the project goes forward to finish this up. I'm looking forward to helping my brother. We're both capable and competent, but I thought I'd ask the more knowledgeable people in this field.

    Obviously, the last thing either of us want is to finish the project and by force of oversight, forget an important step that proves costly to the integrity of the work. 

  6. sapwood | Sep 11, 2014 12:16pm | #6

    Why didn't the window openings get fully wrapped prior to the windows being installed? Can you remove the units and do this now?

    1. User avater
      deadnuts | Sep 11, 2014 05:59pm | #7

      unneccessary waste of time

      IMO, you wouldn't gain anything from wrapping the opening prior to setting this retro-fit window. It would be helpful to do this if you could integrate the window flashing with a continuous WRB, but since it's a retro-fit that ain't hap'nen.

  7. florida | Sep 12, 2014 08:04am | #8

    What ever the answer is it won't involve any silicone.  I'd be using Vycor flashing tape to cover the flanges and lap up onto the bucks then installing PVC brickmold sealed with a polyurethane sealant.

Log in or create an account to post a comment.

Sign up Log in

Become a member and get full access to FineHomebuilding.com

Video Shorts

Categories

  • Business
  • Code Questions
  • Construction Techniques
  • Energy, Heating & Insulation
  • General Discussion
  • Help/Work Wanted
  • Photo Gallery
  • Reader Classified
  • Tools for Home Building

Discussion Forum

Recent Posts and Replies

  • |
  • |
  • |
  • |
  • |
  • |
View More Create Post

Up Next

Video Shorts

Featured Story

Installing Prefinished Cabinet Molding

Use these assembly techniques when installing crown risers and molding to minimize visible gaps and nail holes.

Featured Video

SawStop's Portable Tablesaw is Bigger and Better Than Before

The 10-in. Jobsite Saw PRO has a wider table, a new dust-control port, and a more versatile fence, along with the same reliable safety mechanism included in all SawStop tablesaws.

Related Stories

  • Affordable Scans, Accurate Plans
  • FHB Summit 2025 — Design, Build, Business
  • A Summer Retreat Preserved in the Catskill Mountains
  • Fine Homebuilding Issue #332 Online Highlights

Highlights

Fine Homebuilding All Access
Fine Homebuilding Podcast
Tool Tech
Plus, get an extra 20% off with code GIFT20

"I have learned so much thanks to the searchable articles on the FHB website. I can confidently say that I expect to be a life-long subscriber." - M.K.

Get home building tips, offers, and expert advice in your inbox

Signing you up...

This site is protected by reCAPTCHA and the Google Privacy Policy and Terms of Service apply.
See all newsletters
See all newsletters

Fine Homebuilding Magazine

  • Issue 331 - June 2025
    • A More Resilient Roof
    • Tool Test: You Need a Drywall Sander
    • Ducted vs. Ductless Heat Pumps
  • Issue 330 - April/May 2025
    • Deck Details for Durability
    • FAQs on HPWHs
    • 10 Tips for a Long-Lasting Paint Job
  • Issue 329 - Feb/Mar 2025
    • Smart Foundation for a Small Addition
    • A Kominka Comes West
    • Making Small Kitchens Work
  • Issue 328 - Dec/Jan 2024
    • How a Pro Replaces Columns
    • Passive House 3.0
    • Tool Test: Compact Line Lasers
  • Issue 327 - November 2024
    • Repairing Damaged Walls and Ceilings
    • Plumbing Protection
    • Talking Shop

Fine Home Building

Newsletter Sign-up

  • Fine Homebuilding

    Home building tips, offers, and expert advice in your inbox.

  • Green Building Advisor

    Building science and energy efficiency advice, plus special offers, in your inbox.

  • Old House Journal

    Repair, renovation, and restoration tips, plus special offers, in your inbox.

Signing you up...

This site is protected by reCAPTCHA and the Google Privacy Policy and Terms of Service apply.
See all newsletters

Follow

  • Fine Homebuilding

    Dig into cutting-edge approaches and decades of proven solutions with total access to our experts and tradespeople.

    Start Free Trial Now
    • Facebook
    • Instagram
    • X
    • LinkedIn
  • GBA Prime

    Get instant access to the latest developments in green building, research, and reports from the field.

    Start Free Trial Now
    • Facebook
    • YouTube
  • Old House Journal

    Learn how to restore, repair, update, and decorate your home.

    Subscribe Now
    • Facebook
    • Instagram
    • X

Membership & Magazine

  • Online Archive
  • Start Free Trial
  • Magazine Subscription
  • Magazine Renewal
  • Gift a Subscription
  • Customer Support
  • Privacy Preferences
  • About
  • Contact
  • Advertise
  • Careers
  • Terms of Use
  • Site Map
  • Do not sell or share my information
  • Privacy Policy
  • Accessibility
  • California Privacy Rights

© 2025 Active Interest Media. All rights reserved.

Fine Homebuilding receives a commission for items purchased through links on this site, including Amazon Associates and other affiliate advertising programs.

X
X
This is a dialog window which overlays the main content of the page. The modal window is a 'site map' of the most critical areas of the site. Pressing the Escape (ESC) button will close the modal and bring you back to where you were on the page.

Main Menu

  • How-To
  • Design
  • Tools & Materials
  • Video
  • Blogs
  • Forum
  • Project Guides
  • Reader Projects
  • Magazine
  • Members
  • FHB House

Podcasts

  • FHB Podcast
  • ProTalk

Webinars

  • Upcoming and On-Demand

Podcasts

  • FHB Podcast
  • ProTalk

Webinars

  • Upcoming and On-Demand

Popular Topics

  • Kitchens
  • Business
  • Bedrooms
  • Roofs
  • Architecture and Design
  • Green Building
  • Decks
  • Framing
  • Safety
  • Remodeling
  • Bathrooms
  • Windows
  • Tilework
  • Ceilings
  • HVAC

Magazine

  • Current Issue
  • Past Issues
  • Magazine Index
  • Subscribe
  • Online Archive
  • Author Guidelines

All Access

  • Member Home
  • Start Free Trial
  • Gift Membership

Online Learning

  • Courses
  • Project Guides
  • Reader Projects
  • Podcast

More

  • FHB Ambassadors
  • FHB House
  • Customer Support

Account

  • Log In
  • Join

Newsletter

Get home building tips, offers, and expert advice in your inbox

Signing you up...

This site is protected by reCAPTCHA and the Google Privacy Policy and Terms of Service apply.
See all newsletters
See all newsletters

Follow

  • X
  • YouTube
  • instagram
  • facebook
  • pinterest
  • Tiktok

Join All Access

Become a member and get instant access to thousands of videos, how-tos, tool reviews, and design features.

Start Your Free Trial

Subscribe

FHB Magazine

Start your subscription today and save up to 70%

Subscribe

We hope you’ve enjoyed your free articles. To keep reading, become a member today.

Get complete site access to expert advice, how-to videos, Code Check, and more, plus the print magazine.

Start your FREE trial

Already a member? Log in