Q:
I am building wood-frame screens for my porch and would like to know the best way to attach aluminum screening to those frames.
Jim Farrell, Harvard, MA
A:
Rex Alexander, a cabinetmaker and custom woodworker in Brethren, Michigan, replies: After building the wooden frames for screened windows or doors, installing the screen is like the icing on the cake. A tightly stretched screen and rabbeted-in screen molding make anybody’s work look professional.
Some carpenters may mill all the frame stock and miter the corners of the frames, but I butt-joint the frames together and then do the milling. First, using either a dado blade on my table saw or a router with a rabbeting bit, I cut a rabbet on the inside edge of the frame 1/4 in. deep by 3/4 in. wide. Either way, I’m left with some waste in the inside corners to chisel out. Then I put in a carbide-tipped combination blade and cut a groove or a saw kerf 1/8 in. by 1/8 in. on the inside corner of the rabbet. A 1/8-in. chisel cleans the groove out to the corner. I break the inside edge of the groove slightly with 100-grit sandpaper to keep the screen from tearing when it’s pressed into the groove.
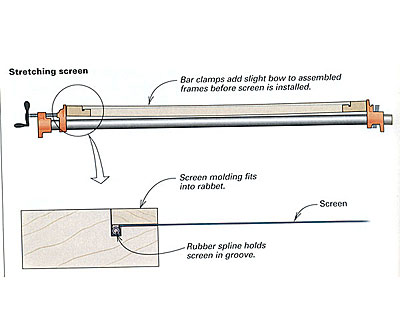
Next, I place the long dimension of the frames on top of two bar clamps on a flat, level surface and tension the clamps to put a slight bow in the frame. I cut an oversize piece of screen and lay it over the opening. Now I begin pressing the screen into the 1/8-in. groove at one end of the frame using a screening tool (a simple tool with a flat-edge wheel on one end and a grooved-edge wheel on the other, available at most hardware stores).
With the grooved side of the screening tool, I press a rubber-ribbed spline (also available at most hardware stores) into the groove over the screen. The hollow-rubber spline crushes as it is pushed into the groove to hold the screen in place. I then tack a piece of screen molding into the rabbet temporarily.
Then, while stretching the screen tight across the frame, I repeat the procedure on the opposite side of the frame, pressing the screen into the groove. The rubber spline actually puts tension on the screen as it’s pressed into the opposite groove. As the bar clamps are released, the frame should return to a flat position, putting a final bit of tension on the screen. If the frame is still bowed when the clamps are released, the screening is too tight.
When the screen has been stretched in one direction, I repeat the sequence on the shorter dimension. When the screen has been stretched both ways satisfactorily, I trim off the excess screen with a razor knife and install the screen mold permanently with stainless-steel or brass nails.