Synopsis: An ellipse is an especially graceful curve that is drawn using two centers. This short article is intended for carpenters who want to lay out a quarter-ellipse on the job site. The layout jig is easy to make.
A building with graceful curves has its own special signature. Soft transitions, impossible in angular structures, can be created with vaulted passageways and rooms with coved ceilings. For curved details, architects and builders usually choose the easily drawn radiused curve, or section of a circle. But sometimes the radius is aesthetically inappropriate, or just won’t describe the curve needed at certain junctions. In cases like these, the ellipse may be a better shape. But unlike the radius with its equal rise and run, the ellipse is challenging to draw accurately.
An ellipse is a curve that has an equal combined distance from two centers (foci) at every point. The length and width of the ellipse are determined by perpendicular major and minor axes that cross at their centers. The foci are always located on the major axis, and are equidistant from its ends.
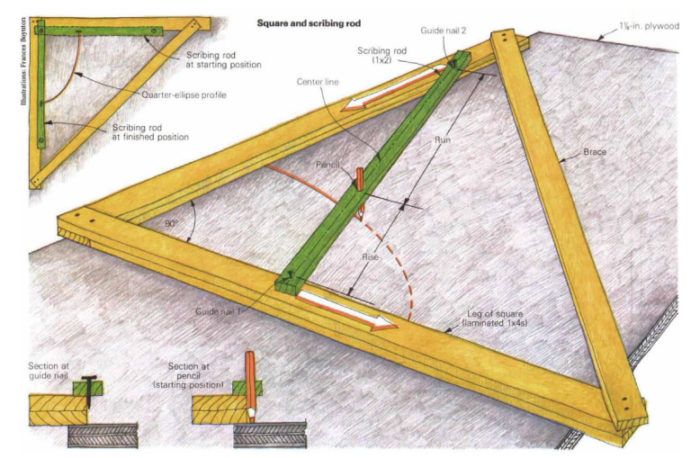
A common method for drawing the ellipse is to tie a loop of string around three pins, one at each focus and the third at one end of the minor axis. Once the string is in place, the pin at the minor axis is removed and replaced with a pencil. Exerting even tension on the string, draw the pencil around the foci and back to the starting point. This method, though, is not a very practical way to lay out work on a job site. Fortunately, there is an expedient carpenter’s method for drawing the quarter-ellipse. All you need is a large square and a scribing rod.
Make the square out of two layers of 1x4s, lapping them at the right angle to keep the legs flush. Cut the legs about a foot longer than the combined rise and run of your quarter-ellipse. The hypotenuse, actually a brace to ensure an accurate 90° angle, can be lapped over the legs and nailed in place.
The scribing rod is the key to this operation, and carries the measurements and scribing tool (usually a carpenter’s pencil) to transfer the quarter-ellipse profile onto the work. The rod should be about the same length as one leg of the square, and cut from a straight 1×2. A few inches from one end, drill a small pilot hole on the center line for an 8d nail, and drive the nail until its point protrudes about 1 in. from the bottom. The nail will act to guide the rod along the inside edge of the square. Measure the distance of the rise from the nail to a point on the center line and drill a hole for a pencil. Make sure you get a snug fit so the pencil won’t wobble. Continuing down the rod, measure the distance of the run from the pencil and set another guide nail on center.
For more diagrams and details on how to lay out elliptical coves, click the View PDF button below.
Fine Homebuilding Recommended Products
Fine Homebuilding receives a commission for items purchased through links on this site, including Amazon Associates and other affiliate advertising programs.

Smart String Line

Short Blade Chisel

Original Speed Square


