FHB Logo Facebook LinkedIn Email Pinterest Twitter Instagram Plus Icon Close Icon Navigation Search Icon Arrow Down Icon Video Guide Icon Article Guide Icon Modal Close Icon Guide Search Icon Skip to content
Main Menu
Subscribe

In every issue you'll find...

  • Expert insights on techniques and principles
  • Unbiased tool reviews
  • Step-by-step details to master the job
  • Field-tested advice and know-how
Subscribe Now!
Subscribe
  • How-To
  • Design
  • Tools & Materials
  • Videos
  • Blogs
  • Forum
  • Magazine
  • Members
  • FHB House
  • Podcast
  • Join
  • Log In
Main Menu Subscribe
Job Site Diaries

A Easy Approach to Wainscot Paneling

Create this classic look with a chair rail and applied moldings

By Andy Moore
Article Image

One of the great things about finish carpentry is that you can make an ordinary room look extraordinary with even very simple trim details. Crown molding is a common trim upgrade. Learning to cut crown molding opens up lots of doors for detail, including built-up crown profiles.

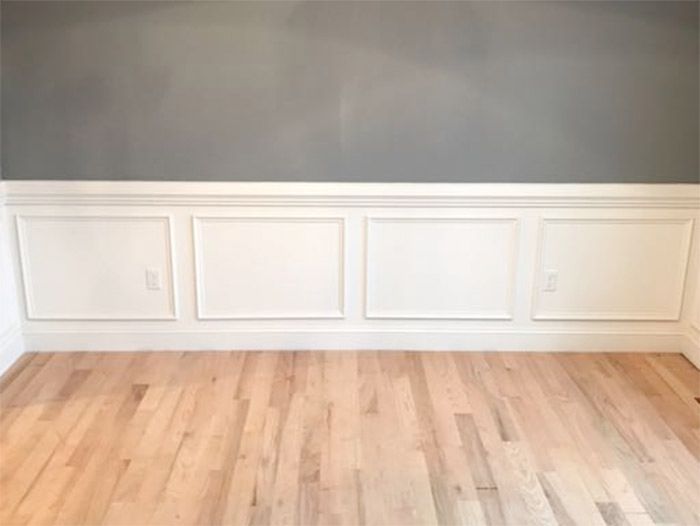
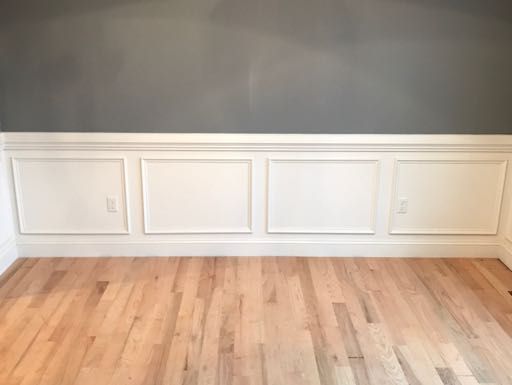
Wainscot is another common upgrade. Like crown, there are limitless possibilities for wainscot. Raised panel wainscot is very popular. You can create a similar look that doesn’t take quite as much trim carpentry expertise, so many tools, or so much time, by installing chair rail around a room and framing shadow boxes with applied molding below. Paint the chair rail and everything below it with trim paint, and perhaps a color on the walls above, and you’ve just added a classic detail with a project that could be tackled in a weekend.

Before I explain how to lay out and install the trim, here’s what you’ll need to get it done. Beyond the obvious hand tools, like a tape measure, you’ll need a miter saw to make accurate 45-degree cuts. You’ll need paintable adhesive caulk and a finish nailer. And if you’re not good at math, have a calculator nearby for the layout work, which is the first part of the process.

First, work out the layout

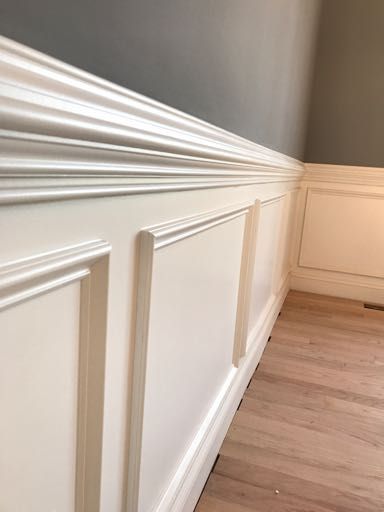
After running the chair rail, I usually make the shadow boxes with 1 1/4 in. base cap molding with mitered corners to create a square on the wall. For the proper look, the base cap should be installed with the “chunky” side on the outside edges of each box. I make two assumptions when laying out the paneling. First, that the average shadow box size will be somewhere around 30 in. to 40 in. Second, that the space between boxes will be around 4 in. This size and spacing tends to give a nice balanced feel within the room.

With those assumptions in mind, my process for laying out the boxes is fairly simple. I think of the room in wall sections, or any flat wall space that runs horizontally until a vertical break (corner, window, door, etc). Upon entering the room, I look for a wall section that will allow for only two boxes based on the 30 in. to 40 in. average size. I then find the center point of this wall section (in inches) by measuring the length and dividing by two. This gives me a rough average box size for the room, call it “S” (hello Algebra!).  This number is key to determining how many boxes go on each wall section. All measurements should be in inches to prevent the extra step of converting feet to inches.

Next measure any wall section longer than the initial wall used to find the rough box size and divide it by “S.” This will determine how many shadow boxes are needed on that particular wall section, or “B.” Since you will most likely never end up with a perfect whole number of boxes, a little extra math is in order.

Start by rounding up to the nearest whole number of boxes needed. Take your total wall section measurement and divide by the number of boxes. This will give you “X,” which should be somewhere close to the rough box size (“S”) determined from above.  Now, repeat the process by rounding down. Whichever “X” number is closest to “S,” is what I go with.

Now, mark the wall section in equal lengths using “X.” These marks represent the center line between each shadow box. Assuming the space between each box to be 4 in., draw a vertical (or plumb) line 2 in. to the right and 2 in. to the left of each center line. These are the outside vertical edges of each shadow box.

Assuming the space between each box to be 4 in, draw a vertical (or plumb) line 2 inches to the right and 2 inches to the left of each center line.

I use this process for all wall sections that are longer than the original wall section used to find “S.”  Any wall section smaller, gets one box.  After all of the vertical lines are marked, I cut a scribe block that measures 1/2 of the spacing between boxes, in this case 2 in. I then scribe all perimeters of each wall section.

After all of the vertical lines are laid off, I cut a scribe block that measures 1/2 of the spacing between boxes.                 Scribe block that measures 1/2 of the spacing between boxes - in this case 2 inches.                    Then scribe all perimeters of each wall section.

Use glue and nails for the install

Now that all of the lines are marked, I measure the base cap molding pieces using the box dimensions drawn on the wall. I apply a bead of paintable adhesive caulk to the back side of the molding pieces, paired with  1 1/4 in., 18-gauge brad nails to secure them to the wall. You can attach each piece individually or pre assemble each box before fastening it to the wall.

Apply a bead of paintable adhesive caulk to the back side of the molding pieces.

Tack it with  1 1/4 inch - 18 gauge brad nails to secure them to the wall.  

Tip: A work around for unfortunately placed outlets

Often times electrical outlets have not been laid out in anticipation of paneling. This can be a problem if the molding is to intersect with an outlet. The easiest way to avoid this is to adjust the size of the space between boxes to shift them slightly one way or another. When that option doesn’t work, I build a small box out of 3/4 in. material around the outlet. This provides a stop for the molding to die into.


outlet


Follow me on Instagram @Modern_Oak for more tips and ideas!


Sign up for eletters today and get the latest how-to from Fine Homebuilding, plus special offers.

Sign Up

Get home building tips, offers, and expert advice in your inbox

×
X
X

New Feature

Fine Homebuilding Forums

Ask questions, offer advice, and share your work

View Comments

  1. ChrisGrabowy | Nov 16, 2016 09:30am | #1

    I did something very similar in my dining room. However I premade the frames on the bench using 2 2x4s nailed together in a perfect L shape onto a piece of plywood. I would upload some pictures but I dont see where I can do that. Anyway, great article. Thanks.

Log in or create an account to post a comment.

Sign up Log in

Become a member and get full access to FineHomebuilding.com

More Job Site Diaries

View All
  • Myron stands with tools in a room

    Plan Ahead: Accessing a Drywall Job Site

  • View of home under construction with hip roof

    Widow's Walk: An Inside Look at an Uncommon Roof Feature

  • Free online access - 2021 IRC

  • carpenter installing ICF foundation forms

    Benefits of Building with ICFs

View All

Up Next

Featured Story

Basement Waterproofing Strategies Roundtable

On April 28, 2021, 7 PM ET, join builders Travis Brungardt and Mike Guertin plus masonry-sealer expert Lance Lang for a discussion of methods and materials for keeping any basement dry.

Featured Video

Micro-Adjust Deck-Baluster Spacing for an Eye-Deceiving Layout

No math, no measuring—just a simple jig made from an elastic band is all you need to lay out a good-looking deck railing.

Related Stories

  • 2nd Annual Wall-Assembly Contest Finals

  • How to Hang Drywall Solo

  • Built-ins for Odd Spaces

  • Successful Vapor Control

Discussion Forum

Recent Posts and Replies

  • |
  • |
  • |
  • |
  • |
  • |
View More Create Post

Highlights

  • Fine Homebuilding All Access
  • Fine Homebuilding Podcast
  • Tool Tech

    Plus, get an extra 20% off with code GIFT20

  • "I have learned so much thanks to the searchable articles on the FHB website. I can confidently say that I expect to be a life-long subscriber." - M.K.

    Get home building tips, offers, and expert advice in your inbox

    Sign Up See all newsletters

Video

View All
  • Exterior PVC Trim: Windows and Doors

  • how to install PVC blocking for plumbing and electric fixtures

    Exterior PVC Trim: Wire and Pipe Penetrations

  • how to install PVC corner boards

    Exterior PVC Trim: Corners, Inside and Out

  • how to install PVC water table trim

    Exterior PVC Trim: Water Table and Cap

View All

Walls

View All
  • modern house with wood-look aluminum siding

    More New Products at the Virtual International Builders’ Show

  • Sheathing the Walls

    Efficient Methods for Installing Wall Sheathing

  • Old Walls Furred Flat

    Simple Way to Make Old Walls Straight and Plumb

  • Fireblocking requirements from the code and beyond

    7 Common Fireblocking Locations

View All

BOOKS, DVDs, & MERCH

Shop the Store
  • Code Check Building 4th Edition

    Buy Now
  • Musings of an Energy Nerd

    Buy Now
  • 2020 Fine Homebuilding Archive

    Buy Now
  • Fine Homebuilding Magazine Slipcase

    Buy Now
  • Shop the Store

Fine Homebuilding Magazine

  • Issue 298 - April/May 2021

    • Butt Boards for Smooth Ceilings
    • Help Installing Gutters
    • Safety Bucket
  • Issue 297 - Feb/Mar 2021

    • Foundations for Success
    • Staircase Renovation
    • Ditch the Hose
  • Issue 296 - Dec 2020/Jan 2021

    • Insulating Glass Keeps Getting Better
    • Simple Way to Make Old Walls Straight and Plumb
    • Making Sense of Minisplits
  • Issue 295 - Kitchens & Baths

    • Condo Kitchen Reimagined
    • Row-House Remodel
    • Rise of the IAQ Monitor
  • Issue 294 - Oct/Nov 2020

    • Schoolhouse Reimagined
    • Tool Test: Folding Sawhorses
    • A Better Way to Build Tall Walls

Fine Homebuilding

Follow

Newsletter

Get home building tips, offers, and expert advice in your inbox

Sign Up See all newsletters

Membership & Magazine

  • Online Archive
  • Start Free Trial
  • Magazine Subscription
  • Magazine Renewal
  • Gift a Subscription
  • Customer Support
  • Manage Preferences

Taunton Network

  • Green Building Advisor
  • Fine Woodworking
  • Fine Gardening
  • Threads
  • About
  • Contact
  • Advertise
  • Privacy Policy
  • Careers
  • Copyright
  • Terms of Use
  • Accessibility
  • California Privacy Rights

© 2021 The Taunton Press, Inc. All rights reserved.

    Main Menu

  • How-To
  • Design
  • Tools & Materials
  • Video
  • Blogs
  • Forum
  • Reader Projects
  • Magazine
  • Members
  • FHB House
  • Podcasts

  • FHB Podcast
  • ProTalk
  • Account

  • Log In
  • Join

    Podcasts

  • FHB Podcast
  • ProTalk
  • Popular Topics

  • Kitchens
  • Business
  • Bedrooms
  • Roofs
  • Architecture and Design
  • Green Building
  • Decks
  • Framing
  • Safety
  • Remodeling
  • Bathrooms
  • Windows
  • Tilework
  • Ceilings
  • HVAC

    Magazine

  • Current Issue
  • Past Issues
  • Magazine Index
  • Subscribe
  • Online Archive
  • Author Guidelines

    All Access

  • Member Home
  • Start Free Trial
  • Gift Membership

    Shop the Store

  • Books
  • DVDs
  • Taunton Workshops

    More

  • FHB Ambassadors
  • Reader Projects
  • Podcast
  • Customer Support

    Account

  • Log In
  • Join

Newsletter

Get home building tips, offers, and expert advice in your inbox

Sign Up See all newsletters

Follow

Join All Access

Become a member and get instant access to thousands of videos, how-tos, tool reviews, and design features.

Start Your Free Trial

Subscribe

FHB Magazine

Start your subscription today and save up to 52%

Subscribe

We hope you’ve enjoyed your free articles. To keep reading, become a member today.

Get complete site access to expert advice, how-to videos, Code Check, and more, plus the print magazine.

Start your FREE trial

Already a member? Log in