
Video: Build a Fireplace, Brick by Brick
Watch mason Mike Mehaffey construct a traditional-style fireplace that burns well and meets current building codes.
This is the companion video to our recent article on building a Rumford-style fireplace.
While photographing the article Build a Fireplace, Brick by Brick with experienced mason Mike Mehaffey, deputy editor Matt Millham brought the Fine Homebuilding video team along to capture the process of building a modern fireplace inspired by the classic Rumford design.
What is a Rumford fireplace?
Traditionally, a Rumford fireplace is characterized by a tall, shallow firebox designed to reflect heat out into a room instead of letting it all go up the chimney with the smoke. In this execution, Mike Mehaffey maintains the aesthetic but adds depth to the firebox to meet code, while tapering the back wall inward to maximize heat reflection. Although the entire assembly will eventually be surround by 8 in. of solid masonry, the focus in this video is on the layout and erection of the visible, interior fire-brick layer of the firebox. Let’s have a look.
Slab
When we arrived on site, the guys were just beginning to mix concrete for the 12-in.-thick base slab that will support the firebox. They decided to mix their own rather than hire a truck due to obstructed access and the relatively small amount needed–about a yard and a half.
While the crew methodically mixes two bags at a time, Mike marks out the fill-line for the top of the slab.
Then they fill the form, spread the concrete evenly, and set the rebar. Mike likes to set the rebar after the pour because it’s easy to position and keep in the top half of the slab without having it compress to the bottom.
Once positioned, he taps it beneath the surface and trowels the top of the slab smooth. Then, as the concrete begins to set up, he trowels ridges into the surface for bonding with the next layer, creating a keyway of sorts. They leave the slab to set overnight.
Base layout
The next day brought snow and a whole lot of cold to the job site, so the guys tented-in the work area in an attempt to keep the temperature above 50°F, the minimum working temperature of the mortar they’ll be using. Once the area was tented, it was time to layout the base of the firebox on the slab.
Mike begins by snapping a chalkline to mark the front face of the fireplace. Then he draws a centerline and measures out 21 in. in each direction to mark the 42-in. opening. He draws a line along the back to establish the 20-in. depth.
To lay bricks, Mike works from the centerline out, extending edges beyond the layout lines to integrate with the 8 in. of solid masonry that will complete the firebox.
Laying brick-base
Because the bond is outside the combustion chamber, Mike uses a standard type-S mortar to bond the firebrick to the slab.
He positions the front of the first brick along the red layout line that denotes the front of the firebox and establishes the height using a stringline that represents the finished height of the base. Then he follows up with a level to get each brick set perfectly before moving on.
Between fire bricks, he switches to fire-resistant mortar because the joints will be exposed to combustion. It has a rating up to 2500°.
The crew mixes the fire-resistant mortar in a 5-gal. bucket to keep batches manageable, and use a mixing paddle to completely eliminate lumps as they mix to achieve the smooth consistency of a thick paste, similar to that of the thinset you would use for setting tiles.
As he fills in, Mike always works from the the centerline out to maintain a consistent stagger between rows.
He seats bricks by tapping them with the handle of his trowel or with a mason’s hammer. The tapping is light, just enough to get the position exact. Then he cleans any squeeze-out from between joints and moves on to the next brick. He fills in until he reaches the 20-in. depth and then switches to standard brick to extend the base by two rows beyond the combustion chamber—again, to support 8 in. of solid masonry that will be built up around the firebrick to complete the firebox.
When the base is in place, he can move on to the walls.
Wall layout
To begin the layout, he first transfers the layout lines onto the bricks, marking the center, the 42-in. opening, and the 20-in. depth.
For the angled walls, he wants 2.5-bricks visible, so he dry-lays them, lining up the front edge with the font mark as he pivots the row until it meets the back. Then he draws a line.
For the other side, he simply measures from the centerline to the corner, flips the tape around, and transfers that measurement in the other direction. Then he connects the two marks with a straightedge and draws a line, and he’s ready to lay brick.
Laying brick-walls
For the space between bricks, he aims for joints about 1/16 in. thick all around. Refractory mortar can stain bricks, so he tries to be as neat as possible to avoid a lengthy clean up.
To minimize squeeze-out, he butters on the mortar only slightly thicker than the joint size he wants, and bevels the edges to keep excess mortar away from the face. As he lays the first row of the back wall, he’s careful to maintain the same bond pattern from the hearth.
On the side, angled walls, he works from the front edge back to help keep the front of the wall in line with the front edge of the hearth. The bricks that butt into the back are precut to a 45° angle, and trimmed to fit with a brick hammer before buttering and installation.
As each course is laid, he uses a straightedge to make sure all the bricks are level and in plane, and uses the handle of his trowel to tap any stray bricks in position.
As he builds up the outer, angled walls, he also checks for level side to side to ensure the walls are raised evenly and in-plane with the back wall.
Some of the bricks that butt into the back wall are pretty small—as the walls get higher, they’ll get even smaller. Buttering mortar on small bricks can be messy, and a lot of it may get scraped off as he sets the brick, so he butters the gap the brick goes into so the joints aren’t starved of mortar.
Once he has two complete rows, he takes a few minutes to check his joints, cleaning up excess and filling and striking joints as needed so there are no voids.
Then, he drops plumb lines to keep the front edges of the side walls on track, and secures them with metal wedges. He then turns his attention to a vent pipe that he lays out centered in the back of the firebox, where he cuts a brick to encapsulate the vent so he can continue the same bond pattern, seamlessly.
For the next several rows, he repeats the process: butter, fit, trim, level, and clean, until he completes the sixth row. Now it’s time to begin to arc the back wall inward.
Tapering the back wall
The idea is for the back wall to arc inward to meet the back edge of the damper. To do this, bricks are back-buttered to the back edge, which raises the back of the brick. Adding this extra mortar to naturally pitch the bricks prevents a whole lot of squeeze-out on the face joint, which he wants to keep consistent with the rest at 1/16 in.
The side walls continue to be raised plumb, without a pitch, with the angle pieces trimmed as needed to match the angle at the back wall.
Because refractory mortar tends to be slippery, the pitched bricks will tend to slide forward, so Mehaffey sets neighboring bricks as soon as he can for added support as he fleshes out the firebox.
For the arc, rather than doing a mathematical equation, Mehaffey does it by eye, arcing in a little at a time and then checking with a level to see how he’s doing. He wants to avoid arcing in too much, too early, which would result in the arc reaching the depth of the flue prematurely.
Instead, he works row by row, inching his way forward. If he has to increase the arc, he’d rather do it on the upper few rows, which will not be visible to the eye.
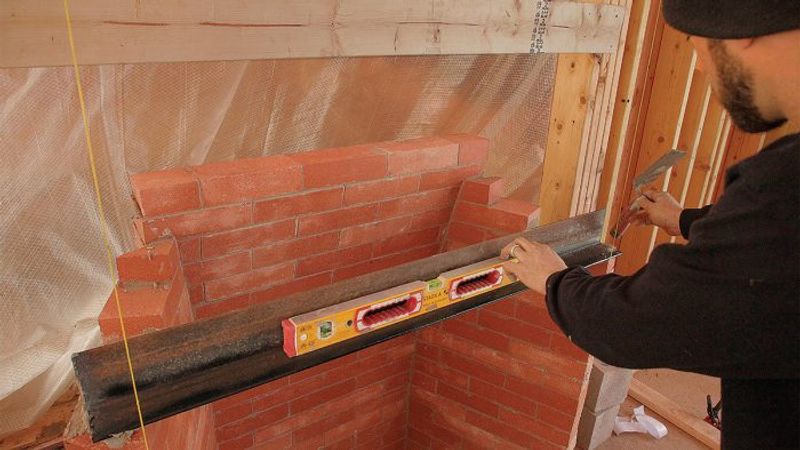
Once he’s reached the height, the lintel is set in refractory mortar and aligned flush with the front edge of the firebox opening. Because the lintel will expand and contract at a different rate than brick, a small scrap of foam is inserted to prevent the lintel bricks from bonding with the bricks below.
Next, he beds the flue in refractory mortar and lays the final row of brick on the face. Then he continues to fill in around the firebox before giving it a good acid wash. The firebox is now complete and ready for Mike’s crew to build the finish masonry surround.
More about fireplaces:
- Easy, Elegant Mantel – Creating a mantel has never been easier.
- Building an Efficient Fireplace – Using these practices to build your fireplace can help guarantee its success.
- Make a Prefab Fireplace Look Like It Belongs – If building a fireplace brick by brick isn’t for you, here’s how to make a factory-made fireplace look like it belongs.

View Comments
Beautiful.