FHB Logo Facebook LinkedIn Email Pinterest Twitter Instagram Plus Icon Close Icon Navigation Search Icon Navigation Search Icon Arrow Down Icon Video Guide Icon Article Guide Icon Modal Close Icon Guide Search Icon Skip to content
Subscribe

In every issue you'll find...

  • Expert insights on techniques and principles
  • Unbiased tool reviews
  • Step-by-step details to master the job
  • Field-tested advice and know-how
Subscribe Now!
Subscribe
  • How-To
  • Design
  • Tools & Materials
  • Videos
  • Blogs
  • Forum
  • Magazine
  • Members
  • FHB House
  • Podcast
  • Join
  • Log In
Subscribe
Renovation Book Excerpts

Soundproofing: A Successful Hybrid Approach

A combination of special clips, channels, and acoustical sealants adds up to the perfect solution for building a quiet room.

By Mike Litchfield

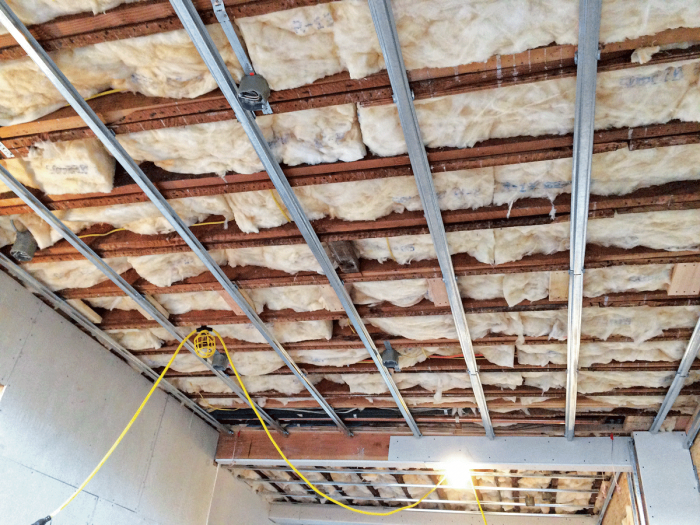
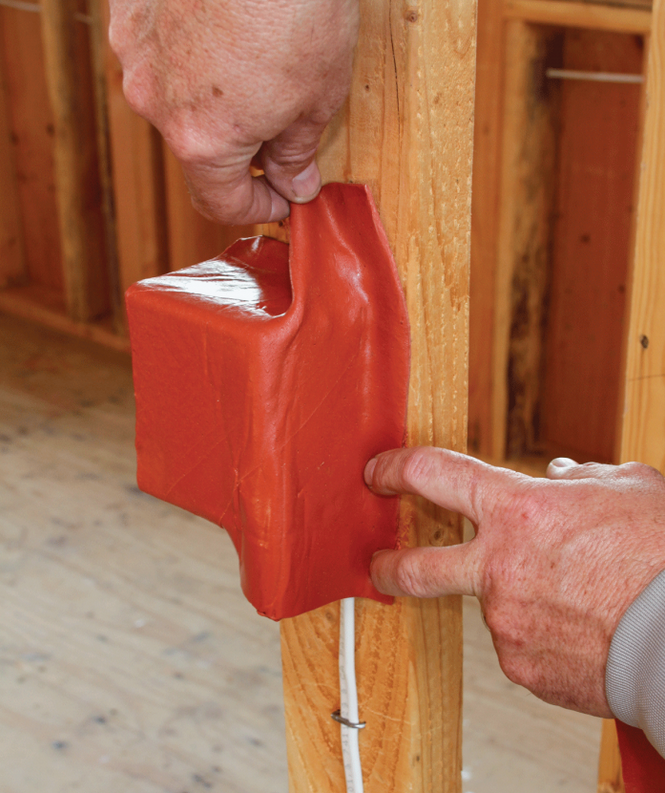
This soundproofing assembly mixes materials from several manufacturers and does an excellent job. It features: (1) Pilteq GenieClip RST sound isolation clips, rubber-and-steel mounts that screw to studs or ceiling joists; (2) 25-gauge steel hat channel that snaps into the GenieClips; (3) two layers of 5⁄8-in. drywall; (4) Green Glue Noiseproofing Compound, applied between layers of drywall; (5) Green Glue Acoustical Sealant, to caulk perimeter gaps around wall and ceiling panels; and (6) SSP Putty Pads, resilient sheets that, when molded to the outside of electrical boxes, stop air and noise leaks. There are many competing products, so choose ones that are effective and easy to install.

Installing a Putty Pad Illustration

Setting up, laying out. Snap horizontal chalklines across stud edges to locate the rows of hat channel. Channels (and thus, the clips that support them) should be spaced 24 in. apart (vertical distance). The bottom row of channels (and clips) should be 3 in. or less from the floor, and the top row of channels (and clips) should be
6 in. or less from the ceiling. Clips should also be placed wherever a section of hat channel ends.

In addition to spacing clips 24 in. vertically, space them 48 in. apart horizontally, as shown in the illustration below. This is best achieved by installing clips in a zigzag pattern, with clips attached to every third stud for framing spaced 16 in. on center (O.C.) or to every second stud for framing spaced 24 in. on center. Use 15⁄8-in. coarse-thread (Type W) drywall screws to secure sound-isolation clips to studs.

Use a pair of metal-cutting shears to cut hat channel to length; wear sturdy gloves to protect your hands. To attach the hat channel, insert its lower edge into the bottom lip of the GenieClip, then press the top edge of the channel down until it snaps into the top lip of the clip. (This is most easily done with two people.) Where sections of hat channel meet, overlap their ends by 6 in. and join them with two self-tapping sheet-metal screws.

soundproofing

Installing drywall panels. When measuring and cutting wall panels, leave a gap of 1⁄4 in. around the perimeter of each wall section so there is room for acoustical sealant. To elevate the bottom panel(s), place 1⁄4-in. plastic spacers along the foot of the wall and set the panel(s) atop them. Screw the drywall to the hat channel. Typically, one will use 11⁄4-in. fine-thread (Type S) drywall screws to attach 5⁄8-in. drywall, but size and space screws according to local building codes. When you press drywall that is screwed to hat channels, it will be slightly springy to the touch because it is decoupled (isolated) from the studs. Important: Don’t use screws that are too long, which could penetrate framing and transmit sound.

Caulk the 1⁄4-in. gap around each wall section with acoustical sealant, and you’re ready to install the second layer of drywall. It, too, should have a 1⁄4-in. gap around its perimeter, but stagger panel seams so they do not line up with those of the first layer. This second layer of 5⁄8-in. drywall will be glued to the first and screwed to the hat channel, using 17⁄8-in. Type S screws spaced according to local building codes.

Green Glue or any other noiseproofing compound should be applied generously to the back of drywall panels; use two 28-oz. tubes of Green Glue for each 4-ft. by 8-ft. panel. Though the adhesive can be applied in a random pattern, it should be distributed evenly. Leave a 2-in. to 3-in. border around panel edges so you can lift it without getting glue on your hands. Noiseproofing compounds, which remain flexible, typically transform the mechanical energy of sound waves into small amounts of heat. Compounds set, however, so it’s important to screw panels to channels within 15 minutes of applying glue.

soundproofing

Caulking and finishing. Caulk with acoustical sealant the 1⁄4-in. gap around the perimeter of the wall section. If there are electrical boxes in walls or ceilings, form Putty Pads to the outside of those boxes to stop air leaks and sound transmission before closing up stud bays with drywall. Spackle, tape, and paint the second layer as you would any drywall.

Soundproofing ceilings is essentially the same—apply Green Glue Noiseproofing Compound between layers of drywall, screw drywall to hat channels secured to ceiling joists, and caulk around the perimeter. And have plenty of help to lift and hold panels in place as you are screwing panels to hat channels.


This blog was adapted from Renovation 5th Edition (Taunton, 2019). A hefty 656 pages, R5 is a trove of pro tips and techniques that builders shared with me over four decades, plus roughly 1000 photos taken on job sites across North America. I hope you find it useful. – Mike

RELATED VIDEOS

How to Soundproof a Bedroom Using Green Glue & Double Sheetrock

Cheap Tricks for Soundproofing

How to Soundproof a Wall Separating a Bedroom from a Family Room

Sign up for eletters today and get the latest how-to from Fine Homebuilding, plus special offers.

Signing you up...

This site is protected by reCAPTCHA and the Google Privacy Policy and Terms of Service apply.
See all newsletters
See all newsletters
×

Get home building tips, offers, and expert advice in your inbox

Signing you up...

This site is protected by reCAPTCHA and the Google Privacy Policy and Terms of Service apply.
See all newsletters
See all newsletters

New Feature

Fine Homebuilding Forums

Ask questions, offer advice, and share your work

View Comments

  1. User avater
    user-7402284 | Jan 27, 2020 01:20pm | #1

    What STC rating comes with this particular system?

Log in or create an account to post a comment.

Sign up Log in

Become a member and get full access to FineHomebuilding.com

More Renovation Book Excerpts

View All
  • Planning and Acquiring Building Permits for Renovation Projects: A Simple Chart
  • Soundproofing: A Successful Hybrid Approach
  • Using Metal Studs to Level a Sloping Ceiling
  • How to Level an Exterior Doorsill
View All

Up Next

Video Shorts

Featured Story

Liquid Flashing for WeatherLogic Integrated-WRB Sheathing

LP has released a liquid-applied sealant for use on panel seams, window and door openings, and other tricky transitions.

Featured Video

SawStop's Portable Tablesaw is Bigger and Better Than Before

The 10-in. Jobsite Saw PRO has a wider table, a new dust-control port, and a more versatile fence, along with the same reliable safety mechanism included in all SawStop tablesaws.

Related Stories

  • Makeshift Mud Mixer for Drywall
  • Drywall Cutouts With Wiggle Room
  • How to Finish Drywall Around a Shower Enclosure
  • How to Get Sturdy Walls Without OSB

Discussion Forum

Recent Posts and Replies

  • |
  • |
  • |
  • |
  • |
  • |
View More Create Post

Highlights

Fine Homebuilding All Access
Fine Homebuilding Podcast
Tool Tech
Plus, get an extra 20% off with code GIFT20

"I have learned so much thanks to the searchable articles on the FHB website. I can confidently say that I expect to be a life-long subscriber." - M.K.

Get home building tips, offers, and expert advice in your inbox

Signing you up...

This site is protected by reCAPTCHA and the Google Privacy Policy and Terms of Service apply.
See all newsletters
See all newsletters

Video

View All
  • How to Finish Drywall Around a Shower Enclosure
  • Taping Outside Corner Beads on Drywall
  • Angle Your Drywall Knife for Best Results
  • How to Use Drywall Stilts
View All

Drywall

View All Drywall Articles
  • fix a damp wall
    How to Remediate A Damp Exterior Wall Cavity
  • A man skimcoating drywall
    Repairing Drywall After Removing Wallpaper
  • Lydia Crowder on drywall stilts
    Tradesperson Interview: Lydia Crowder, Drywaller
  • Finished FHB House WI at sunset
    Build or Build Not, There is No Try
View All Drywall Articles

BOOKS, DVDs, & MERCH

Shop the Store
  • Pretty Good House
    Buy Now
  • 2023 Tool Guide
    Buy Now
  • 2022 Fine Homebuilding Archive
    Buy Now
  • Code Check Building 4th Edition
    Buy Now
  • Shop the Store

Fine Homebuilding Magazine

  • Issue 313 - Feb/March 2023
    • Practical System for a Seismic Retrofit
    • Fine Homebuilding Issue #313 Online Highlights
    • Practical System for a Seismic Retrofit
  • Issue 312 - Dec 2022/Jan 2023
    • Tool Test: Cordless Tablesaws
    • Gray-Water System for a Sustainable Home
    • Insulate a Cape Roof to Avoid Ice Dams
  • Issue 311 - November 2022
    • 7 Steps to a Perfect Exterior Paint Job
    • Options for Smarter Home-Energy Tracking
    • The Fine Homebuilding Interview: James Metoyer
  • Issue 310 - October 2022
    • Choosing a Tile-Leveling System
    • Choosing Between HRVs and ERVs
    • Custom Built-in Cabinets Made Easy
  • Issue 309 - Aug/Sept 2022
    • 10 Steps to Install Crown Molding on Cabinets
    • How to Get Sturdy Walls Without OSB
    • Choosing the Right Construction Tape for the Job

Fine Homebuilding

Follow

  • twitter
  • facebook
  • instagram
  • pinterest

Newsletter

Get home building tips, offers, and expert advice in your inbox

Signing you up...

This site is protected by reCAPTCHA and the Google Privacy Policy and Terms of Service apply.
See all newsletters
See all newsletters

Membership & Magazine

  • Online Archive
  • Start Free Trial
  • Magazine Subscription
  • Magazine Renewal
  • Gift a Subscription
  • Customer Support
  • Privacy Preferences

Taunton Network

  • Green Building Advisor
  • Fine Woodworking
  • Fine Gardening
  • Threads
  • About
  • Contact
  • Advertise
  • Careers
  • Copyright
  • Terms of Use
  • Site Map
  • Do not sell or share my information
  • Privacy Policy
  • Accessibility
  • California Privacy Rights

© 2023 The Taunton Press, Inc. All rights reserved.

X
X
This is a dialog window which overlays the main content of the page. The modal window is a 'site map' of the most critical areas of the site. Pressing the Escape (ESC) button will close the modal and bring you back to where you were on the page.

Main Menu

  • How-To
  • Design
  • Tools & Materials
  • Video
  • Blogs
  • Forum
  • Reader Projects
  • Magazine
  • Members
  • FHB House

Podcasts

  • FHB Podcast
  • ProTalk

Webinars

  • Upcoming and On-Demand

Account

  • Log In
  • Join

Podcasts

  • FHB Podcast
  • ProTalk

Webinars

  • Upcoming and On-Demand

Popular Topics

  • Kitchens
  • Business
  • Bedrooms
  • Roofs
  • Architecture and Design
  • Green Building
  • Decks
  • Framing
  • Safety
  • Remodeling
  • Bathrooms
  • Windows
  • Tilework
  • Ceilings
  • HVAC

Magazine

  • Current Issue
  • Past Issues
  • Magazine Index
  • Subscribe
  • Online Archive
  • Author Guidelines

All Access

  • Member Home
  • Start Free Trial
  • Gift Membership

Shop the Store

  • Books
  • DVDs
  • Taunton Workshops

More

  • FHB Ambassadors
  • Reader Projects
  • Podcast
  • Customer Support

Account

  • Log In
  • Join

Newsletter

Get home building tips, offers, and expert advice in your inbox

Signing you up...

This site is protected by reCAPTCHA and the Google Privacy Policy and Terms of Service apply.
See all newsletters
See all newsletters

Follow

  • twitter
  • facebook
  • instagram
  • pinterest

Join All Access

Become a member and get instant access to thousands of videos, how-tos, tool reviews, and design features.

Start Your Free Trial

Subscribe

FHB Magazine

Start your subscription today and save up to 70%

Subscribe

We hope you’ve enjoyed your free articles. To keep reading, become a member today.

Get complete site access to expert advice, how-to videos, Code Check, and more, plus the print magazine.

Start your FREE trial

Already a member? Log in