
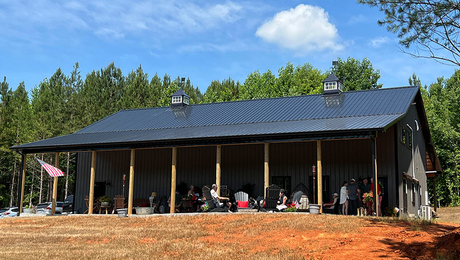
Deck-Style Foundation for an Addition
Creative problem-solving meant removing a chimney, using 36-in. Sonotube footing forms, and installing pressure-treated glulams for this addition.
To save time and reduce the amount of concrete called for in the traditionally designed basement foundation under the kitchen addition, Jon Beer applied some value-engineering and changed the plans. The resulting structure is a deck-like frame that relies on exposed pressure-treated glulams set on giant footings. The area is enclosed by a retaining wall.
Here’s the transcript:
I’m sitting underneath a new edition here at the Fine Homebuilding House. This is a deck-style single-story addition. It’s built with an I-joist floor system. The one side of it is hung on a ledger, and it’s resting on a glulam that is transferring down with a pressure-treated post to several large footings. What you see behind me is a result of a value engineering change that we had to make midstream. This structure originally was supposed to be a three-sided concrete room, essentially with a slab. As we started to get into the design process and pricing it with our concrete sub, we realized a couple of things. One was that in order to properly protect the existing foundation of the basement, our new frost walls would have to extend 4 feet below the footing of the new house, making the proposed walls over 11 feet tall. As soon as we realized how much work was involved in this section and the cost to us, concrete alone was coming in around $25,000 just for that foundation work. We had to shift gears.
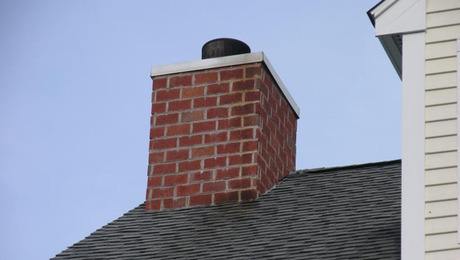
The addition itself is oriented around one point on the existing structure. When we bought the house, there was a two-sided chimney on the back of the house in the dining room area. It had a hearth on the interior and it had a hearth on the exterior. We knew that part of the existing house was going to become our kitchen, and we had imagined an addition coming off of that, through that location where the chimney was. Anticipating that there would be a header there, we would have to do minimal structural work so we could walk from the kitchen to this living room and then from the living room out into the backyard, because that chimney was the focal point of this construction. That’s where we started as far as the actual process.
Removing a chimney
The chimney was tied into the veneer-brick walls. The first step was to bring the chimney down as far as we could for the roof line, and then we needed to disconnect it from the rest of the house. It was so large that we couldn’t get rid of that chimney by hand. We wanted the excavator to pull it out, but I didn’t want to take the whole wall with it. So we very carefully saw cut down the side of the chimney. We made sure that we were totally disconnected on the sides and on the top, the only connection point being the bottom. That way, when the excavator put his strap around the chimney and he yanked on it, it would break at the lowest point and just fall backwards out of the house. Our plan, for once in my life, went without a hitch. In about two minutes the chimney was out of the house, and we suddenly had the big hole to walk from the future addition into the kitchen.
Digging and placing footings
From there, our excavator took over, basically, and dug out a massive hole where we planned this new retaining wall. For the foundation itself for the addition, we had the excavator dig three very large footings. They’re 36 inches in diameter and they’re about 5 feet deep. We used a really large Sonotube for a couple of reasons. One is the ease of locating the posts. They are pretty much perfectly centered, but if something was amiss with his layout, we would have 36 inches of play to drop that post onto the footing.
Then the other reason was that by the time he dug the holes with his bucket, the holes were already large enough for a big Sonotube, and at that point it was just more efficient for him to set a big Sonotube and pour in one section rather than two pours, or build something like a more traditional footing.
Building the retaining wall
The retaining wall is made from Versa-Lok blocks. It’s taken the place of that cast-in-place cement wall, but it’s closed on two sides, with its third side being open as opposed to the original design, which was a three-sided concrete room with a door cut into it and steps. Our goals were to eliminate the concrete as much as possible and to eliminate the staircase for the reason of expense, but also for ease of use. It’s hard to get something heavy down a flight of stairs when you could just walk it down a slope.
Framing the addition
The install for the addition starts with the footings and with the ledger. Once the footings were in, they were cured. We started with layout, the first portion of that being the ledger that dictates the beginning and the end of either outside wall of the addition. And then from there we pulled square off of the house and used that imaginary rectangle to locate our posts, and from there we plumbed down. We located our post brackets. We installed those, and then we started installing the posts. First, the posts support pressure-treated glulam. Another tricky aspect of this build was finding a way to use an engineered structural beam that was rated for outdoor use.
As you can see, the glulam is exposed; it’s not going to become part of the thermal layer and encapsulated in the house. It’ll be something that’s out all the time in the weather. So it was a little bit of a challenge finding something that was rated for all weather, even though it’s covered. So we opted for a pressure-treated glulam. The 6×6 posts carry that, and then the I-joists rest on top of that.
In order of operations, we worked with a ledger first, then pulling square for the new structure, setting post bases, setting 6x6s, shooting our I-joists elevations, setting the glulam on top. And then starting with the outside I-joists, we turned that imaginary rectangle into a real one, squared it to the building, and then infilled the rest of the I-joists from there.
I think at the end of the day I’m actually happier with the solution. There’s something about the elevation, change from the grade, the new first-floor addition and the new second floor that looks really interesting. It also is pretty easy to get into. We’ve utilized this space heavily. As you can see behind me, we have a bunch of siding getting stained right now.
Collaborating with subs
We’re lucky to have subs that are interested in a collaborative relationship and helping us figure out a solution to our problem. As builders, we work in a cost-plus style, so it’s a time and materials–based contract with a fixed profit and overhead fee. In the beginning of this project I extended that idea and that opportunity to our subs here also, knowing that this is a personal project for us, and it’s a little bit atypical; it’s not them coming in to work for a client of ours. But I also want to make sure they’re feeling taken care of and were not feeling taken advantage of either.
So much in construction we deal with the “I win, you lose; you win, I lose” game. So when it came time to figure this out with our excavator, he was really motivated to help us figure this out because he was working cost-plus and has gone on since to do this with other clients. So I think encouraging transparency and creativeness among our subtrades is a big part of what I do as a builder and a big part of what we’ve encouraged here at the house to try and figure out these issues that inherently come up—like this foundation for this addition is just part of what this process has been like.
RELATED STORIES


View Comments
I am curious how you insulated your floor system and then how did you close it off from the underside?