FHB Logo Facebook LinkedIn Email Pinterest Twitter Instagram Plus Icon Close Icon Navigation Search Icon Navigation Search Icon Arrow Down Icon Video Guide Icon Article Guide Icon Modal Close Icon Guide Search Icon Skip to content
Subscribe
Log In
  • How-To
  • Design
  • Tools & Materials
  • Videos
  • Blogs
  • Forum
  • Magazine
  • Members
  • FHB House
  • Podcast
Log In

Fine Homebuilding Project Guides

Decks

Guide Home
  • Design & Planning
  • Tools & Materials
  • Footings & Foundations
  • Framing a Deck
  • Installing Decking
  • Installing Railings
  • Deck Stairs
  • Custom Details
  • Finishes, Repairs, and Maintenance
  • Complete Deck Builds
Tools & Materials

Digging Deck Footing Holes

Depending how many holes you have to dig (and how deep), you might consider a power auger or other mechanized digger rather than doing the work by hand.

By Scott Schuttner

If you need just a few holes not much deeper than 2 or 3 ft. or not too big around, then a good sharp shovel and a post hole digger will be the only tools you’ll need. Throw in a pair of boots or shoes with stiff soles to keep your feet from getting sore. And remember that big rocks should be moved by rolling, not lifting, even if it means digging a bigger hole. But if you have quite a few holes or they need to be deep, then consider mechanizing the process. There are a couple of options that can help save your back (and your spirit).

Power augers

The first option is to rent a handheld gasoline-powered auger. The one-person model is fine for small fence post holes, but the two-person model is essential for larger holes. I’ve found though that even in ground that doesn’t have too many rocks, a 12-in. diameter bit is really about the upper limit for two people to handle. I’ve also found that a power auger is not a user-friendly tool; I almost prefer digging these holes by hand. Be prepared for some abrupt stops as you hit roots and snags, and this tool really gets heavy when you’re lifting it out of the hole with an auger full of dirt. It may be quicker than handwork, but not necessarily less painful.

Drill rigs

This maneuverable drill rig costs me about $150 per job but will save a day’s back breaking labor when I have more than a few holes to drill. It can easily drill 12-in. diameter holes 48 in. deep in most soils.

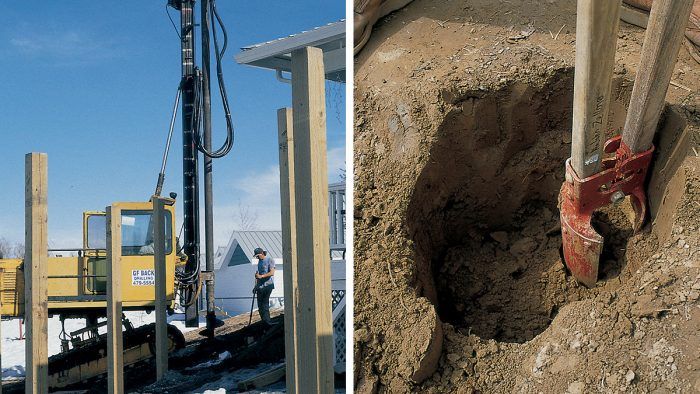
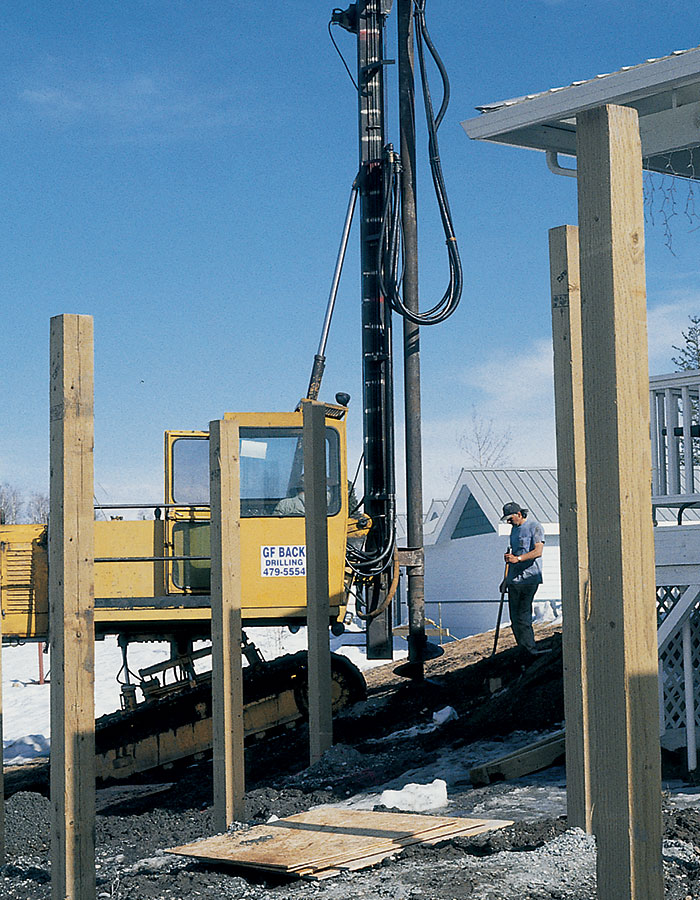
My favorite option is to hire a local fencing installer to come over with his drill rig. Depending on the contractor I contact, I’ll get a small, self-contained unit with plenty of mobility to get around obstructions or a slightly less maneuverable one mounted on the back of a vehicle. Drilling holes on moderate slopes isn’t a problem because usually both vehicles have four-wheel drive. These rigs can drill up to about 24-in. diameter holes that are up to 5 ft. deep if there’s not too much rock. Prices in my area run about $125.00 per hour, but it only takes an hour or so (plus travel time) to drill the holes for an average-sized deck.

If you have a steep site, lots of rocks, or some other onerous complication, then check in the yellow pages under electrical contractors or drilling companies. They’ll have track-mounted machines that can do 30-in diameter holes as deep as you’d ever want them for a deck, though these services cost twice as much as the small rigs. If it’s the only way to get the job done, however, the cost differential is well worth it.

This larger drill rig on tracks can go up the side of a hill and drill 24-in. diameter holes 8 ft. deep, all day long (or until you run out of money).

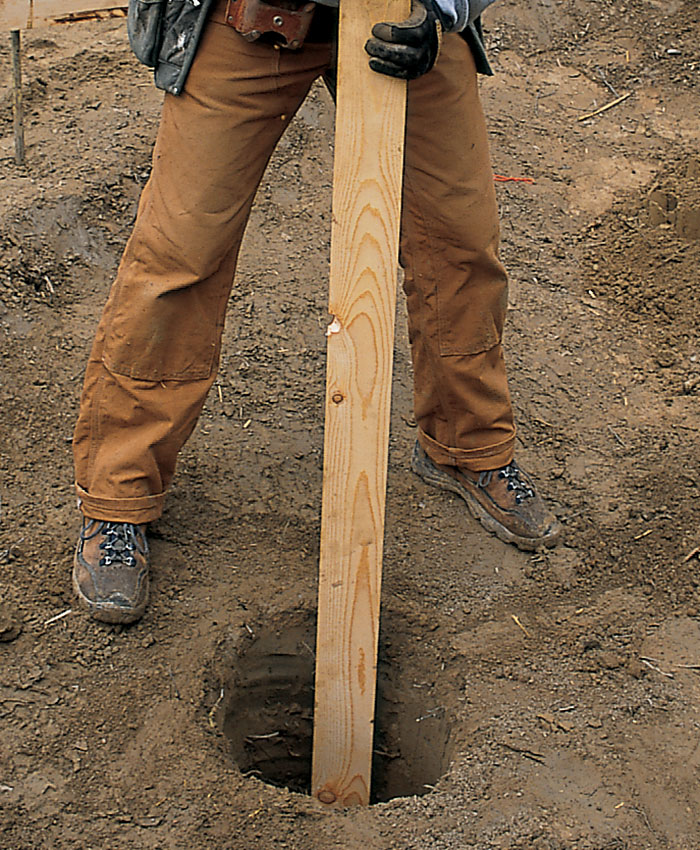
No matter how you drill your holes, a few inches of loose dirt will be left in the bottom of the hole. Try to remove as much as you can with the post hole digger, and then compact whatever’s left. I do this with a 234 or a 434 that is long enough to reach the bottom of the hole and still allow me to grab it without bending over. I pound the board up and down until the bottom of the hole feels solid. Fine soils will compact better with addition of a little gravel.

This is also the time to add a thicker layer of gravel if needed for drainage, and this gravel can be compacted the same way. A 6-in. to 8-in. layer of gravel will allow for easy compaction and aid drainage. Adding a little water to the gravel until it is moist, but not puddling, is important for solid compaction. But avoid too much water; you’ll just make mud, and that won’t compact at all.

In addition to a shovel, a post hole digger will make hand-digging for deep pier holes easier.

Compacting dirt or gravel in layers during backfill will discourage future settling.


Sign up for eletters today and get the latest how-to from Fine Homebuilding, plus special offers.

Signing you up...

This site is protected by reCAPTCHA and the Google Privacy Policy and Terms of Service apply.
See all newsletters
See all newsletters
Previous: Deck Footings Done Right Next: Don’t Forget to Flatten and Pack Your Deck Footing Holes

Guide

Decks

Chapter

Footings & Foundations

View Comments

  1. bobbomax | Feb 15, 2022 12:05am | #1

    Put depth marks on the handles of your posthole digger. You won't get total accuracy, but it'll get you close quickly & then you can get out the tape.

Log in or create an account to post a comment.

Sign up Log in

Become a member and get full access to FineHomebuilding.com

Decks

Decks

Hundreds of articles and videos by top deck-building pros on how to design and build a beautiful, sturdy, and safe deck

View Project Guide

View All Project Guides »

Become a member and get unlimited site access, including the Decks Project Guide.

Start Free Trial

Design & Planning
  • Basic Design Options
  • Generating Plans
  • Calculating Deck Loads
  • Code Compliance
Tools & Materials
  • Deck Building Tools
  • Foundation and Framing Materials
  • Decking Materials
  • Fasteners and Hardware
Footings & Foundations
  • Choosing a Foundation
  • Sizing and Laying Out Footings
  • Excavation
  • Pouring the Foundation
Framing a Deck
  • Framing Overview
  • Installing the Ledger
  • Setting Posts and Beams
  • Installing Joists
Installing Decking
  • Decking Basics
  • Installation Process
  • Adding Fascia and Other Decorative Elements
Installing Railings
  • Installing Deck Railing Posts
  • Building Wood Rails and Balustrades
  • Non-Wood Railing Options
  • Installing Nonwood Balustrades
Deck Stairs
  • Deck Stairs Overview
  • Laying Out, Cutting, and Installing the Stringers
  • Installing Treads, Risers, and Stair Railings
Custom Details
  • Benches, Planters, and Privacy Features
  • Pergolas
  • Lighting
Finishes, Repairs, and Maintenance
  • Deck Finishes
  • Cleaning and Refinishing
  • Inspection and Repair
Complete Deck Builds
  • Grade-Level Decks
  • Raised Decks

Fine Homebuilding

Follow

  • twitter
  • facebook
  • instagram
  • pinterest

Newsletter

Get home building tips, offers, and expert advice in your inbox

Signing you up...

This site is protected by reCAPTCHA and the Google Privacy Policy and Terms of Service apply.
See all newsletters
See all newsletters

Membership & Magazine

  • Online Archive
  • Start Free Trial
  • Magazine Subscription
  • Magazine Renewal
  • Gift a Subscription
  • Customer Support
  • Privacy Preferences

Taunton Network

  • Green Building Advisor
  • Fine Woodworking
  • Fine Gardening
  • Threads
  • About
  • Contact
  • Advertise
  • Careers
  • Copyright
  • Terms of Use
  • Site Map
  • Do not sell or share my information
  • Privacy Policy
  • Accessibility
  • California Privacy Rights

© 2023 The Taunton Press, Inc. All rights reserved.

X
X
This is a dialog window which overlays the main content of the page. The modal window is a 'site map' of the most critical areas of the site. Pressing the Escape (ESC) button will close the modal and bring you back to where you were on the page.

Main Menu

  • How-To
  • Design
  • Tools & Materials
  • Video
  • Blogs
  • Forum
  • Reader Projects
  • Magazine
  • Members
  • FHB House

Podcasts

  • FHB Podcast
  • ProTalk

Webinars

  • Upcoming and On-Demand

Podcasts

  • FHB Podcast
  • ProTalk

Webinars

  • Upcoming and On-Demand

Popular Topics

  • Kitchens
  • Business
  • Bedrooms
  • Roofs
  • Architecture and Design
  • Green Building
  • Decks
  • Framing
  • Safety
  • Remodeling
  • Bathrooms
  • Windows
  • Tilework
  • Ceilings
  • HVAC

Magazine

  • Current Issue
  • Past Issues
  • Magazine Index
  • Subscribe
  • Online Archive
  • Author Guidelines

All Access

  • Member Home
  • Start Free Trial
  • Gift Membership

Shop the Store

  • Books
  • DVDs
  • Taunton Workshops

More

  • FHB Ambassadors
  • Reader Projects
  • Podcast
  • FHB House
  • Customer Support

Account

  • Log In
  • Join

Newsletter

Get home building tips, offers, and expert advice in your inbox

Signing you up...

This site is protected by reCAPTCHA and the Google Privacy Policy and Terms of Service apply.
See all newsletters
See all newsletters

Follow

  • twitter
  • facebook
  • instagram
  • pinterest

Join All Access

Become a member and get instant access to thousands of videos, how-tos, tool reviews, and design features.

Start Your Free Trial

Subscribe

FHB Magazine

Start your subscription today and save up to 70%

Subscribe

We hope you’ve enjoyed your free articles. To keep reading, become a member today.

Get complete site access to expert advice, how-to videos, Code Check, and more, plus the print magazine.

Start your FREE trial

Already a member? Log in