Flashing-Free Deck Ledger
Mike Guertin recommends either a freestanding deck or spacers for a tricky house clad in T1-11.
I need to attach a deck ledger to my house but am not sure how to install the flashing. The most common method I’ve seen is to tear back the siding, install the ledger, flash the ledger, and then reinstall the siding. That’s not possible in my case because the 4×8 sheathing panels on my house also serve as the siding. I’ve been pondering three ideas: The first is to cut out the sheathing/siding and fasten the ledger directly to the rim board, and then try to tuck the back flange of the ledger flashing up under the sheathing. The second is to screw the ledger over the sheathing and caulk the top edge of the ledger flashing. The simplest plan would be to install the ledger and just caulk it to the wall. Which should I do?
—Chris via email
Editorial adviser Mike Guertin replies: Your house is clad in what’s most commonly referred to as T1-11. Unfortunately, retrofitting conventional deck ledger flashing to a wall clad with T1-11 is tricky. I have seen several ledgers installed using all of the methods you mentioned that still ended up with considerable rot.
If the height of your deck is within a few feet of ground level, my recommendation is to skip the ledger and instead build a freestanding-style deck an inch or two from the wall. Freestanding decks do require more footings for support and may not be a good option if you’re building a second-story-level deck where the beam and support posts will interfere with first-floor windows or limit use of the area below the deck.
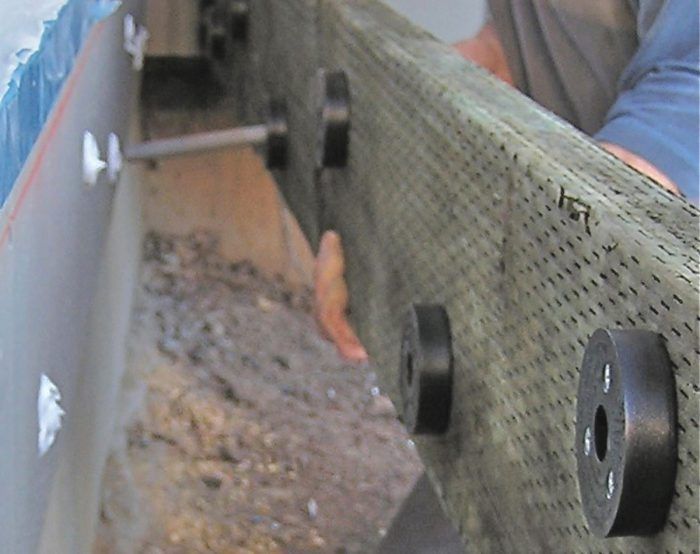
If you need or want to support the house-side of the deck with a ledger, I recommend you skip the flashing altogether and install spacers to hold the ledger off the face of the wall. Spacers will let water pass between the ledger and T1-11 and allow that space to dry out on non-rainy days. The International Residential Code (IRC) deck ledger fastening table R507.9.3.1(1) includes an option for spacing the back of the deck ledger up to 1 in. from the outside face of the rim board, so after you subtracted the 1/2-in. thickness of the sheathing, the code would allow a stack of washers 1/2-in. thick at each bolt location.
Instead of a stack of washers, you can use proprietary or DIY spacers to create a 1/2-in. space. Deck2wall.com makes disk-style spacers for 1/2-in.- to 5/8-in.-dia. bolts and another model for structural wood screws. The wood-screw spacers are a good option if there’s a finished ceiling inside the house preventing access to the rim-joist area to install nuts and washers on bolts. I’ve made my own spacers out of 1/2-in.-thick scraps of composite fascia boards cut 1-1/2 in. wide and the same length as the width of the ledger. I taper the top to a point to help shed water.
If you choose the spacer option, avoid the grooves in the T1-11; attach the spacers to the back of the ledger first, and pre-drill for the bolts or screws. Then apply sealant to the wall face of the spacers before mounting the ledger against the wall. Always use exterior-grade hardware compatible with pressure-treated lumber—and it might be a good idea to have a conversation with your local building official about your design and the products you plan on using.
From Fine Homebuilding #318
RELATED STORIES
Fine Homebuilding Recommended Products
Fine Homebuilding receives a commission for items purchased through links on this site, including Amazon Associates and other affiliate advertising programs.
Metal Connector Nailer
4-Gallon Piston Backpack Sprayer
Lithium-Ion Cordless Palm Nailer



View Comments
And, in my area at least, if your deck is not attached to the house, you don't need a building permit.
We built my parent's retirement home that way fifty years ago, redwood T-1-11, 5/8" hdg bolts, 1x4 smooth surfaced redwood blocks set vertical as spacers. The floor rim joist is D Fir 2x12 well nailed to the intersecting joists (before there were particular rules in the code). The deck rim and joists on hangers are redwood 2x10. It is wearing well in our dry summer wet winter climate.