Unfinished-Attic Insulation Upgrade
Seal air leaks first, then blow in extra insulation for an energy-saving improvement that offers a great bang for the buck.
Synopsis: Although it’s easy to think of big things when you’re looking for places to cut energy costs (replacement windows, anyone?), the first steps to take involve insulation in your home. FHB contributing editor Mike Guertin guides you through some relatively low-cost techniques for upgrading your home’s insulation. He begins by sealing air leaks, such as the gaps around recessed lights and electrical boxes, plumbing or electrical chases, framing and a chimney, and more. Guertin includes a guide to finding the best air sealant for the job. He then recommends tuning up existing insulation, whether fiberglass batts or loose-fill cellulose. In conclusion, Guertin outlines the process for blowing in loose-fill insulation, which he says is a two-person job.
Magazine extra: Watch Mike use the Owens Corning AttiCat system to blow fiberglass insulation into his own attic during an energy upgrade.
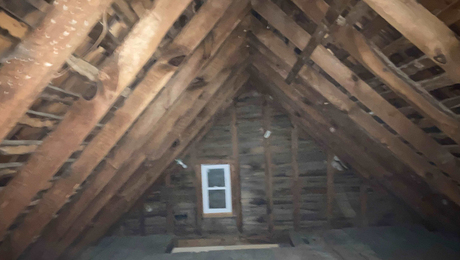
Do you want to keep your heating costs from going through the roof? It’s easy: Keep your heat from going through the roof. Saving money on heating-fuel costs is a lot simpler than negotiating with OPEC or your local utility. On a recent upgrade in the attic of a 1950s-era house (one of two projects shown here), I air-sealed and spread a 12-in.-deep layer of cellulose throughout 1500 sq. ft. of space in about a day. Coupled with other energy-saving improvements made to the home, the result was that the owner saw his heating and cooling costs reduced by half compared to the previous year, even in the face of higher electricity and heating-fuel costs.
I typically focus my efforts to improve the energy efficiency of an attic on two main areas: sealing air leaks in the ceiling and increasing the amount of insulation.
The payback period for tightening a leaky ceiling can be as short as a month. Adding insulation might take a few heating or cooling seasons to pay off, but the wait is relatively brief. I estimate the payback for air-sealing and upgrading attic insulation to be realized in three years.
On these projects, I also chose to install a radiant-reflective membrane. Besides reducing radiant-heat gain from the roof, the membrane makes the attic more attractive and dust-free for storage use, and it keeps the blown-in insulation from blocking the rafter bays. While they can reduce peak attic temperatures by 10°F to 30°F, the barriers haven’t proved to be cost effective in all geographic regions, or in attics that are adequately insulated, that are air-sealed, and that have well-insulated, wrapped air-handling equipment and ductwork. You are probably better off spending the money on more insulation and air-sealing than on a radiant barrier.
Stop the air leaks, stop losing heat for attic insulation
Air leaks can account for 30% of a home’s energy loss, so it pays to seek out and seal every penetration between the living space and the attic before adding insulation. Don’t leave any batt unturned when hunting down air leaks. Dust deposits in leaking air stain insulation brown or black, so you can start by looking for discoloration in the insulation.
I treat the drywall ceiling as the air barrier and seal all penetrations, joints, and holes. The open framing for soffits and chases is a highway for air leaking from wall cavities into the attic. Another gaping hole is the attic-stair bulkhead.
I install an insulated and gasketed cover for the attic access panel or pull-down stairway. you can buy a ready-made access cover, or you can make your own. The cover can be fit within the riser or on top of it. When the cover sits on top of the riser, apply the gasket material (usually adhesive-backed foam tape) to the cover (not the floor) so that it’s not damaged when someone accesses the attic.
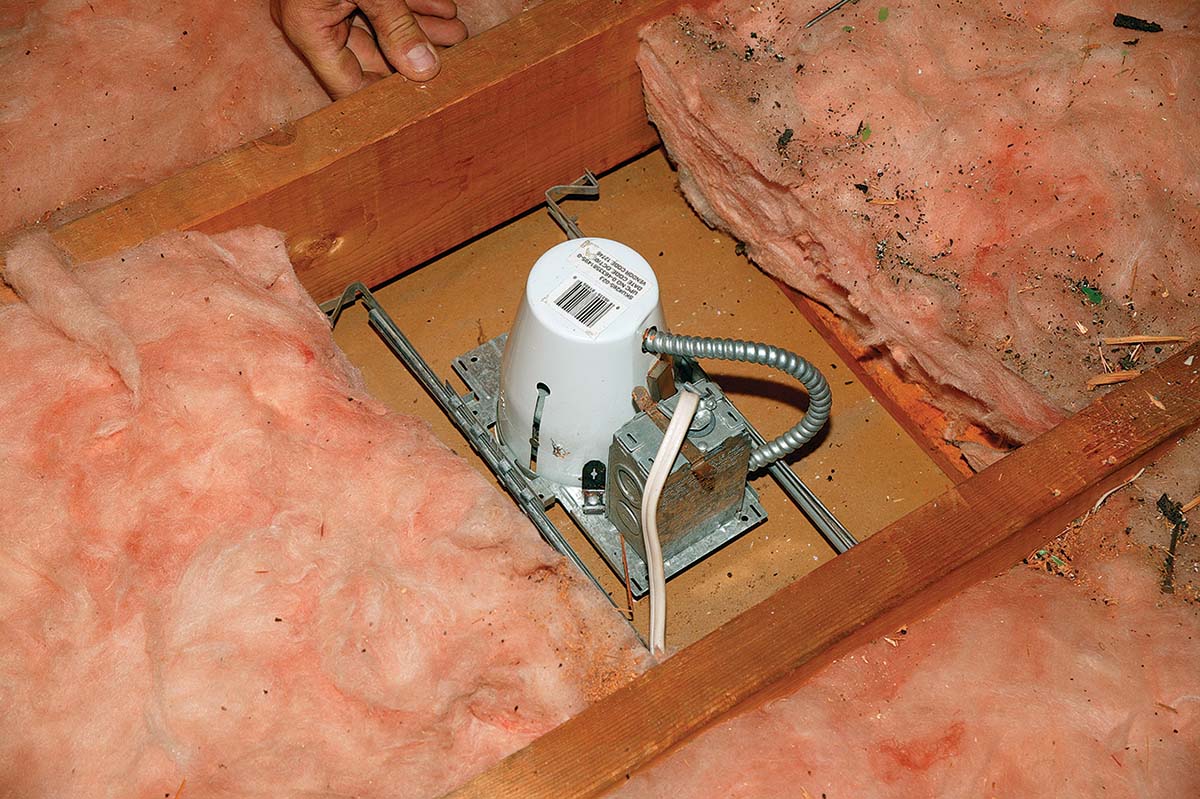
Next, I seal recessed-light cans and ceiling-mounted light-fixture boxes. Both are often overlooked but when combined are one of the biggest sources of air leaks. The holes and the perimeter of ceiling-mounted electrical boxes should be sealed to the drywall with a fire-resistant sealant or foam. Gaps around ducts, wires, and pipes that penetrate into the attic must be located and closed, too. Most inexpensive and old bathroom exhaust fan boxes have open seams and holes that should be covered with mastic or duct sealing tape. The fan-box perimeter should be sealed to the drywall with caulk or foam.
Another typical area to block off and seal is the 2-in.-wide space between framing and masonry chimneys. Combustible materials aren’t allowed to contact the masonry, so it’s best to use sheet metal to block the space.
I also seal the joint between the drywall and the wall plates. The thin joints between the ceiling drywall and the wall top plates might seem insignificant, but they add up when you figure the linear footage of walls. Expanding foam or sealing caulk easily fills the gaps.
Address wiring issues when upgrading attic insulation
Because knob-and-tube wiring can’t be buried under new insulation, have an electrician replace any old wires in the attic before adding insulation. Ideally, all junction boxes should be raised above the level of the insulation. When elevating the junction boxes isn’t an option, you should install clearly marked permanent tags that can be seen above the insulation level.
While I am working in the attic, I like to install two electrical conduits (one line voltage and one telecom/low voltage) between the attic and the basement or the crawlspace to make any future wiring upgrades easier to accomplish.
Tune up existing insulation
The two types of insulation that are usually found in older attics are fiberglass batts and loose-fill cellulose. For batt insulation to perform at its rated level, it must be installed snug to the ceiling surface and to the edges of the framing. Any gaps or voids reduce the insulation’s effectiveness. If the existing insulation is in good condition, it can be reused.
I tune up the insulation by tightening end joints, making sure batts are tight to the ceiling drywall, and filling in any voids with new pieces of insulation.
If I’ve decided to increase the amount of insulation with more batts, I like to bring the level of the older batts flush with the top of the joists and then install a new layer of unfaced batts running perpendicular to the joists. Placed above the joists, the cross layered batts can be tight together to minimize heat loss through the joists and to maximize performance.
If I’m upgrading to loose-fill insulation, I keep it from falling into eave soffits and maintain channels for roof ventilation by installing a layer of blocking made from rigid insulation in the rafter (or truss) bays over the exterior-wall plates. I notch the rigid insulation around the rafters so that I get a tight fit in the bay.
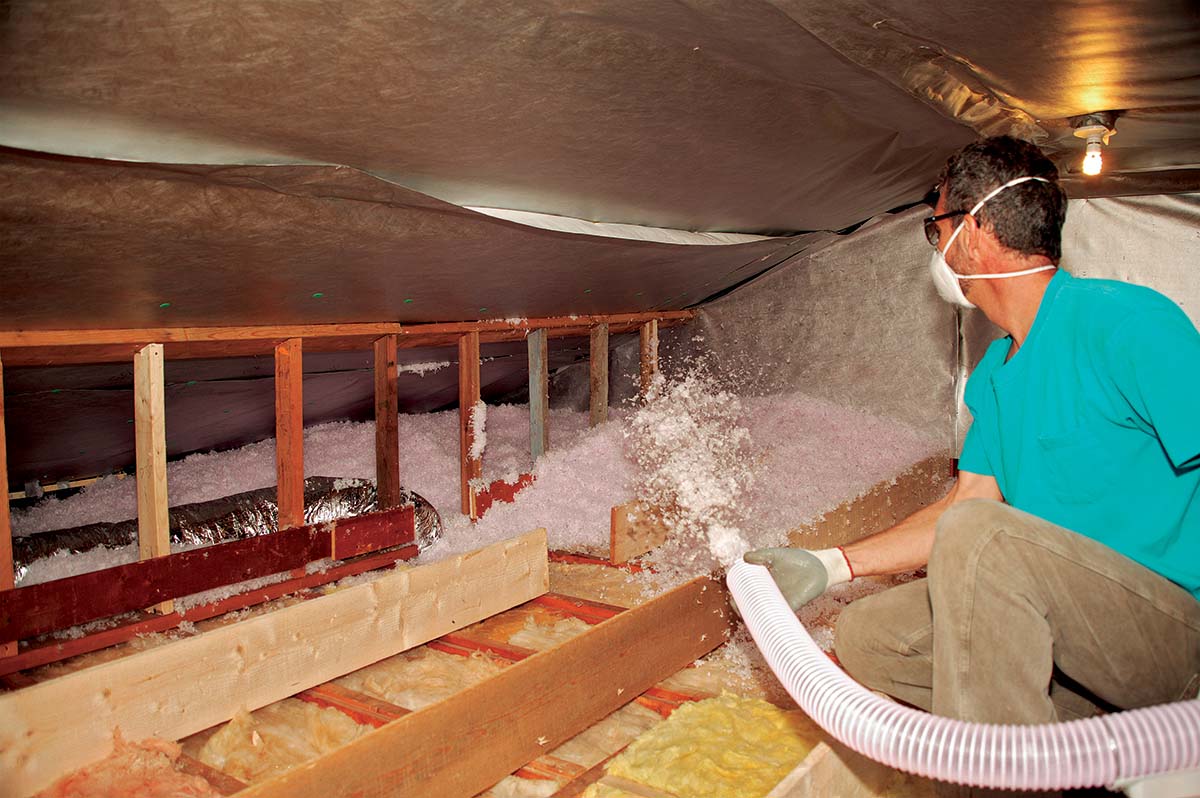
Blowing insulation is a two-person operation
Blown-in loose-fill cellulose or fiberglass isn’t as common as batt insulation, but both are installed quickly and completely cover the ceiling. Loose fill can be blown in over any existing insulation that’s been tuned up first. Comparisons in r-value between the two are similar (around r-3.2 per in.); over the first year, cellulose tends to settle more than fiberglass. Of the two materials, cellulose is generally more available to homeowners; both can be installed with the same basic techniques. A two-person crew is the absolute minimum. The machines used to blow in insulation vary in power and features, but rental machines are typically the most basic.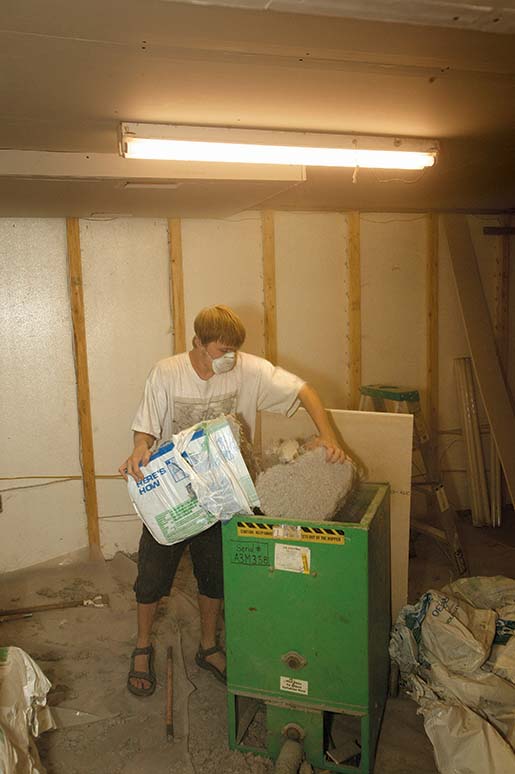
Pick a blower location as close to the attic access as possible. Cellulose and blowing fiberglass are messy to handle, so the loading area will be covered quickly. I prefer to set up outside, but a garage is an ideal place to stage the bales and blower when the weather doesn’t cooperate. I lay down a large, clean tarp and place the machine in the middle with the bales close by. Insulation that falls onto the tarp is easy to gather up and reload. don’t let any debris get mixed into fallen insulation. nails and sticks can jam the blower or plug the hose.
Route the delivery hose through the shortest and straightest distance to the attic. runs of 50 ft. or less are ideal. runs longer than 100 ft. or runs with a lot of bends reduce airflow and can lead to a plugged hose.
All blowing machines have an agitator that breaks up the insulation bales and a blower that drives air and insulation through a hose. The person feeding the machine breaks up the bales and drops them through a protective grate on top of a hopper. It takes a little practice to know how fast and how full to feed the machine, especially when using a basic blower. Fill too fast, and you run the risk of slowing the flow through the delivery hose. After a little practice, the loader understands the sounds the blower makes and can adjust loading speed for optimal delivery.
The insulation dispenser handles the hose and works from the far ends of the attic toward the access hole. Good lighting is a must. If hard-wired attic lighting isn’t enough, run a string of work lights or wear a high-powered headlamp. discharge the hose at a slight angle upward, and let the insulation fall into place. This helps it to spread more evenly. Shooting the hose directly at the ceiling causes the insulation to mound up. If high spots occur, use a long stick or broom to even them off. Although high spots aren’t really a problem, low spots don’t perform as well.
Once insulation covers the ceiling joists, there’s little way to know the depth of the insulation. Insulation distributors sell paper gauges marked in inches that you staple to rafters or ceiling joists. I make gauges by cutting 11 ½-in.-wide cardboard strips about 1 in. to 2 in. longer than the target depth; I draw a line across each strip at the final insulation grade. Expecting the insulation to settle 1 in. or 2 in. over time, I marked the strips at 14 in. and stapled them to the sides of ceiling joists every 6 ft.
Attic work safety
Working with insulation is about balancing safety and comfort. Although official health warnings are ambiguous at best, it’s a good idea to err on the side of caution, especially regarding fiberglass. You might see photos of me without a long-sleeved shirt or, occasionally, gloves, but not without a mask; when it’s 100°F in an attic, I’ll sacrifice some itching to stay cooler.
- A respirator and safety glasses are necessary in any situation.
- When handling fiberglass, it’s a good idea to wear long pants and a long-sleeved shirt, or a one-piece work suit. If your hands are sensitive, wear gloves.
- Step only on ceiling joists, never on the ceiling. Use kneeboards that span between ceiling joists for more freedom and stability.
- Work in the cool of the day, early morning or evening when the sun isn’t beating on the roof (in the summer, of course).
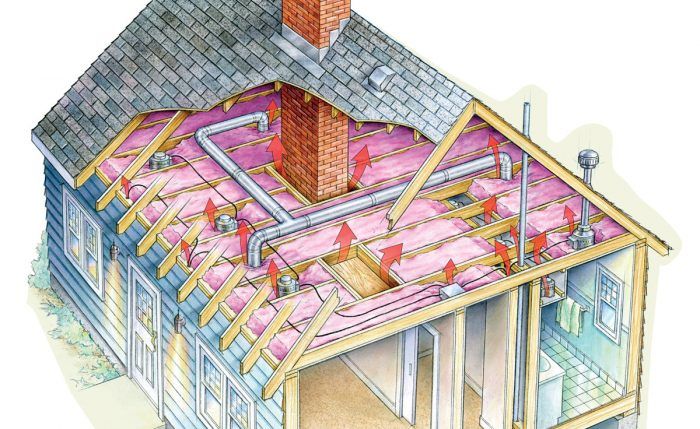
Potential air leaks in the attic
In a conventional attic, insulation typically placed between the ceiling joists of the rooms below can be only partially effective if air leaks aren’t properly sealed. These leaks can range in size from a pinhole to the 3-ft. by 4-ft. access hatch. For the contractor or homeowner who wants to create a tighter building envelope, the hardest part of the task is finding the leaks; sealing them is relatively easy.
- Recessed lights and electrical boxes
- Holes for wires or pipes in drywall and framing
- Attic hatchway
- Spaces between the framing and the chimney
- Plumbing or electrical chases
- Framed soffits that are open to the attic
- Drywall joints between ceiling and wall plates
- Leaky joints in ductwork
Choose the right air sealant for the job
When I’m air-sealing an attic, I use four or five different types of sealants. I use caulk when I need precision: caulking a recessed-light can to the ceiling drywall, for instance, or sealing some pieces of rigid foam to framing. Where gaps around pipes or wires need filling, I use expanding urethane foam.
The distinctions become finer when I’m sealing leaks that come under the code heading of draft-blocking or fire-stopping. (In many areas, local fire codes supersede the International Building Code, so be sure to check them first.) Draft- or fire-blocking refers to stopping smoke or fire from passing from one area to another through perforations in floors, walls, and ceilings. These caulk or foam sealants typically are used to seal perforations in top plates that otherwise would compromise the integrity of the wall’s fire-blocking.
Fire-stopping or fire barrier refers to sealants classified as intumescent; when exposed to direct flame or heat, they expand to fill the cavity and are rated to withstand direct flame.
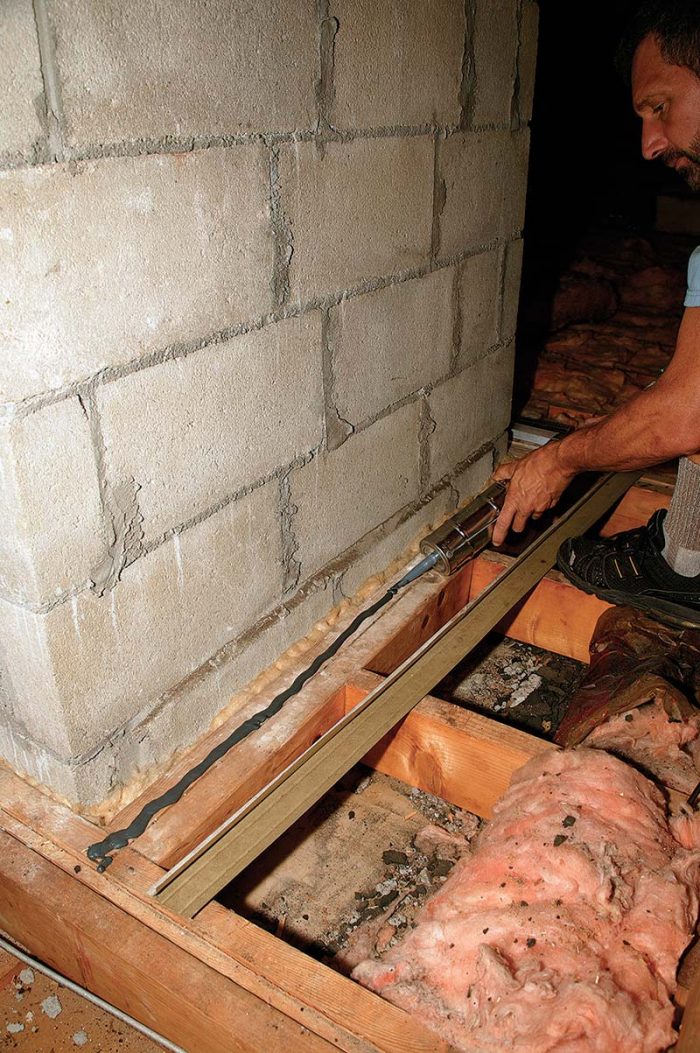
The space around the chimney needs a fire-resistant seal
There’s usually a 2-in.-wide gap, required by code, between framing and masonry chimneys. To close the gap, I first stuff it with rockwool, then apply a bead of adhesive caulk to the framing. Next, I screw down wide strips of metal (recycled drip edge) along the perimeter. I seal the metal to the chimney with fire-rated intumescent caulk. For continuity, you need to seal the ceiling joists to the drywall below and at inside/outside corners of the rough opening with expanding foam.
Small leaks add up, so seal them all
Usually, the greatest number of leaks comes from small perforations in the ceiling: metal electrical boxes, drywall seams, and anyplace a wire or pipe comes through from below. I use expanding urethane foam to seal holes around PVC vent pipe, in electrical boxes, and especially at ceiling-corner drywall seams. If any of the sealing comes under local regulations for fire-stopping or draft-stopping, then use fire- or smoke-rated foam or caulking.
Replace, seal, or enclose recessed lights
The most overlooked sources of air leaks into attics. My first choice is to change old can bodies for airtight insulation-contact-rated (IC-rated) models and then to seal the rim to the drywall with foam or caulk. IC-rated lights that aren’t airtight can be sealed by covering the fixture with an airtight box made from rigid-foam insulation, metal, or drywall, or by sealing holes in the can body with spray-foam insulation.
Remember that non-IC-rated cans need an airspace around them and that they can’t come in contact with the insulation. Some sources recommend installing a sealed box over non-IC-rated cans, but recessed-light manufacturers frown on this practice. The best practice is to replace non-IC-rated cans with air-sealed IC-rated models.
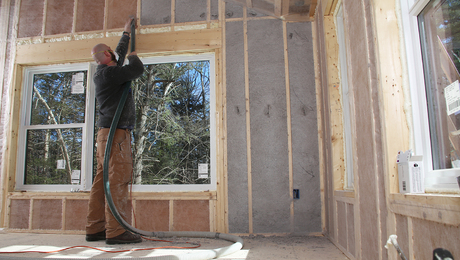
Blowing insulation is a team effort
A division of labor keeps insulation flowing. One person handles the hose, and the other feeds the blowing machine. The most critical job is at the machine, where the steady rate of insulation flow is controlled by the operator. At the other end of the hose, it’s best to start at the farthest point and work back to the attic access. A slight upward hose angle helps to spread the insulation more evenly.
Block the biggest offenders
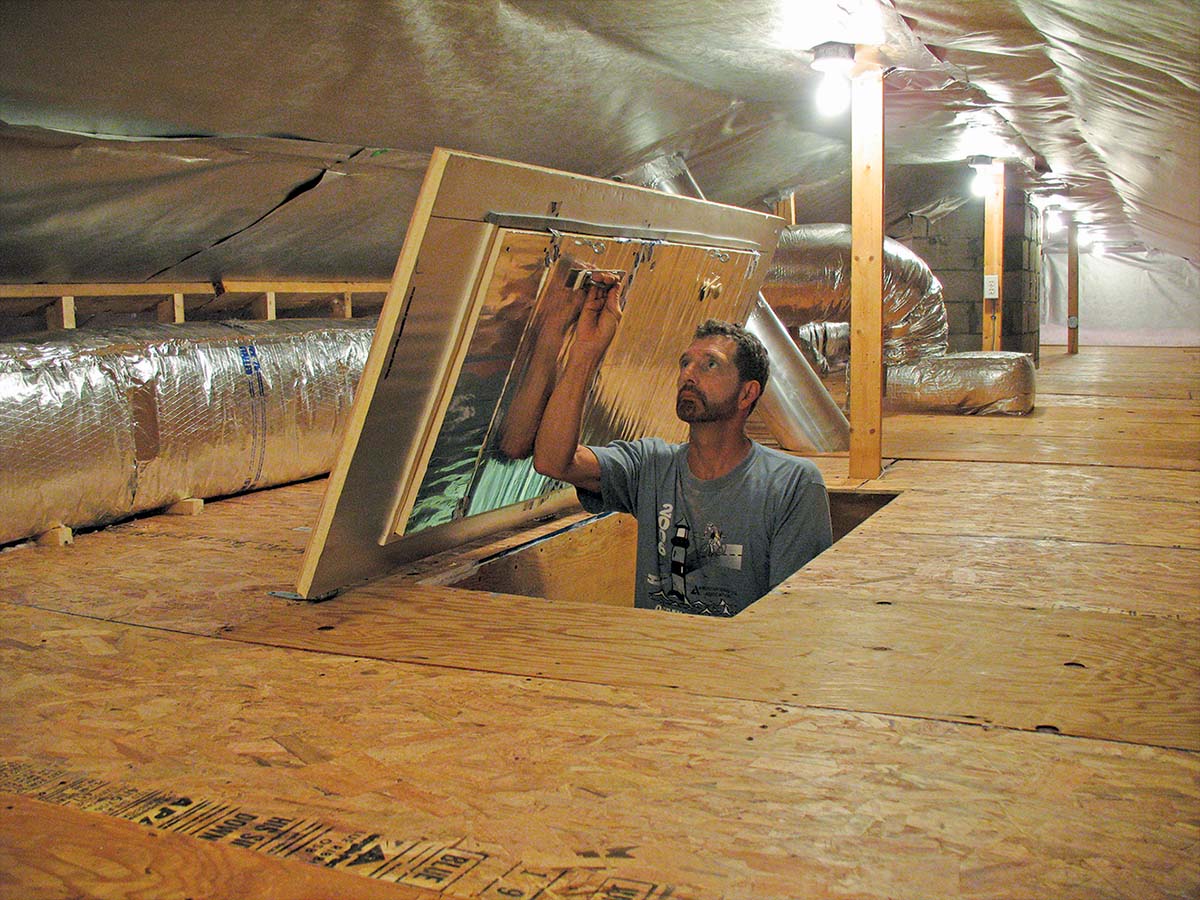
sealing cover.
The attic access is a big leak that can be fixed quickly: Build or buy an insulated cover for the access bulkhead. The key is to provide a rim to connect to the sealing cover. The rim can be made from strips of sheathing, framing lumber, or rigid foam; then the cover sits on top or fits around the rim. On this job, once the insulation was added, I added a deck of leftover 1⁄2-in. plywood and OSB.
Interior soffits that are framed before the drywall is hung can leak huge quantities of air. I fill in the openings between the ceiling joists above the soffits with solid materials like rigid-foam panels, drywall pieces, or sheathing scraps, then seal the edges with expanding foam or caulk.
Joist bays should be sealed with rigid blocks to keep insulation where it belongs. I cut rigid foam into strips the width of the joist bays and slip them out over the top wall plate. The panels block the loose-fill insulation that’s to be installed from clogging the soffit-to-ridge air channel and add a higher R-value to the short space over the plate.

Costs and labor for an attic upgrade
The project was a 1950s ranch with 1500 sq. ft. of attic space. Here’s a breakdown of the costs. It’s mostly labor, and relatively little money for materials.
Air-sealing
One tube of fire-barrier caulk: $7; Two cans of polyurethane foam: $20; Scrap pieces of rigid foam and recycled metal drip edge: $30; Labor: About three hours
Insulation
Cellulose bales and blower rental: $500; Labor: About eight hours to tune up existing insulation. Also, two people for three hours to blow in cellulose and clean up; Optional: Seven hours to lay a new floor deck.
Total
Materials: $557; optional floor deck: $170; Labor: 17 hours
Photos by Charles Bickford. Drawing by Don Mannes
RELATED STORIES
- How to Choose and Install Blown-in Insulation
- Sliding Insulation between Rafters from Above
- Insulating Unvented Roof Assemblies
Fine Homebuilding Recommended Products
Fine Homebuilding receives a commission for items purchased through links on this site, including Amazon Associates and other affiliate advertising programs.

Insulation Knife
Foam Gun
Great Stuff Foam Cleaner


View Comments
A big Thank You to FHB for providing a full copy of this great article by Mike Guertin, which is even more important today than when it was published in 2008.
One key point that should be clarified in the online version: canned spray foam (Great Stuff) is shown in the PDF being used to seal the rim of a canned ceiling light. We now know that these one-part canned spray foams are VERY flammable and should NEVER be used near any source of heat, e.g. a canned ceiling light, hot exhaust pipe, etc. The cured foam will ignite at just 240 degrees F -- which is significantly lower than the ignition temp for paper or wood.
This is also why these canned spray foams should not be used to fireblock (fill) holes in framing etc, e.g. around wiring or pipes -- even if the can has "Fireblock" on the label. This type of foam is banned for fireblocking in commercial construction, and can only be used for residential construction due to a gap in the code. It is up to your local building inspector to approve it -- or not. More inspectors are becoming aware of this fire safety risk and will fail an inspection if spray foam is used -- leading to time consuming and costly rework. We always use true fire resistant caulk which is also easy to apply, e.g. 3M CP-25WB+. At a project last year the inspector saw that we used caulk instead of foam, and he smiled, "You just saved a bunch of time with that caulk."
Mark Hays