
Detailed Assemblies for an Airtight Small Home
Designer Amber Westerman shares drawings and details for building a high-performing slab-on-grade foundation, double-stud wall, and truss roof with nontoxic materials.
In 2020, I left my desk at Amber Westerman Building Design to build my own home. It’s a 1208-sq.-ft. superinsulated, all-electric, net-zero demonstration home that I designed and shared with over 500 people who attended the open houses I held during construction and post completion. The following are among the topics I covered as part of my messaging around high-performance home building.
Optimizing a slab on grade
A slab-on-grade foundation eliminates the costs and weatherproofing concerns of a basement—especially in an area where the water table is high. It helps with passive solar gain in winter, and keeps the house cool in summer. It also supports a barrier-free structure suitable for aging-in-place.

The slab rests within a tray of two layers of 2-in. XPS sheet foam (R-20) with staggered joints. Frost protection is a standard 8-in.-thick concrete wall with footings to frostline.

A vapor barrier directly under the slab does double duty as an air barrier. It was run long and draped over the frostwall, where it was bedded into a bead of ChemLink’s M-1 low-VOC sealant, and later folded up under the mudsills and taped to the wall sheathing for a continuous air barrier.

The slab was power-troweled and a day later sawn into 10-ft. by 10-ft. sections to control cracking. It was left to cure for six months, and in the spring when the surface temperature was up to 60°F, it was cleaned and etched with muriatic acid, then coated with an eco-friendly clear sealer.
Below the slab is a 6-in.-thick layer of clear stone (no fines) that can be vented to the exterior through a 4-in. PVC pipe should radon be detected in the future.

Detailing a double-stud wall
I chose a double-stud wall because it’s easy to understand, straightforward to build, and uses materials with low upfront carbon emissions.
The walls are 11-3⁄4 in. thick with an outer 2×4 bearing wall on 24-in. centers married to an inner 2×4 wall by way of plywood gussets at 48-in. vertical centers.
To avoid the use of toxic materials and beef up the air-sealing, I used a 2×4 western red cedar plate on Conservation Technology’s EPDM gasket (rather than the conventional 2×4 pressure-treated bottom plate laid on foam sill seal).
For increased wind-resistance, I switched out the usual anchor bolts for Simpson’s Titen Screw Anchors with 3-in. square-plate washers at 48-in. centers. The interior bottom plate was caulked to the slab after installation with ChemLink’s M-1 low VOC sealant.
The walls were dense-packed with cellulose (R-45) after Certainteed’s MemBrain, a vapor-variable membrane, followed by USG’s 1/2-in. EcoSmart drywall. The vapor retarder was hung long and the drywall stopped short by 6 in. at the bottom of each window and at the top of each wall section, which provided enough room for the cellulose blower hose to fit into. The vapor retarder was sealed to the framing and at mechanical penetrations with ChemLink’s DuraSil, a nontoxic, low-odor silicone adhesive. The vapor retarder (not the drywall) is the interior air barrier.
I chose cellulose because there’s no other insulation that takes less energy to produce, uses more recycled content, is as biodegradable, and is less toxic to people and animals (not counting direct-from-the-earth materials like straw or wood). It was available locally as a byproduct of the paper mills in northern Wisconsin.
Exterior wall sheathing was upgraded to 5/8-in. plywood and seams were taped with 3M-8067. The nailing pattern was increased from code minimum to 4-in. centers at ends/edges and 6-in. centers in the field for increased wind resistance. The plywood is the exterior air barrier.

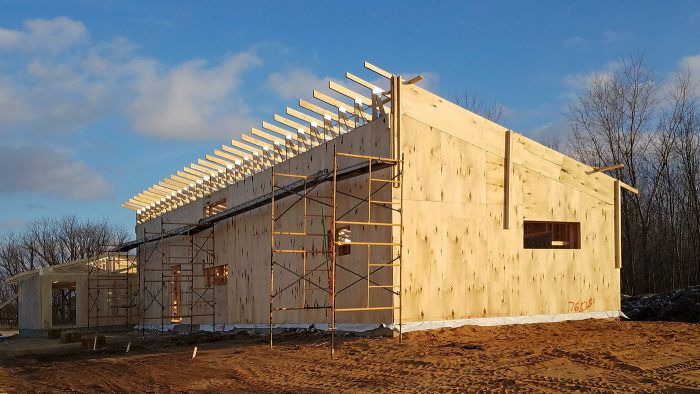
Sequencing a truss roof
The roof was built with parallel chord trusses on 24-in. centers—with a 24-in. energy heel—that spans the width of the house. They were attached to the exterior frame wall with Simpson’s SDWC truss screws. We site-built a vent chute (an air space for venting the roof assembly) by attaching 1×2 nailers to each face of the top chords to support 22-1/2-in.-wide rips of 1/2-in. fiberboard. The old-school wood fiberboard (asphalt impregnated on one side) was cheap and easy to handle overhead. The chute is open to the eave and rake soffits, which are vented by way of gapped 1×4 boards.
As with the exterior walls, Certainteed’s MemBrain air barrier and smart vapor retarder was installed before the insulation—in this application, a 12-in.-wide access gap was left down the middle of the ceiling. The insulation installer later inserted himself into this gap so he could see the end of the hose as he filled each bay. The fiberboard above and the vapor retarder/drywall below create a 22-in.-deep sealed cavity in which to dense-pack cellulose (R-82). The fiberboard isn’t rated as an air-tight material, but it is strong enough to dense-pack against. It’s vapor-permeable and protects the insulation from dust and bugs.
Again, the vapor retarder (not the drywall) is the interior air barrier. It’s sealed at seams and to the truss framing with ChemLink’s DuraSil. Drywalling the ceiling was a breeze—the partition walls were installed after. The crew used 5/8-in. thick by 12-ft.-long boards to minimize the number of seams. The access gap was later covered with 1/2-in. thick drywall so feathering the seams was easier.
The roof sheathing was also upgraded to 5/8-in. 5-ply plywood and the nailing pattern was increased from code minimum to 4-in. centers at ends/edges and 6-in. centers in the field for increased wind resistance.
A 3-in-12 shed roof isn’t the ideal pitch for solar panels at this latitude, but it gave me the sloped ceiling I wanted inside without a too-tall wall at the back. Standing-seam galvanized steel roofing pairs well with solar panels—the rack system simply clips onto the standing seams. None of the PV system components penetrate the roof. The steel will outlast the panels, probably by decades.

There are no mechanical penetrates through the roof either. The plumbing stack and ventilation ducts/fans exit the walls. Likewise, there are no penetrations through the ceiling. Instead of ceiling light fixtures or can lights, I chose pendants that swag from outlets in the wall. It’s a personal aesthetic preference, but it does eliminate potential air leaks and insulation displacement. With no wiring to worry about, it wasn’t a problem to insulate and drywall the ceiling prior to installing partition walls.

Testing for airtightness
Blower-door testing was done at the completion of three milestones. The goal was 1 ACH50Pa.
- Test 1 was performed after the roof and windows were installed. The ceiling fiberboard was also in place and caulked to the truss framing. Result: 2.23 ACH50Pa.
- Test 2 happened after the ceiling was insulated and drywalled, and the mechanicals were in and air-sealed to the exterior sheathing—but before the walls were insulated and drywalled. Two leaks were identified; one at the perimeter of the fixed-panel sliding glass door and the other at the air-source heat pump, where the line set connecting the outdoor condenser to the indoor air handler hadn’t been air-sealed. Result: 0.87 ACH50Pa.
- Test 3 was the final measurement done once the entire envelope was insulated and air-sealed. It was to determine how well the HRVs and bath fans were working. Result: 0.38 ACH50Pa.

Together, these systems constitute some of the foundational building blocks with which high-performance homes are being constructed with more and more regularity—because they work. My home is exceptionally energy-efficient, thermally comfortable, and healthy to occupy, among many other attributes.
Amber Westerman is founder of Poem Homes in Spring Green, Wisconsin.
Photos by the author.
COMPANION ARTICLES
Fine Homebuilding Recommended Products
Fine Homebuilding receives a commission for items purchased through links on this site, including Amazon Associates and other affiliate advertising programs.

Peel & Stick Underlayment
Flashing Boot

Nitrile Work Gloves

View Comments
HI, I got everything you said except for the roof structure. A bit to much 'builder talk" for just a home owner like me. I am going to be building in Maine in couple of years and would like this information for my shed roof. Is it possible to have some dumbed down information that I could understand. Lastly, did the plumbers have any issues with you having the vents out the walls vs the roof? thanks,
Hi. Why don't you check out my Construction Blog at http://www.poemhomes.org. You'll find lots of pictures and more detailed information about the roof structure. If you have any questions, just phone or email me, I'll try to help. As for the plumbing vent, I don't know what the Code says (and it may be different in Wisconsin) about the minimum height difference needed between plumbing trap and top of vent----but I was relieved to learn that my plumber could exit out the tall north wall, and not puncture through the steel roof. Amber
I love the blog! Lots of great info there.