
Is Adding Exterior Insulation When Re-siding Your Home Worth the Cost?
Re-cladding a house is typically a once-in-multiple-generations upgrade, and can be an economical opportunity to make walls more energy efficient.
Teandrie’s Iowa home needs new siding after sustaining damage in a storm, presenting him with an opportunity to add a layer of continuous insulation on the exterior of the house.
“I am considering going with an R-5 foil-faced insulation under the siding from Johns Manville,” he writes in this Q&A post. “It will cost me about $3000 to add the insulation, and I’m trying to figure out if it is worth that investment.”
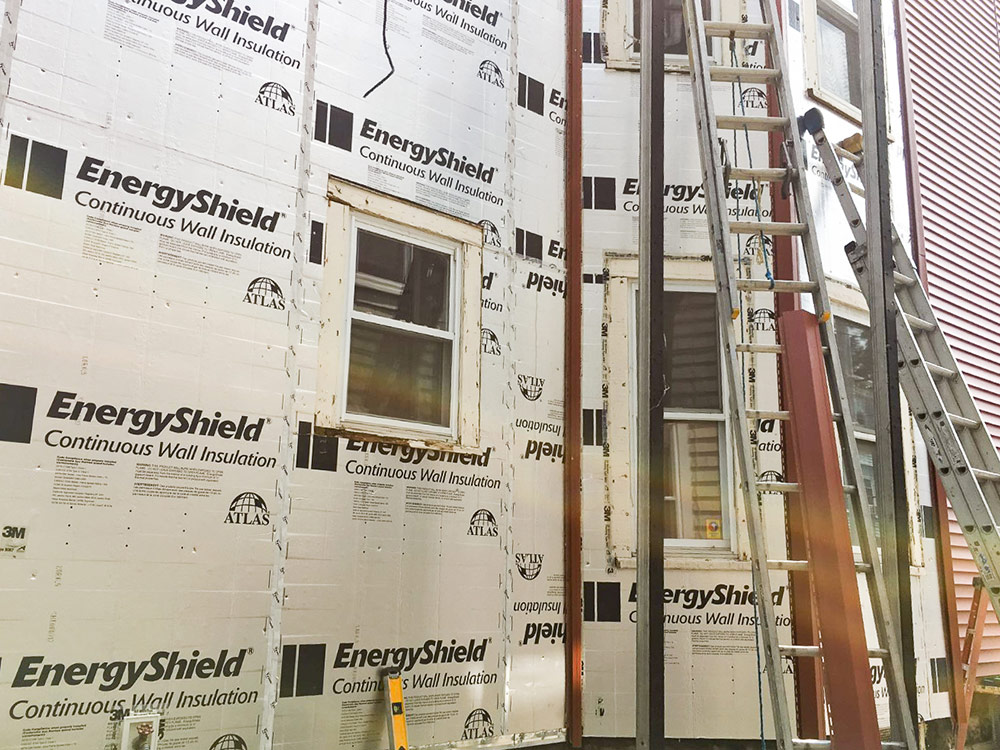
The 2004 house, located in climate zone 5, has 2×6 walls insulated with batts. The plan is to leave the housewrap that’s already there, then add the 3/4-in. layer of insulation, and another layer of Tyvek to seal the building. He’s also planning to install new windows, upgrade the attic insulation from R-28 to R-60, and air-seal around recessed lights below the attic.
Teandrie says the contractor has balked at adding thicker exterior insulation because he thinks it will be too difficult to work around exterior electrical outlets. Teandrie also is concerned about two outdoor hose bibs, which have been spray foamed into place and are now immovable.
“Any thoughts or suggestions you have would be welcome,” he adds, and that’s where this Q&A Spotlight begins.
Outlet issue is an easy fix
The contractor’s concerns about exterior outlets is a pretty easy fix, says Kyle Bentley. There are many different types of weatherproof receptacle extensions that can compensate for the insulation layer, he writes, including one he found at Lowe’s. Or, says Zephyr7, put a cover plate with a knockout over the original box, then install a new box in front. This would accommodate the added thickness of insulation while leaving the original box accessible to satisfy code.
Likewise, there are simple solutions to refitting the outside faucets. Replace them if need be, says Bentley, or build small bucks around them. Energy losses would be minimal.
The larger issue, of course, is whether the $3000 for the extra insulation is a good investment.
“It will reduce the amount of energy required to heat and cool your home, with a few caveats,” Bentley says. “Air leakage can reduce insulation efficiency quite substantially if there are a lot of leaks. Large thermal ‘holes’ can make the addition of insulation futile, as all the energy will still flow out of them.”
Still, he says, the opportunity to add exterior insulation is unlikely to present itself again for decades, so Teandrie should go ahead with it. There may, he adds, be incentives for energy upgrades that would soften the blow.
Complications of added insulation
The insulation question may not be as simple as it seems, says Walter Ahlgrim.
“From a financial point of view, the question becomes, ‘Will this insulation reduce the amount of fuel I will purchase enough to recover its cost before I sell this home?'” Ahlgrim says. “From a green point of view, ‘Will covering my house in foam reduce my carbon footprint?’ From an aesthetic point of view, ‘Will the added insulation distort all the trim details and make the house unappealing?'”
None of these questions has a clear answer, Ahlgrim adds.
Variables include how long Teandrie plans on owning the house, what fuel he uses for heating, what fuel costs will do in the future, and whether he could earn more by investing the $3000 elsewhere.
“The only way I know to answer the financial question is to build a computer model of your home and run the numbers with the BEopt program,” he says, referring to software available from the National Renewable Energy Laboratory.
More insulation would be better, Akos writes. With a 2×6 wall, adding R-5 of exterior insulation would be an improvement, but it will not make a dramatic difference. Bumping that to R-10 would be bigger change and worth the extra labor. Even with 1-1/2 in. of new insulation, most siding could be attached directly through the foam.
Air-sealing is the bigger deal
What will really make a difference in comfort, Akos adds, is air-sealing the house. The simplest way to accomplish that would be to tape the seams on the sheathing after removing the existing housewrap, paying particular attention to sealing the sheathing to the foundation.
“I think Akos hit it on the head,” says Josh Salinger. “If you are replacing the siding, which only happens once every few decades, it is a huge opportunity to address the air leakage.”
Salinger recommends removing the existing Tyvek because it will be redundant in the new wall assembly. He adds: “Taping the seams and sealing the sheathing to the foundation and detailing the punched openings will have a much bigger effect on energy usage and comfort (not to mention air quality and durability) than adding the insulation.”
But at $3000, the layer of exterior insulation is a “screaming bargain,” Salinger adds. Teandrie should jump at the chance, especially if he has no plans to move.
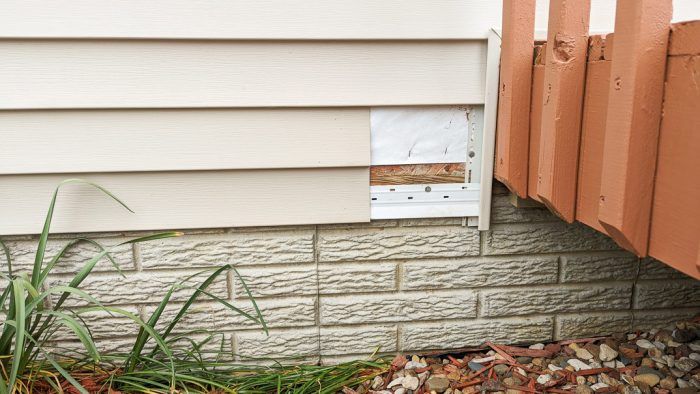
Teandrie has done some sleuthing on the house by pulling a small section of siding to see what’s underneath. What he found was that the original Tyvek ended some 9 in. above the bottom of the wall—meaning the sill was not covered at all. It made him think that the air-sealing might pay bigger dividends than adding 3/4 in. of insulation.
“I would do both,” Salinger replies, “but if it came down to choosing between the insulation and the air barrier, I would choose the air barrier.”
He suggests removing the existing Tyvek, taping the seams of the sheathing, then installing a layer of Tyvek for bulk-water control. There would be no need to tape the seams of the new housewrap. At the sheathing-foundation intersection, Salinger recommends Siga Fentrim tape.
An air barrier could be created at the sheathing, the housewrap, or even at the exterior of the rigid foam. By taping the seams of the sheathing, the air barrier is in a protected place, and it should prove more durable, Salinger says.
“It should be noted that an air barrier is a system and not a material,” Salinger adds. “The tapes, membranes or sheathing are all parts of the air barrier system.”
Our expert’s opinion
We asked Kohta Ueno, a senior associate at Building Science Corporation (BSC), to offer a few thoughts. Here’s what he had to say:
First, the TLDR version of what I have to add:
- R-5 continuous exterior insulation over a 2×6 wall is very likely to pencil in as an economic winner in Climate Zone 5, based on previous modeling from BSC and more recent modeling from the Pacific Northwest National Lab.
- Given thermal bridging through a 2×6 wall, a nominal R-19 wall is closer to R-12 or possibly worse, given typical fiberglass batt installation with voids and gaps. This puts the R-5 upgrade in a bit more context.
- Re-cladding a house is typically a once-in-multiple-generations upgrade, and is a perfect opportunity to economically upgrade the wall. Re-siding while failing to upgrade the wall is a missed opportunity.
- Upgrading to 1 in. rather than 3/4-in. rigid insulation would both improve the wall thermal performance and condensation/moisture safety. Also, 1 in. is the maximum thickness allowed by vinyl siding manufacturers. For more on foam thickness: Calculating the Minimum Thickness of Rigid Foam Sheathing
- As discussed by others, detailing around mechanical penetrations and window/door openings is a solvable problem. On my own home (Boston area, triple-decker), the local siding contractor didn’t bat an eye at adding 1 in. of insulation underneath vinyl siding—it is one of his day-in day-out options.
- I agree with all the folks pointing out the air barrier aspects of this upgrade—taping the structural sheathing joints and the wall-to-foundation joint are great options.
- If you wanted to ‘pull back’ some costs from adding rigid insulation, an alternative to installing a layer of housewrap over the foam is to tape the foam joints to make the face of the foam the water control layer/WRB. It can also act as an air barrier, but will require more thought in detailing.
Getting into these topics in a bit more detail:
Economics: Running tuned energy simulations of your existing house and then calculating the impact of the exterior insulation (and possibly airtightness improvements) is the most rigorous way to figure out if that $3000 pays off, accounting for fuel costs and equipment efficiency.
However, BSC ran a bunch of simulations with assumed fuel costs and installation costs in a 2013 report (BA-1314: Cladding Attachment Over Thick Exterior Insulating Sheathing). Take a look at the BEopt curves in Appendix A, for multiple climate zones. Assuming a 2×4 wall and cold climates (Kansas City, Boston, Duluth), the winners (best optimized bottom-of-curve values) are #2 (1-in. foam) and #3 (1.5-in. foam). Going thicker means that you have to install strapping to support your cladding, which drives up the costs.
Also, the National Renewable Energy Laboratory spent a bunch of time looking at this problem in “Residential Façade Retrofits Modeling: NREL Documentation”2021-12-14 NREL Residential Façade Retrofits Modeling Report (Present, Wilson, and Romero, 2021). They did a massive number of simulations trying to roughly gauge the cost-effectiveness of various façade (wall and window) retrofit measures. Takeaway: in cold and mixed-humid climates, 1 in. of foam is a no-brainer retrofit, with typical simple paybacks well within the 10-year time frame (see Figure 11 in the report: Distributions of simple payback period for all seven upgrades, separated by climate zone). Other interesting takeaways: none of these measures make sense in warm climates (hot dry/hot humid or marine). Triple-pane windows commonly have a very long payback, even in cold climates.
Carbon accounting: For reference, polyisocyanurate is one of the less-carbon-intensive of the foam plastic insulation boards—according to this GBA column, better than many of the other rigid board foam options.
Missed opportunities: Betsy Pettit and Ken Neuhauser stated the missed opportunity when doing renovations better than I can in the Mass Save DER Guide:
The best time to perform a DER [deep energy retrofit] for a major building system is when repairs or renovations are needed for that building system. For example, a re-roofing project (made necessary by the existing roof condition) is likely to represent the best opportunity to provide a super-insulated roof and bring the attic into conditioned space. The cost for superinsulation of exterior walls (for an existing home) is typically lowest when siding and trim are being replaced. In fact, even when facing the expense of re-painting an exterior, it is worth considering whether those resources might be directed toward a DER for the exterior wall that will essentially eliminate the need for painting for many years into the future.
One of the early participants in the National Grid Deep Energy Retrofit Pilot program observed that significant expenditures to replace (as in siding or windows) or renovate (such as a basement or attic) a building component essentially prevents that building component from receiving further performance improvement for the life of the component. In other words, once windows are replaced, a roof is re-roofed, or siding is removed and reinstalled on an exterior wall, it is very unlikely that these systems will be upgraded for a long time. Certainly, once the renovation or replacement has been implemented, the most cost-effective opportunity for a high-performance retrofit is past.
Vinyl siding: I can’t speak for the specific product being used here, but vinyl siding manufacturers commonly have a limit of 1 in. of rigid foam thickness for “direct nailing” (back to the sheathing or studs), with requirements for minimum nail length and penetration. For instance, CertainTeed’s installation manual states:
NOTE: Vinyl siding must be applied over a rigid sheathing that provides a smooth, flat surface or an underlayment (such as wood, wood composition, rigid foam, or fiber sheathing) that is no more than 1-in. thick. Vinyl siding cannot be applied over open studs.
Taped foam: BSC’s report on using the exterior face of rigid foam insulation as a taped water control layer/WRB is covered in BA-1301: Guidance on Taped Insulating Sheathing Drainage Planes—Final Report. Joe Lstiburek has some entertaining discussion on this topic in BSI-067: Stuck On You. Takeaway: if you wanted to pull back some cost, taping the rigid foam with a high-quality tape (3M 8067 would be my go-to) is an alternative to going around the house a second time with a layer of housewrap. If you wanted to ask, “Do you trust that system,” my answer is: “Yes, definitely,”—that is what is on the outside of my house.
Originally published on GreenBuildingAdvisor.com. Scott Gibson is a contributing writer at GBA and Fine Homebuilding magazine. Reader comments may have been edited for clarity. For a look at the complete thread, use the link at the top of this column.
Fine Homebuilding Recommended Products
Fine Homebuilding receives a commission for items purchased through links on this site, including Amazon Associates and other affiliate advertising programs.

Caulking Gun

Insulation Knife
Staple Gun
