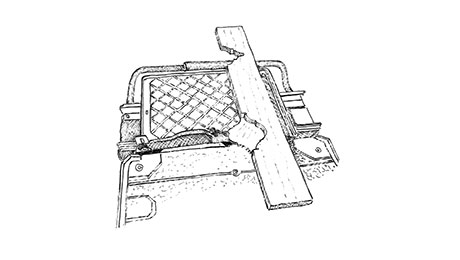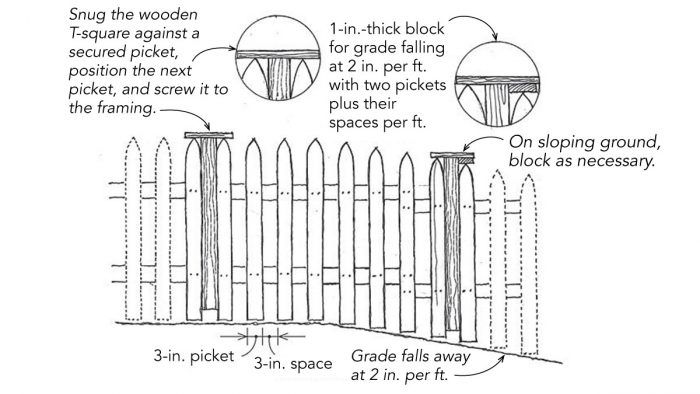
When I built a picket fence around my yard, I wanted it to blend seamlessly into the landscaping by rising and falling in equal measure with the terrain. I also wanted it to be easy to install. To achieve these goals, I created a simple jig. As shown in the drawing above, I ripped a piece of scrap to the 3-in. width of the space between the pickets and attached another small piece of scrap to the top. The jig, which is basically a wooden T-square, indexes off the height of the installed picket, leaving my hands free to attach the next one with my screw gun.
In addition to speeding things up on level ground, the jig helped in areas where the elevation changed. I needed to make only two simple measurements to have the fence rise or fall evenly with the ground.
I measured the distance to the end of the change in elevation and the total difference in elevation. By dividing the distance to the end of the rise or fall by the width of a picket and its accompanying open space (3 in. + 3 in. = 6 in.), I knew how many pickets would be affected by the change in elevation. By dividing the total change in elevation by the number of pickets affected, I knew how far each picket would have to move up or down. In the example shown here, the grade falls 8 in. in 4 ft. That works out to 2 in. per ft., or 1 in. per picket.
The jig made it easy to change the height of each picket by a set increment. I used small pieces of scrap of various thicknesses and in various combinations to adjust the T-square’s crossbar as necessary. In this example, the spacer is 1 in. thick. This setup allowed me to modify the jig in less than a minute to compensate for elevation changes.
Jane McClintock, Urbana, IL
Edited and Illustrated by Charles Miller
From Fine Homebuilding #222