FHB Logo Facebook LinkedIn Email Pinterest Twitter Instagram Plus Icon Close Icon Navigation Search Icon Navigation Search Icon Arrow Down Icon Video Guide Icon Article Guide Icon Modal Close Icon Guide Search Icon Skip to content
Subscribe

In every issue you'll find...

  • Expert insights on techniques and principles
  • Unbiased tool reviews
  • Step-by-step details to master the job
  • Field-tested advice and know-how
Subscribe Now!
Subscribe
  • How-To
  • Design
  • Tools & Materials
  • Videos
  • Blogs
  • Forum
  • Magazine
  • Members
  • FHB House
  • Podcast
  • Join
  • Log In
Subscribe
How-To

Framing a Cathedral Ceiling

To avoid a sagging ridge or bowed walls, start by understanding how a typical roof frame works

By Scott McBride Issue 77
Interior framing

Q:

The plans for a house I am building call for a great room with a cathedral ceiling. The room measures 26 ft. along the eaves walls and 20 ft. 8 in. across the gable end. How can I remove the ceiling joists without allowing the ridge to sag or the walls to bow out?

S. A. Macioce, Pittsburgh, PA

A:

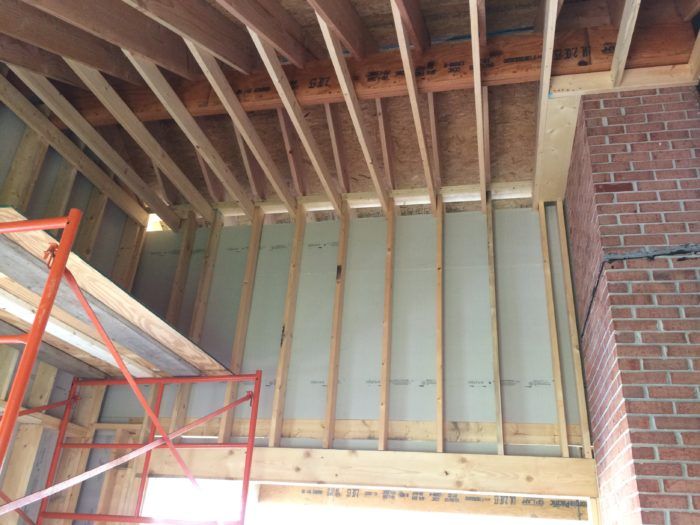
Contributing editor Scott McBride replies: To avoid these problems in a structure with a cathedral ceiling, it helps to understand how a typical roof frame works. A plain flat-ceiling gable is actually a procession of light trusses, usually spaced 16 in. o. c. Each truss is composed of two opposing rafters and a ceiling joist. The rafters are in compression, pushing outward on the eaves walls, and the ceiling joists are in tension, pulling inward on the eaves walls.

As a first option in enlarging the ceiling space, you can move the ceiling joists up the rafters, making them collar ties, as shown in the drawing below. The portion of each rafter that extends below the collar tie is actually a cantilever; its stiffness transmits the tension action of the collar tie down to the plate, preventing the walls from bowing. The farther up the collar tie is moved, the longer the cantilever of the rafter becomes. Depending on the stiffness of the rafter stock, a point will be reached where the rafter starts to bend outward below the collar tie. This pushes the walls out and allows the ridge to sag. As a general rule of thumb, when ceiling joists are moved up to become collar ties, they should be moved up no more than one-third the length of the rafter.

move the ceiling joists up the rafters, making them collar ties

The next option you can consider in opening up the ceiling frame is to remove some of the ceiling joists or collar ties while leaving the full complement of rafters in place. Typically, this is done by leaving every third collar tie and removing the two in between, as shown in the drawing. You still have rafters 16 in. o. c., so you can easily cover the underside of the roof with drywall and its outside with plywood. But the spacing of the ties is reduced to 48 in. o. c., and the flat ceiling is eliminated. The collar ties can be wrapped with drywall, or a higher grade of lumber can be used and left exposed. In a frame like this, the remaining collar ties are often doubled up, putting one 2x on each side of the rafter. This balances the construction and makes it look beefier. (The channel between the 2xs is a good place for concealed track lighting; light can be bounced off the sloped ceiling down into the room.) Bolts are the best fasteners for the rafter/ collar-tie connection. If you nail the collar tie to the rafter, use plenty of 16d commons and angle them toward the center of the building; this will cause them to dig in as the rafter pushes out.

remove some of the ceiling joists or collar ties while leaving the full complement of rafters in place

You can get away with removing two out of every three collar ties because the eaves-wall plate acts as a horizontal beam. It transfers the outward thrust of the two intervening 16-in. o. c. rafters out to where the opposing plates are tied together by the remaining collar ties. Incidentally, the 48-in. o. c. rule for collar-tie spacing prevailed in the days of 2×4 walls. Because most exterior walls are now framed with double 2×6 top plates, you might be able to increase that spacing, depending on the weight of the roof. Obviously, your final design should be reviewed by an architect or an engineer.

The final option for opening up the ceiling space would be to hang all the rafters on a structural ridge beam supported at each end by a wall, as shown in the drawing below left. This beam must be capable of carrying half the weight of the entire roof. The other half is carried by the eaves walls. The nice thing about this approach is its simplicity. The not-so-nice thing is getting such a large beam up there in the first place. In your case, a 26-ft. long beam is going to be mighty hefty. If you’ve got a crane handy, you could use a one-piece beam such as a steel I-beam or a wood glulam. If you’re relying on muscle power, you’ll probably want to set up pipe scaffolding so that you can sandwich the beam together in place from smaller members. These might include 2x lumber, 1-3/4 in. thick Micro-Lams or steel flitch plates.

hang all the rafters on a structural ridge beam supported at each end by a wall

For more on cathedral ceilings:

Comfortable Cathedral Ceilings — Cathedral ceilings can leave large rooms feeling cavernous and off-putting. Here are some techniques for making these spaces more attractive and more comfortable.

Open Up a Ceiling With a Steel Sandwich — An angled steel flitch plate bolted between rafters eliminates the need for rafter ties in this cathedral ceiling.

Ceiling Remodel: From Flat to Cathedral — Opening up a flat ceiling in the family room of this ranch-style house transformed the space.

Insulating a Cathedral Ceiling — Martin Holladay explains how to insulate and detail a cathedral ceiling to avoid moisture problems.


Sign up for eletters today and get the latest how-to from Fine Homebuilding, plus special offers.

Signing you up...

This site is protected by reCAPTCHA and the Google Privacy Policy and Terms of Service apply.
See all newsletters
See all newsletters
×

Get home building tips, offers, and expert advice in your inbox

Signing you up...

This site is protected by reCAPTCHA and the Google Privacy Policy and Terms of Service apply.
See all newsletters
See all newsletters

New Feature

Fine Homebuilding Forums

Ask questions, offer advice, and share your work

Log in or create an account to post a comment.

Sign up Log in

Become a member and get full access to FineHomebuilding.com

Up Next

Video Shorts

Featured Story

Q&A With Sarah Vadney, Historic Preservationist

Sarah talks with Fine Homebuilding about the skills needed for historic preservation and changing the trades to make room for caregivers.

Featured Video

Builder’s Advocate: An Interview With Viewrail

Learn more about affordable, modern floating stairs, from design to manufacturing to installation.

Related Stories

  • Insulating a Roof: Getting Higher R-Value
  • Dress Up a Ceiling With Reclaimed Beams
  • Balancing Design and High-Performance Construction
  • Rainwater Storage and Fence in One

Discussion Forum

Recent Posts and Replies

  • |
  • |
  • |
  • |
  • |
  • |
View More Create Post

Highlights

Fine Homebuilding All Access
Fine Homebuilding Podcast
Tool Tech
Plus, get an extra 20% off with code GIFT20

"I have learned so much thanks to the searchable articles on the FHB website. I can confidently say that I expect to be a life-long subscriber." - M.K.

Get home building tips, offers, and expert advice in your inbox

Signing you up...

This site is protected by reCAPTCHA and the Google Privacy Policy and Terms of Service apply.
See all newsletters
See all newsletters

Video

View All
  • Podcast 503: Not Quite a Scrape-Off, Too Tight for Insulation, and Weather-Beaten Felt Paper
  • Taping Drywall Ceilings
  • Hang Drywall on the Ceiling the Right Way
  • Podcast Episode 86 — "Build On, Baby!"
View All

Ceilings

View All Ceilings Articles
  • outside of house
    High Ceilings in the Hills
  • strengthening notched floor joists
    Strengthening Notched Floor Joists
  • Mounting a Minisplit in an Out-of-Level Ceiling
  • Finished FHB House WI at sunset
    Build or Build Not, There is No Try
View All Ceilings Articles

BOOKS, DVDs, & MERCH

Shop the Store
  • 2022 Fine Homebuilding Archive
    Buy Now
  • Pretty Good House
    Buy Now
  • 2023 Tool Guide
    Buy Now
  • Code Check Building 4th Edition
    Buy Now
  • Shop the Store

Fine Homebuilding Magazine

  • Issue 313 - Feb/March 2023
    • Practical System for a Seismic Retrofit
    • Fine Homebuilding Issue #313 Online Highlights
    • Practical System for a Seismic Retrofit
  • Issue 312 - Dec 2022/Jan 2023
    • Tool Test: Cordless Tablesaws
    • Gray-Water System for a Sustainable Home
    • Insulate a Cape Roof to Avoid Ice Dams
  • Issue 311 - November 2022
    • 7 Steps to a Perfect Exterior Paint Job
    • Options for Smarter Home-Energy Tracking
    • The Fine Homebuilding Interview: James Metoyer
  • Issue 310 - October 2022
    • Choosing a Tile-Leveling System
    • Choosing Between HRVs and ERVs
    • Custom Built-in Cabinets Made Easy
  • Issue 309 - Aug/Sept 2022
    • 10 Steps to Install Crown Molding on Cabinets
    • How to Get Sturdy Walls Without OSB
    • Choosing the Right Construction Tape for the Job

Fine Homebuilding

Follow

  • twitter
  • facebook
  • instagram
  • pinterest

Newsletter

Get home building tips, offers, and expert advice in your inbox

Signing you up...

This site is protected by reCAPTCHA and the Google Privacy Policy and Terms of Service apply.
See all newsletters
See all newsletters

Membership & Magazine

  • Online Archive
  • Start Free Trial
  • Magazine Subscription
  • Magazine Renewal
  • Gift a Subscription
  • Customer Support
  • Privacy Preferences

Taunton Network

  • Green Building Advisor
  • Fine Woodworking
  • Fine Gardening
  • Threads
  • About
  • Contact
  • Advertise
  • Careers
  • Copyright
  • Terms of Use
  • Site Map
  • Do not sell or share my information
  • Privacy Policy
  • Accessibility
  • California Privacy Rights

© 2023 The Taunton Press, Inc. All rights reserved.

X
X
This is a dialog window which overlays the main content of the page. The modal window is a 'site map' of the most critical areas of the site. Pressing the Escape (ESC) button will close the modal and bring you back to where you were on the page.

Main Menu

  • How-To
  • Design
  • Tools & Materials
  • Video
  • Blogs
  • Forum
  • Reader Projects
  • Magazine
  • Members
  • FHB House

Podcasts

  • FHB Podcast
  • ProTalk

Webinars

  • Upcoming and On-Demand

Account

  • Log In
  • Join

Podcasts

  • FHB Podcast
  • ProTalk

Webinars

  • Upcoming and On-Demand

Popular Topics

  • Kitchens
  • Business
  • Bedrooms
  • Roofs
  • Architecture and Design
  • Green Building
  • Decks
  • Framing
  • Safety
  • Remodeling
  • Bathrooms
  • Windows
  • Tilework
  • Ceilings
  • HVAC

Magazine

  • Current Issue
  • Past Issues
  • Magazine Index
  • Subscribe
  • Online Archive
  • Author Guidelines

All Access

  • Member Home
  • Start Free Trial
  • Gift Membership

Shop the Store

  • Books
  • DVDs
  • Taunton Workshops

More

  • FHB Ambassadors
  • Reader Projects
  • Podcast
  • Customer Support

Account

  • Log In
  • Join

Newsletter

Get home building tips, offers, and expert advice in your inbox

Signing you up...

This site is protected by reCAPTCHA and the Google Privacy Policy and Terms of Service apply.
See all newsletters
See all newsletters

Follow

  • twitter
  • facebook
  • instagram
  • pinterest

Join All Access

Become a member and get instant access to thousands of videos, how-tos, tool reviews, and design features.

Start Your Free Trial

Subscribe

FHB Magazine

Start your subscription today and save up to 70%

Subscribe

We hope you’ve enjoyed your free articles. To keep reading, become a member today.

Get complete site access to expert advice, how-to videos, Code Check, and more, plus the print magazine.

Start your FREE trial

Already a member? Log in