FHB Logo Facebook LinkedIn Email Pinterest Twitter Instagram Plus Icon Close Icon Navigation Search Icon Navigation Search Icon Arrow Down Icon Video Guide Icon Article Guide Icon Modal Close Icon Guide Search Icon Skip to content
Subscribe

In every issue you'll find...

  • Expert insights on techniques and principles
  • Unbiased tool reviews
  • Step-by-step details to master the job
  • Field-tested advice and know-how
Subscribe Now!
Subscribe
  • How-To
  • Design
  • Tools & Materials
  • Videos
  • Blogs
  • Forum
  • Magazine
  • Members
  • FHB House
  • Podcast
  • Join
  • Log In
Subscribe
How-To

Making a Bullnose Starting Step

You don't have to buy this classic detail; kerf-bending oak is easier than it looks.

By Stephen Winchester Issue 82

Synopsis: A carpenter and woodworker explains how to make a bullnose starter step in the shop with simple tools and techniques. The secret is in careful saw kerfing of the riser, allowing it to bend easily in a semi-circular shape. A sidebar has details on installing the bottom newel so it won’t wobble.

Most trim carpenters are comfortable hanging doors and casing windows, but when it comes to stairs, they call in a specialist. Stairs really aren’t that difficult to construct and install if you take a bit of care, don’t rush and make your joints as if the President himself were going to inspect your work.

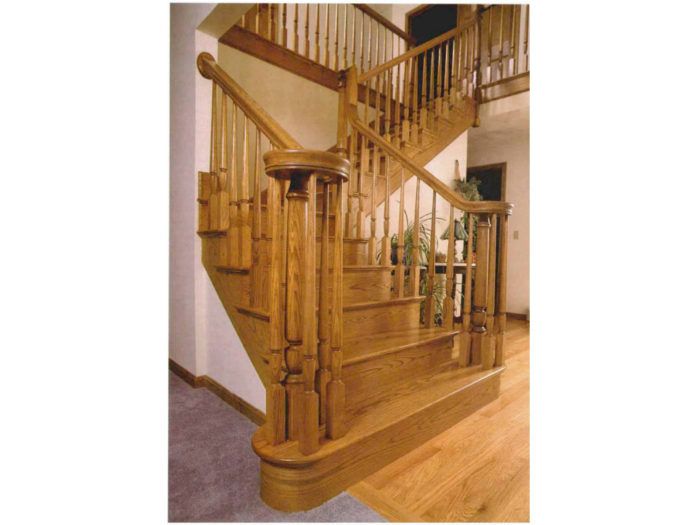
On a recent job, I built a staircase with a double-bullnose starting step. The starting step is the first riser and tread on a stair. It’s wider than the rest of the staircase and has curved ends, called bullnoses, that anchor the newel posts. In this article I’ll explain how I made the starting step pictured in this article. Each staircase is different, so the dimensions I use here won’t work for every stair, but the technique applies to any starting step.

Start with the tread

I have a small shop where I make treads, risers and moldings, but these components could also be made on site. I don’t have a lathe, however, so I buy manufactured newels and balusters rather than make them. I also buy handrails and fittings. The stairs themselves, on the other hand, I usually frame on site, which is what I did on this project.

After installing the mitered finish stringers (the trim boards on the sides of the stairs) over the rough stringers and drywall, I measured the finished width of the staircase at the bottom step. On the starting step this is the dimension between the curved ends of the riser. The width of this stair is 42 1/2 in. The bullnoses extend about 14 in. beyond the finished stringers, so the overall length of the starting tread blank is 70 1/2 in. But I don’t cut the tread to the exact length yet.

If I have a wide enough piece, I make my tread blank from solid stock. Otherwise, I glue it up from narrower stock and match the grain so that the tread doesn’t look like a zebra. Manufactured tread blanks will work, but they’re often glued up from narrower stock, and the grain doesn’t always match. For this stair the run, or tread depth, is 10 1/2 in. I added 1 1/8 in. for nosing on the front and another 1 1/8 in. for nosing on the back of the tread where the bullnose ends curve around. So I needed 12 3/4-in. wide stock. I use 1-in. thick stock for treads; 3/4-in. stock is okay but looks a little flimsy.

To get 1 1/8-in. nosing all around the starting tread, it’s necessary to notch the back of the tread so that it fits over the second riser. The length of this notch equals the finished width of the stairs — 42½ in — and its depth equals the size of the nosing: 1 1/8 in. When notched, the tread is 11 5/8 in. deep where it hits the second riser and 12 ¾ in. deep only on the bullnose ends.

For more photos, illustrations, and details, click the View PDF button below:

Sign up for eletters today and get the latest how-to from Fine Homebuilding, plus special offers.

Signing you up...

This site is protected by reCAPTCHA and the Google Privacy Policy and Terms of Service apply.
See all newsletters
See all newsletters
×

Get home building tips, offers, and expert advice in your inbox

Signing you up...

This site is protected by reCAPTCHA and the Google Privacy Policy and Terms of Service apply.
See all newsletters
See all newsletters
View PDF

New Feature

Fine Homebuilding Forums

Ask questions, offer advice, and share your work

Log in or create an account to post a comment.

Sign up Log in

Become a member and get full access to FineHomebuilding.com

Up Next

Video Shorts

Featured Story

The Fine Homebuilding Interview: Emily Mottram

A Maine architect speaks about Pretty Good House and biophilic design principles that adapt to all climates.

Featured Video

Builder’s Advocate: An Interview With Viewrail

Learn more about affordable, modern floating stairs, from design to manufacturing to installation.

Related Stories

  • Forming Foundation Walls
  • Podcast 481: Members-only Aftershow
  • Podcast 479: One Story or Two, Basement Bunkers, and the Best DIY Spray Foam
  • Podcast 478: PRO TALK With Home-Technology Expert Mike Bennett

Discussion Forum

Recent Posts and Replies

  • |
  • |
  • |
  • |
  • |
  • |
View More Create Post

Highlights

Fine Homebuilding All Access
Fine Homebuilding Podcast
Tool Tech
Plus, get an extra 20% off with code GIFT20

"I have learned so much thanks to the searchable articles on the FHB website. I can confidently say that I expect to be a life-long subscriber." - M.K.

Get home building tips, offers, and expert advice in your inbox

Signing you up...

This site is protected by reCAPTCHA and the Google Privacy Policy and Terms of Service apply.
See all newsletters
See all newsletters

Video

View All
  • How to Repair Shrinking Crown Molding
  • Installing Exterior PVC Window and Door Trim
  • Exterior PVC Trim: Wire and Pipe Penetrations
  • Installing Exterior PVC Trim Corner Boards
View All

Finish Carpentry

View All Finish Carpentry Articles
  • An open container of wood putty
    Filling Nail Holes in Stained Trim
  • A piece of straight and curbed copper tubing
    Scribe Perfect Curves with Copper Tubing
  • Foolproof Insert Cabinet Doors
    Foolproof Inset Cabinet Doors
  • casing miters
    Getting Casing Miters Tight
View All Finish Carpentry Articles

BOOKS, DVDs, & MERCH

Shop the Store
  • Outdoor Projects
    Buy Now
  • Pretty Good House
    Buy Now
  • 2021 Fine Homebuilding Archive
    Buy Now
Shop the Store

Fine Homebuilding Magazine

  • Issue 309 - Aug/Sept
    • 10 Steps to Install Crown Molding on Cabinets
    • How to Get Sturdy Walls Without OSB
    • Choosing the Right Construction Tape for the Job
  • Issue 308 - July 2022
    • Pretty Good House Book Excerpt: Copper Farmhouse
    • 10 Dos and Don'ts for Electric In-Floor Heat
    • A Sturdy Rail for Outdoor Stairs
  • Issue 307 - June 2022
    • How to Raise a Post-Frame Home
    • Trimming Deck Stairs
    • Evolving an Energy-Efficient Envelope
  • Issue 306 - April/May 2022
    • Framing Stairs to an Out-of-Level Landing
    • Building a Zero-Energy Home for Less
    • Good-Looking and Long-Lasting Traditional Gutters
  • Issue 305 - Feb/March 2022
    • The Steady Surge in Residential Solar
    • The Fine Homebuilding Interview: William B. Rose
    • How Good Is Your Air Barrier?

Fine Homebuilding

Follow

  • twitter
  • facebook
  • instagram
  • pinterest

Newsletter

Get home building tips, offers, and expert advice in your inbox

Signing you up...

This site is protected by reCAPTCHA and the Google Privacy Policy and Terms of Service apply.
See all newsletters
See all newsletters

Membership & Magazine

  • Online Archive
  • Start Free Trial
  • Magazine Subscription
  • Magazine Renewal
  • Gift a Subscription
  • Customer Support
  • Privacy Preferences

Taunton Network

  • Green Building Advisor
  • Fine Woodworking
  • Fine Gardening
  • Threads
  • About
  • Contact
  • Advertise
  • Careers
  • Copyright
  • Terms of Use
  • Site Map
  • Do not sell my information
  • Privacy Policy
  • Accessibility
  • California Privacy Rights

© 2022 The Taunton Press, Inc. All rights reserved.

X
X
This is a dialog window which overlays the main content of the page. The modal window is a 'site map' of the most critical areas of the site. Pressing the Escape (ESC) button will close the modal and bring you back to where you were on the page.

Main Menu

  • How-To
  • Design
  • Tools & Materials
  • Video
  • Blogs
  • Forum
  • Reader Projects
  • Magazine
  • Members
  • FHB House

Podcasts

  • FHB Podcast
  • ProTalk

Webinars

  • Upcoming and On-Demand

Account

  • Log In
  • Join

Podcasts

  • FHB Podcast
  • ProTalk

Webinars

  • Upcoming and On-Demand

Popular Topics

  • Kitchens
  • Business
  • Bedrooms
  • Roofs
  • Architecture and Design
  • Green Building
  • Decks
  • Framing
  • Safety
  • Remodeling
  • Bathrooms
  • Windows
  • Tilework
  • Ceilings
  • HVAC

Magazine

  • Current Issue
  • Past Issues
  • Magazine Index
  • Subscribe
  • Online Archive
  • Author Guidelines

All Access

  • Member Home
  • Start Free Trial
  • Gift Membership

Shop the Store

  • Books
  • DVDs
  • Taunton Workshops

More

  • FHB Ambassadors
  • Reader Projects
  • Podcast
  • Customer Support

Account

  • Log In
  • Join

Newsletter

Get home building tips, offers, and expert advice in your inbox

Signing you up...

This site is protected by reCAPTCHA and the Google Privacy Policy and Terms of Service apply.
See all newsletters
See all newsletters

Follow

  • twitter
  • facebook
  • instagram
  • pinterest

Join All Access

Become a member and get instant access to thousands of videos, how-tos, tool reviews, and design features.

Start Your Free Trial

Subscribe

FHB Magazine

Start your subscription today and save up to 70%

Subscribe

We hope you’ve enjoyed your free articles. To keep reading, become a member today.

Get complete site access to expert advice, how-to videos, Code Check, and more, plus the print magazine.

Start your FREE trial

Already a member? Log in