Framing a Bay-Window Roof
It's only a small hip roof, but its 45-degree corners befuddle many carpenters. Drawing bay roofs out full scale is key to fast and accurate framing.
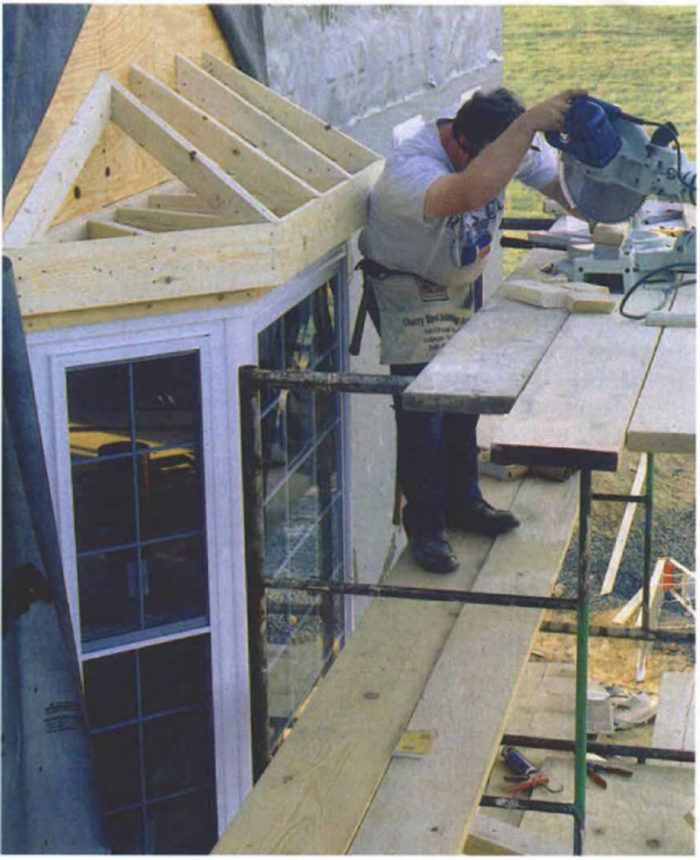
Synopsis: Framing a hipped roof for a bay window is harder than it looks. This article explains how to lay out framing members with the help of full-scale graphic templates.
For as long as architects have been drawing bay windows, carpenters have been scratching their heads over how to frame the roofs. Victorian builders sometimes got around the problem by letting two-story bays die into a projection of the main roof above. Tract builders in the 1950s did likewise by tucking bay windows under overhanging second floors or wide eaves. A well designed bay window should match the proportions of the facade where it sits.
When a bay bumps out on its own, it needs a miniature hip roof to keep out the elements. Because the corners of bay windows aren’t square, neither is the roof above, and figuring the rafter cuts isn’t straightforward. I’ve built many of these roofs and have worked out a system that does the job without guesswork.
Roofs on manufactured or site-built bays are much the same
The skeleton of a bay roof consists of two parts. The first part is the cornice, an assembly of horizontal lookouts tied together by subfascias. (A subfascia will receive a finished material, in this case aluminum coil stock. If you’re planning to install a painted wood fascia, you can substitute the finished fascia material for the subfascia.) A horizontal ledger carries the lookouts where they are attached to the building.
The common rafters for the middle roof, hip rafters and jack rafters comprise the second part of the skeleton. The side roofs also require sloped ledgers to support the sheathing where it meets the building.
Bays can be site-framed or manufactured units. When the walls of a bay are framed on site, the horizontal lookouts double as ceiling joists. In that case, the lookouts bear directly on the wall’s top plates.
When I’m installing a manufactured bay, as I did for this article, the bay’s plywood headboard provides the ceiling. With the bay installed, I screw through the headboard to affix 2×4 plates above, parallel with the bay’s outside edges. I nail a second plate atop the first. This step makes room for a 3-in. frieze above the windows, which I think looks better than having the fascia directly above the glass. Raising the overhang lets in more light and provides room for insulation, which must usually be installed before the roof is sheathed. As a final plus, adding plates to the headboard provides a meatier surface for nailing the lookouts.
There are no rectangles in a hipped bay roof
A frequent mistake is framing the middle roof as a rectangle, using common rafters as hips. This error makes the side roofs steeper than the middle roof. The result looks clunky, and the disparity in pitch complicates the cornice details.
Bisecting the bay angle with a hip shapes the middle roof as a trapezoid and also ensures that the middle roof and the side roofs will be equally pitched.
Before attaching the plates, I draw the center line of each hip on the headboard, extending the line all the way to the house. To find the center lines, remember that the angle encompassed by a bay window is not its nominal angle, in this case 45°, but rather its supplement. (An angle plus its supplement equals 180°.) So the outer corners of a 45° bay each encompass an angle of 135°. The hips bisect these angles, so the hip center-line angle for a 45° bay is half of 135°, or 67.5°. The other common bay angle is 30°. The techniques in this article work on 30° bays, or bays of any angle for that matter, but you’ll have to adjust the angles accordingly.
To lay out the hip center line accurately, I use a framing square. Conveniently, a 5:12 angle on a framing square is equal to 67.5°, the hip angle of a 45° bay. I place 5 on the apex of the bay’s angle, 12 on either the front or side edge of the bay, and mark on the 5 side. Doubling 5:12 to 10:24, provides even greater accuracy.
I pencil plumb lines on the house wall where the hip center-lines intersect it. These plumb lines serve as references for locating the hip lookouts and hip rafters.
For a full-scale graphic template for all rafter cuts, click the View PDF button below.
More on bay windows:
Video: How to Build a Bay-Window Roof — Veteran builder Rick Arnold demonstrates his simplified method for laying out and building a bay roof.
How to Install a Bay Window: Part 1 — Build the roof first to make the installation a little easier.
How to Install a Bay Window: Part 2 — With the roof built, it’s time to install the window.
Supporting a Cantilevered Bay — Before building that eye-catching bay on the side of the house, you have to get the floor framing right first.
Framing a Gable Roof Over a Bay — Cantilevering the ceiling joists beyond the walls makes this challenging roof detail stronger and easier to build.
Fine Homebuilding Recommended Products
Fine Homebuilding receives a commission for items purchased through links on this site, including Amazon Associates and other affiliate advertising programs.
Portable Wall Jack
11" Nail Puller
Roof Jacks
