Supporting a Cantilevered Bay
Before you build that eye-catching bay onto the side of a house, you have to get the floor framing right.
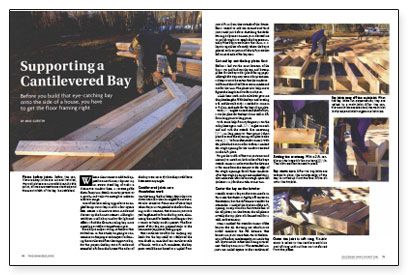
Synopsis: A bump-out or bay on the side of a house not held up by posts or columns relies on cantilevered floor framing for support. This article explains how framing for a bay 8 ft. wide should be connected to the rest of the structure.
When a client wants to add curb appeal to a new home, I dip into my Mr. Potato Head bag of tricks: a distinctive window here, a reverse gable there, fancy trim details, an entry portico or a porch — and voilà! It’s enough to make an architect cringe.
One of the best-selling upgrades is an angled bump-out or bay. It adds a few square feet, creates a distinctive room inside and dresses up the home’s exterior. Although I could just install a bay window for light and effect, I find the floor-to-ceiling bay more appealing as well as competitive in cost.
But a bay is only as strong as the floor that it’s built on. In this article, I’m going to concentrate on the proper techniques for framing the cantilevered floor that supports a bay. For this project, the bay was 8 ft. wide and extended 2 ft. from the house. The sides of the bay were set at 45°, but they could have been set at any angle.
Cantilevered joists save foundation work
Cantilevering the bay keeps down the cost, about $400 less than an angled foundation. It’s also easiest to frame one of these bays when the joists run parallel to the floor framing. In this scenario, the common joists are just lengthened to form the bay joists, eliminating the need for headers and hangers. But I wasn’t so lucky on this project. The floor joists of this bay ran perpendicular to the main joists.
The cantilever wouldn’t be carrying any loads but the bay itself, so I followed the two-thirds in, one-third out cantilever rule of thumb. With a 2-ft. cantilever, the bay joists would be anchored to a tripled floor joist 4 ft. in from the outside of the house. But I waited to add the second and third joists until just before sheathing the deck. Having only one common joist allowed me to nail through it to attach the bay joists initially. The bay joists follow the 16-in. o. c. layout regardless of exactly where the bay is placed, so first I put in all the 4-ft. joists that fell on each side of the bay area.
Cut and lay out the bay plates first
Before I laid out the exact location of the bay, I cut and laid out the top and bottom plates for the bay walls. Although this step may seem a bit premature, I always want to be certain that the windows will fit and that I’ll still have room inside and out for the trim. The plates also help me to figure the length and cut for each joist.
A little basic math and a calculator gave me the plate lengths. With the bay cantilevering 2 ft. and the walls at 45°, I needed to come in 2 ft. from each side for the bay’s front plate. With 22 1/2° angles on each end (half of 45°), I cut the plate for the bay’s front wall at 4 ft. from long point to long point.
For more photos and details, click the View PDF button below: