Finishing Hardwood Floors
A professional takes the fear out of sanding and shows how to get great results with waterborne finishes.

Synopsis: A flooring contractor demonstrates how to sand wood floors correctly, with tips on renting and using large floor-sanding equipment as well as edging tools. He also covers the application of water-based finishes.
People say that beauty is only skin deep, but they’re usually talking about their neighbors, not about hardwood floors. The steps that bring beauty to the surface of wood are the hardest parts of floor installation; it’s also when my customers start to ooh and aah. The job shown here, a basic strip floor finished with a waterborne polyurethane, is a good example of the techniques my crew and I use. Remember that every species of wood has different sanding and finishing nuances, so check manufacturers’ recommendations for each species.
Getting started
The first step to finishing a strip floor is a thorough cleaning and inspection. The entire area should be swept clean; all of the nails should be countersunk deeply enough so that they can’t tear holes in the sanding drum or produce sparks that can cause fires. At this time, I check my sanders, too. To minimize the effects of the dust that I generate, I seal the doorways with 6-mil poly and wear a dust mask while I’m working.
There are three types of sanding equipment: big floor machines, edgers and buffers. The newer three- and four-head randomorbit sanders aren’t as readily available. The larger machines, either belt sanders or drum sanders, often feature a clutch like device that allows the operator to raise or lower the sandpaper to the floor. I prefer the belt types to the drums, mostly because the drum sanders’ paper-clamping mechanism sometimes cuts imperfections into the floor.
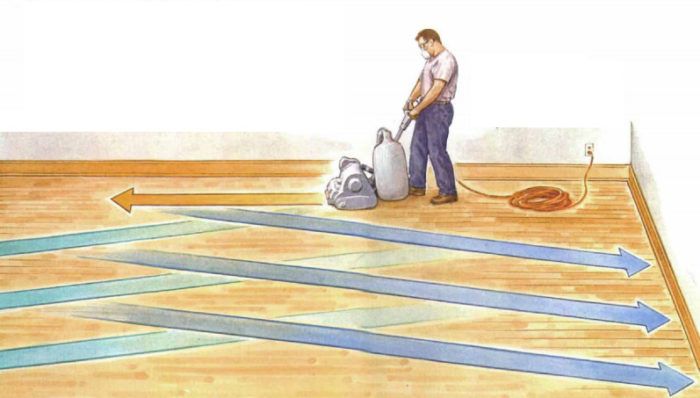
Sand at an angle to level the floor
Sanding a floor should be thought of as a complete sequence of grits; each successive grit should erase scratches left by the previous grit. The final grit is determined by the finish manufacturer’s recommendations. I always start with the least aggressive grit that will level height discrepancies between floorboards. On a new floor, I usually start with 60-grit paper on the big sanding machine. If a test pass with 60 grit doesn’t even out the surface, I try 40 grit. (Whatever grit you use, it’s not a good idea to skip more than one grit in a sanding sequence, or you’ll end up with visible scratches on the floor.) The first series of passes should be run at a 15° angle to the flooring’s length. This slight angle reduces the sander’s tendency to bounce when it hits butt ends of the flooring that are proud of the surface. Bounces can dig troughs in the wood that can be impossible to remove.
For more photos and information on buffing and getting the tight spots of your floor, click the View PDF button below.
Fine Homebuilding Recommended Products
Fine Homebuilding receives a commission for items purchased through links on this site, including Amazon Associates and other affiliate advertising programs.

Milwaukee M18 Fuel 18v Cordless Circular Saw (2730-22)

Cadex 18-Gauge Brad Nailer (CB18.50)


