Pocket-Hole Jigs
Tools for making quick, strong joints in everything from cabinets to window casings.
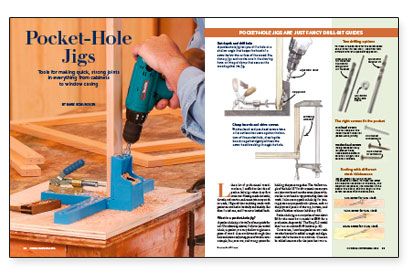
Synopsis: An overview of pocket-hole jigs and joinery, this article explains how pocket screws work and where they’re best used, and offers advice on which jig to buy. It’s a beginner’s guide to buying and using these handy tools.
Like a lot of professional woodworkers, I scoffed at the idea of pocket-hole jigs when they first came out. Having made dovetails, dowels, and mortise-and-tenon joints my stock in trade, I figured that anything made with pocket screws had to be shady and shoddy. But then I tried one, and I’ve never looked back.
What is a pocket-hole jig?
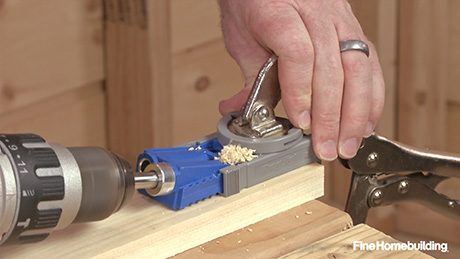
A pocket-hole jig is basically a fancy guide for a drill bit. It allows you to drill a hole, or pocket, at a very shallow angle into a piece of wood. A screw driven through that hole and into an adjoining piece of wood creates a simple, fast, accurate, and strong system for holding the pieces together. The shallow angle of the hole (15° for this system) means you can join two boards on the same plane without the screw head or tip protruding from the work. I also use my pocket-hole jig for joining pieces on perpendicular planes, such as the plywood panels of the top, bottom, and sides of kitchen cabinets.
Pocket-hole jigs cost anywhere from about $6 for the most basic model to $800 for a production-shop model. The Kreg K-2 model that I use cost about $100.
On occasion, I combine pocket screws with wooden biscuits for added strength and alignment while the screws are driven. Glue can be added insurance for the joint but isn’t really necessary; also, without glue, I can take the pieces apart more easily for finishing.
The biggest drawback to the pocket-hole system is the large oval holes that the screws are driven into. Although wooden plugs are available to fill the holes, it’s important to plan carefully and to use pocket screws only where they will be hidden. For example, I make cabinet face frames with pocket-hole joinery because the back sides of the frames are hidden. But I rarely build cabinet doors with pocket screws because both sides of the door (and likewise the pocket holes) will be visible.
Set depth, drill, clamp, and screw
The beauty of a pocket-hole jig is how simple it is to use. The jigs are either stationary with integral clamps that hold the work, or portable and have to be clamped to the piece of wood before the hole is drilled.
The depth of the pocket hole and the length of the screw change depending on the size of the stock. Most jig companies provide specific instructions for setting the depth. An adjustable collar that slips over the shaft of the drill bit controls the depth of the hole. A second, smaller-diameter hole provides clearance for the shaft of the screw.
The most obvious way to drill these two different-size holes is with two different bits. The larger hole (3⁄8 in.) should be made first with a brad-point bit to create a flat hole bottom for the screw head. Then a smaller-diameter bit (1⁄8 in.) drills the clearance hole for the screw. Both of these bits have to be longer than the standard length. This method requires a lot of bit changing, so manufacturers have come up with a stepped-diameter bit (for around $15) that drills both of the holes at once.
For more photos, drawings, and details, click the View PDF button below:
Fine Homebuilding Recommended Products
Fine Homebuilding receives a commission for items purchased through links on this site, including Amazon Associates and other affiliate advertising programs.

Not So Big House

A Field Guide to American Houses

Homebody: A Guide to Creating Spaces You Never Want to Leave


