FHB Logo Facebook LinkedIn Email Pinterest Twitter Instagram Plus Icon Close Icon Navigation Search Icon Navigation Search Icon Arrow Down Icon Video Guide Icon Article Guide Icon Modal Close Icon Guide Search Icon Skip to content
Subscribe
Log In
  • How-To
  • Design
  • Tools & Materials
  • Videos
  • Blogs
  • Forum
  • Magazine
  • Members
  • FHB House
  • Podcast
Log In
Tips & Techniques

A story-pole approach to shingling a roof

Issue 162

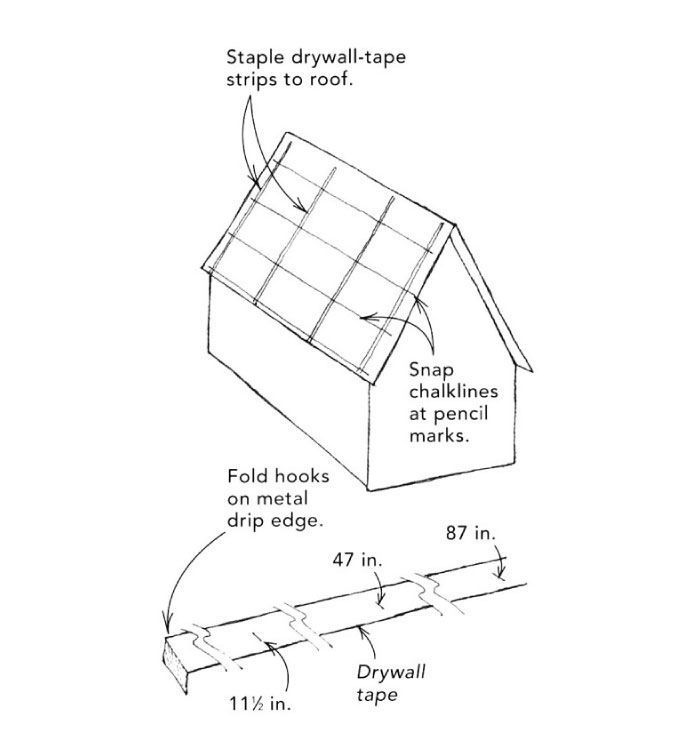
Although roofing isn’t one of my favorite tasks, I appreciate a straight, well-installed job. But my eyes aren’t what they used to be. These days, it is harder and harder to see the pencil marks for the alignment chalklines on a dark, tar-paper background. To make it easy for me to see the marks for the chalklines, I put them on drywall tape.

As shown in the drawing, I make marks on the drywall tape indicating the top edges of shingle courses. I put them at 40-in. intervals for shingles with 5-in. exposure so that I can check the installation every eight courses. In the example shown, the 11-1/2 in. mark allows for the starter and first course of 12-in.-wide shingles to extend 1/2 in. past the metal drip edge.

The subsequent marks on the tape refer to the exposure of the shingles plus the 12-in. width of the overlapping shingles. For example, the top of the second shingle course is 17 in. (5 in. + 12 in.) up from the drip edge. For any given course above, the top of the shingle is 12 in. higher: 17 in., 22 in., 27 in., 32 in., 37 in., 42 in., 47 in., and so forth. I unroll strips of tape on the ground and mark them on the ground all at the same time. That step makes it easier to be accurate and lets me avoid the step of pulling a tape on a shingle to get a reference point. A fold at the end of each piece of tape hooks on the metal drip edge.

I staple these tape strips atop the tar paper at 12-ft. to 15-ft. intervals. Then I snap chalklines without having to hunt around for a hard-to-see pencil mark or snaking my tape down to the drip edge, hoping it won’t pull off as I get to the top of the roof.

Bob Bulick, via email, None

Edited and Illustrated by Charles Miller

From Fine Homebuilding #162

Sign up for the Fine Homebuilding Tip of the Day and get daily tips and special offers delivered to your inbox.

Signing you up...

This site is protected by reCAPTCHA and the Google Privacy Policy and Terms of Service apply.
See all newsletters
See all newsletters
×

Get home building tips, offers, and expert advice in your inbox

Signing you up...

This site is protected by reCAPTCHA and the Google Privacy Policy and Terms of Service apply.
See all newsletters
See all newsletters

New Feature

Fine Homebuilding Forums

Ask questions, offer advice, and share your work

View Comments

  1. jedky | Dec 01, 2018 01:21pm | #1

    it seems like the math on this tip may be 1/2 an inch off for the 2nd course (and therefore all additional courses). If I overhang the first course 1/2 an inch over the drip edge, and then measure up 17 inches for the 2nd course, doesn't that make the exposure for the 1st course 5.5 inches?

    I am an amateur and have only installed a few roofs so please offer me some clarification if I am just mixing these directions up in my head and messing it up.
    Or, does an extra 1/2 inch exposure on the 1st course NOT make an important difference?
    thanks,
    Jed

  2. jedky | Dec 01, 2018 02:40pm | #2

    *in the above comment i should have wrote: "and then measure up 17 inches from the drip edge (instead of from the overhanging shingle)"

  3. user-3976312 | Dec 01, 2018 10:10pm | #3

    I think you caught it Jed. This description messes with that 1/2 inch. Personally, I would align the first shingle with the drip edge and avoid the confusion. Besides, if you ever lean a ladder against that roof edge in the future, you won't be asking an unsupported asphalt shingle to resist the weight. It leaves obvious dents in the edge. For the same reason I use a heavy gauge metal drip edge.

  4. Torqueflite | Jan 09, 2022 09:11pm | #4

    Or, one could forego the old under performing tar paper and install modern synthetic underlayment that's better than tar paper in every way and also has a bonus of having nice straight grid lines printed on it.

Log in or create an account to post a comment.

Sign up Log in

Become a member and get full access to FineHomebuilding.com

More Tips & Techniques

View All
  • Prevent Porch-Stair Rot
  • Easy-release Hole Saw
  • Extend Epoxy Working Time
  • Lantern-style-tile Jig
View All

Up Next

Video Shorts

Featured Story

PVC for a Rot-Proof Fence

Built with rot-proof material with traditional tools and techniques, this classic border is engineered to never sag.

Featured Video

Builder’s Advocate: An Interview With Viewrail

Learn more about affordable, modern floating stairs, from design to manufacturing to installation.

Related Stories

  • Strategies for Venting a Roof Valley
  • Double-Duty Large-Jaw Pliers
  • Space-Saving Trim Square
  • Vents for Wildfire Protection

Discussion Forum

Recent Posts and Replies

  • |
  • |
  • |
  • |
  • |
  • |
View More Create Post

Highlights

Fine Homebuilding All Access
Fine Homebuilding Podcast
Tool Tech
Plus, get an extra 20% off with code GIFT20

"I have learned so much thanks to the searchable articles on the FHB website. I can confidently say that I expect to be a life-long subscriber." - M.K.

Get home building tips, offers, and expert advice in your inbox

Signing you up...

This site is protected by reCAPTCHA and the Google Privacy Policy and Terms of Service apply.
See all newsletters
See all newsletters

Video

View All
  • Podcast 454: PRO TALK With Greg Palese of Klein Tools
  • Angle Your Drywall Knife for Best Results
  • Must-Have Hand Tools for a Remodeler's Kit
  • Cutting Out Drywall for Doorways
View All

Hand Tools

View All Hand Tools Articles
  • Tajima Sigma Stop tape measure
    Ergonomic Tape Measure
  • templating techniques
    Templating Techniques for Countertops and Floating Shelves
  • timber-framing chisel
    A Durable Yet Affordable Timber-Framing Chisel
  • Podcast 454: PRO TALK With Greg Palese of Klein Tools
    Podcast 454: PRO TALK With Greg Palese of Klein Tools
View All Hand Tools Articles

BOOKS, DVDs, & MERCH

Shop the Store
  • 2022 Fine Homebuilding Archive
    Buy Now
  • Code Check Building 4th Edition
    Buy Now
  • 2023 Tool Guide
    Buy Now
  • Pretty Good House
    Buy Now
  • Shop the Store

Fine Homebuilding Magazine

  • Issue 314 - April/May 2023
    • 7 Options for Countertops
    • Tool Test: Wood-Boring Bits
    • Critical Details for Ductless Heat Pumps
  • Issue 313 - Feb/March 2023
    • Practical System for a Seismic Retrofit
    • Fine Homebuilding Issue #313 Online Highlights
    • Practical System for a Seismic Retrofit
  • Issue 312 - Dec 2022/Jan 2023
    • Tool Test: Cordless Tablesaws
    • Gray-Water System for a Sustainable Home
    • Insulate a Cape Roof to Avoid Ice Dams
  • Issue 311 - November 2022
    • 7 Steps to a Perfect Exterior Paint Job
    • Options for Smarter Home-Energy Tracking
    • The Fine Homebuilding Interview: James Metoyer
  • Issue 310 - October 2022
    • Choosing a Tile-Leveling System
    • Choosing Between HRVs and ERVs
    • Custom Built-in Cabinets Made Easy

Fine Homebuilding

Follow

  • twitter
  • facebook
  • instagram
  • pinterest

Newsletter

Get home building tips, offers, and expert advice in your inbox

Signing you up...

This site is protected by reCAPTCHA and the Google Privacy Policy and Terms of Service apply.
See all newsletters
See all newsletters

Membership & Magazine

  • Online Archive
  • Start Free Trial
  • Magazine Subscription
  • Magazine Renewal
  • Gift a Subscription
  • Customer Support
  • Privacy Preferences

Taunton Network

  • Green Building Advisor
  • Fine Woodworking
  • Fine Gardening
  • Threads
  • About
  • Contact
  • Advertise
  • Careers
  • Copyright
  • Terms of Use
  • Site Map
  • Do not sell or share my information
  • Privacy Policy
  • Accessibility
  • California Privacy Rights

© 2023 The Taunton Press, Inc. All rights reserved.

X
X
This is a dialog window which overlays the main content of the page. The modal window is a 'site map' of the most critical areas of the site. Pressing the Escape (ESC) button will close the modal and bring you back to where you were on the page.

Main Menu

  • How-To
  • Design
  • Tools & Materials
  • Video
  • Blogs
  • Forum
  • Reader Projects
  • Magazine
  • Members
  • FHB House

Podcasts

  • FHB Podcast
  • ProTalk

Webinars

  • Upcoming and On-Demand

Podcasts

  • FHB Podcast
  • ProTalk

Webinars

  • Upcoming and On-Demand

Popular Topics

  • Kitchens
  • Business
  • Bedrooms
  • Roofs
  • Architecture and Design
  • Green Building
  • Decks
  • Framing
  • Safety
  • Remodeling
  • Bathrooms
  • Windows
  • Tilework
  • Ceilings
  • HVAC

Magazine

  • Current Issue
  • Past Issues
  • Magazine Index
  • Subscribe
  • Online Archive
  • Author Guidelines

All Access

  • Member Home
  • Start Free Trial
  • Gift Membership

Shop the Store

  • Books
  • DVDs
  • Taunton Workshops

More

  • FHB Ambassadors
  • Reader Projects
  • Podcast
  • FHB House
  • Customer Support

Account

  • Log In
  • Join

Newsletter

Get home building tips, offers, and expert advice in your inbox

Signing you up...

This site is protected by reCAPTCHA and the Google Privacy Policy and Terms of Service apply.
See all newsletters
See all newsletters

Follow

  • twitter
  • facebook
  • instagram
  • pinterest

Join All Access

Become a member and get instant access to thousands of videos, how-tos, tool reviews, and design features.

Start Your Free Trial

Subscribe

FHB Magazine

Start your subscription today and save up to 70%

Subscribe

We hope you’ve enjoyed your free articles. To keep reading, become a member today.

Get complete site access to expert advice, how-to videos, Code Check, and more, plus the print magazine.

Start your FREE trial

Already a member? Log in